
The Curves menu items process entire animation curves.
Animation curves are extrapolated outside the first and last keys of the curve. Curves before the first key and after the last key will be flat (no change in value over time) unless you set the pre and post infinity controls to anything other than constant. You can use these options to automatically generate specific types of repeating animation.
If you want to create editable animation of a repetitious or cyclical nature, you can bake a channel with Infinity turned on.
- Pre and Post Infinity
-
The Pre and Post settings define the behavior of an animation curve before and after the first key of that curve.
-
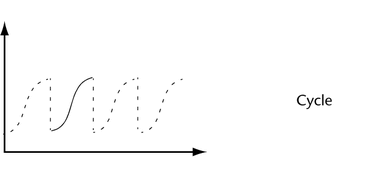
- Cycle
-
The Cycle setting repeats the animation curve as a copy infinitely.
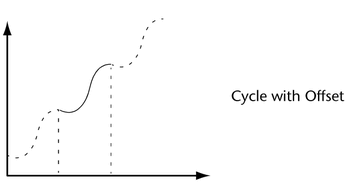
- Cycle with Offset
-
The Cycle with Offset setting repeats the animation curve infinitely, except it appends the cycled curve’s last key’s value to the value of the first key’s original curve.
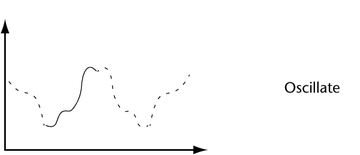
- Oscillate
-
The Oscillate setting repeats the animation curve by reversing its values, and therefore shape, with each cycle, creating an alternating backwards and forwards effect.
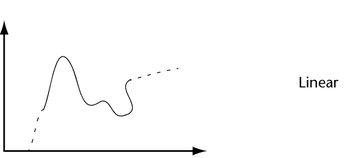
- Linear
-
The Linear setting extrapolates the value of the first key using its tangent information. It projects a linear curve infinitely beyond.
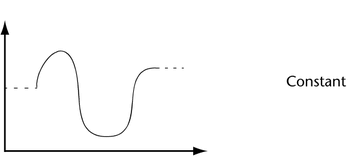
- Constant
-
The Constant setting maintains the value of the end keys. This is the default setting for animation curves in Maya.
- Isolate Curve
-
When on, only selected curves display in the graph view area and all other curves are hidden.
For example, to focus on only the Translate Y curves of several objects at once, select either the Translate Y curves in the graph view or the Translate Y channels in the Channel Box, then enable Isolate Curve. All other curves are hidden and you can easily edit the Translate Y curves alone.
- Bake Channel
-
This operation calculates a new animation curve for an attribute using the input nodes that contribute to its properties. This is different from the Bake Animation operation in the Key menu. This operation is useful when you want to:
- edit a single animation curve instead of all the contributing attributes that affect the behavior of a single attribute.
For example: an object affected by a driven key or an Expression.
- add keys to an existing curve
Note: Bake Channel operates only on animation that can be evaluated explicitly. Inverse Kinematics systems, Dynamics, and some Expressions cannot be operated on with Bake Channel.
To create animation curves from these animation types, use Bake Animation in the Key menu.
Select Bake Channel >
 to open the
Bake Channel Options.
- edit a single animation curve instead of all the contributing attributes that affect the behavior of a single attribute.
- Mute Channel
-
Mutes the selected channel.
Mute appears under the current animation channel’s name in the outliner and the muted animation curve appears as a dotted line in the graph view. See also Mute channels.
- Unmute Channel
-
Unmutes the selected (muted) channel. See also Mute channels.
- Lock/Unlock Channel
- Freezes or unfreezes the channel to prevent it from changes. Use the hotkey
H or
J respectively to lock or unlock the channel.
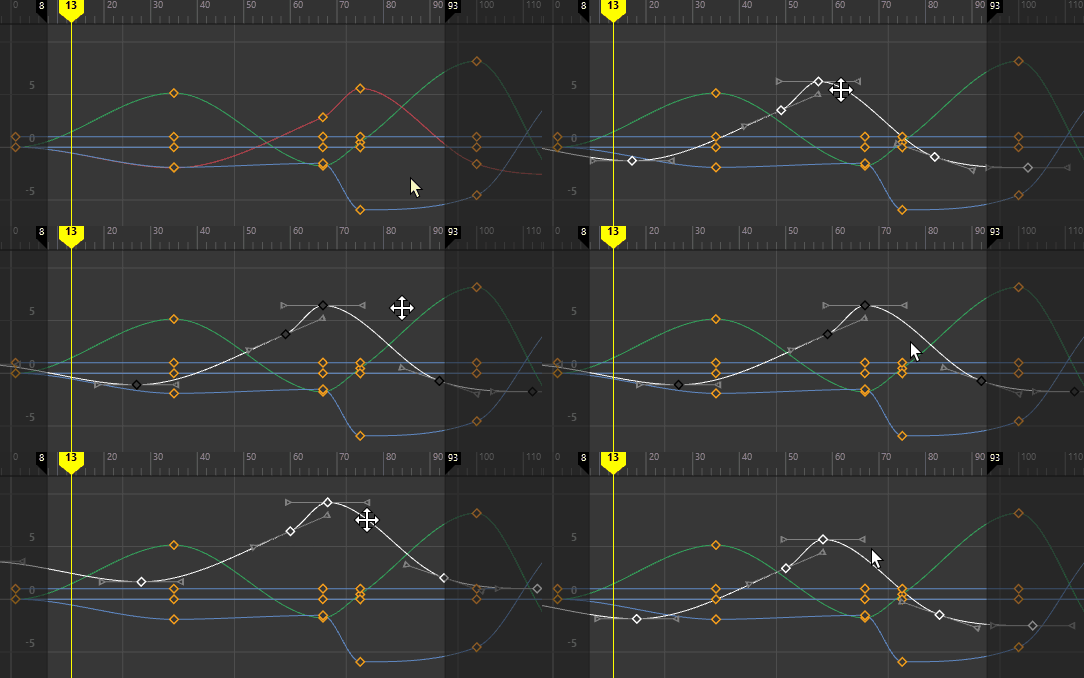
- Pin/Unpin Channel
-
Pins or unpins the selected channel so that its curve displays in the graph area regardless of what is selected. See also Pinning channels.
- Smooth Filter (Butterworth)
-
Note: Previous versions of Maya referred to this filter as Butterworth Filter. It has been renamed Smooth Filter (Butterworth) for clarity.
Smooth Filter (Butterworth) averages key frames using intelligent low-pass smoothing. It is a frequency filter that works best on curves affected by noise.
Select Smooth Filter (Butterworth) > to open the
Smooth Filter (Butterworth) Options.
Note: This filter is similar to the Butterworth filter in Autodesk MotionBuilder, but there are differences, for example, the MotionBuilder filters attempt to match tangents to maintain their shape, where Maya only compares error tolerance to ensure a predictable result.
to open the
Smooth Filter (Butterworth) Options.
Note: This filter is similar to the Butterworth filter in Autodesk MotionBuilder, but there are differences, for example, the MotionBuilder filters attempt to match tangents to maintain their shape, where Maya only compares error tolerance to ensure a predictable result.Smooth Filter (Butterworth) removes noise from data without affecting the curve's minimum or maximum values. In this way, Smooth Filter (Butterworth) avoids "over-averaging" problems that can happen when filtering motion capture data.
- Euler Filter
- Key Reducer Filter
- The Key Reducer Filter uses a different algorithm from the Smooth Filter (Butterworth) and eliminates the number of keyframes by removing unnecessary keyframes on curves.
- Select
Key Reducer Filter >
 to open the
Key Reducer Filter Options.
Note: This filter is similar to its counterpart in Autodesk MotionBuilder, but there are differences, for example, the MotionBuilder filters attempt to match tangents to maintain their shape, where Maya only compares error tolerance to ensure a predictable result.
 - Smooth Filter (Gaussian)
-

-
The Smooth Filter (Gaussian) is similar to the Smooth Filter in Autodesk MotionBuilder. Use the Smooth Filter (Gaussian) to apply linear filtering to reduce noise on keyframe channels.
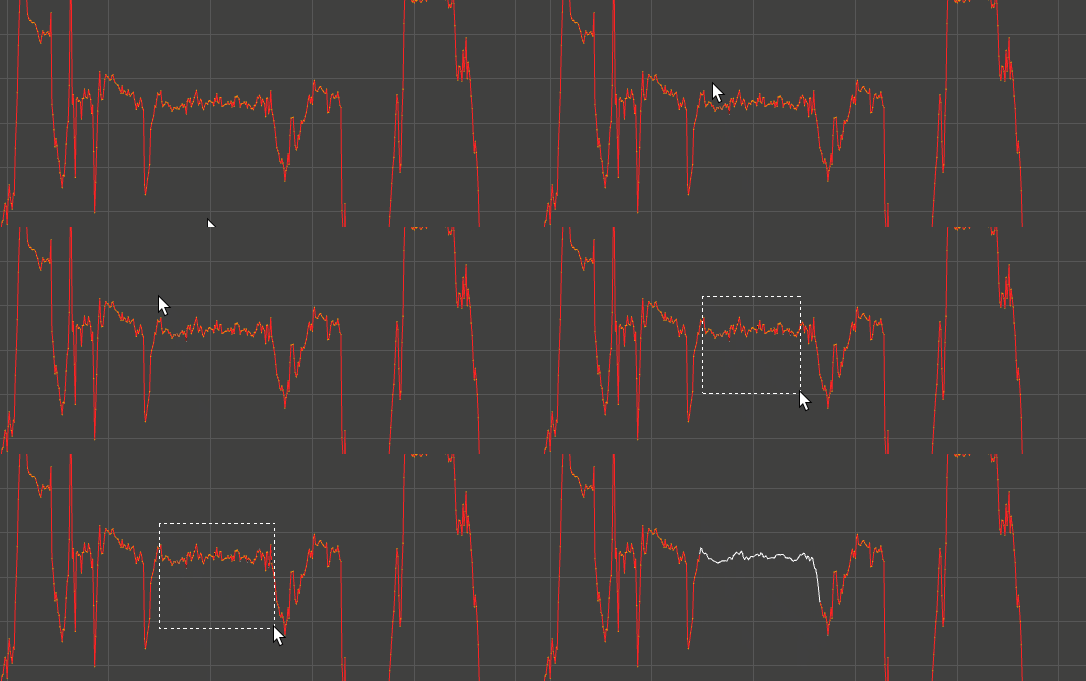
Smooth (Gaussian) filter applied to one channel
-
Select Smooth Filter (Gaussian) >
 to open the
Smooth Filter (Gaussian) Options where you can specify the area to filter in the
Time Range options.
- Peak Removal Filter
-

-
The Peak Removal Filter replaces unwanted peaks and spikes in animation data with cubic keys that have an average value based on the neighboring keys. Use the Peak Removal filter to clean, or modify motion capture data, especially in cases with magnetic capture systems that generate localized distortions caused by occluded markers that require you to manually tweak the captured data.
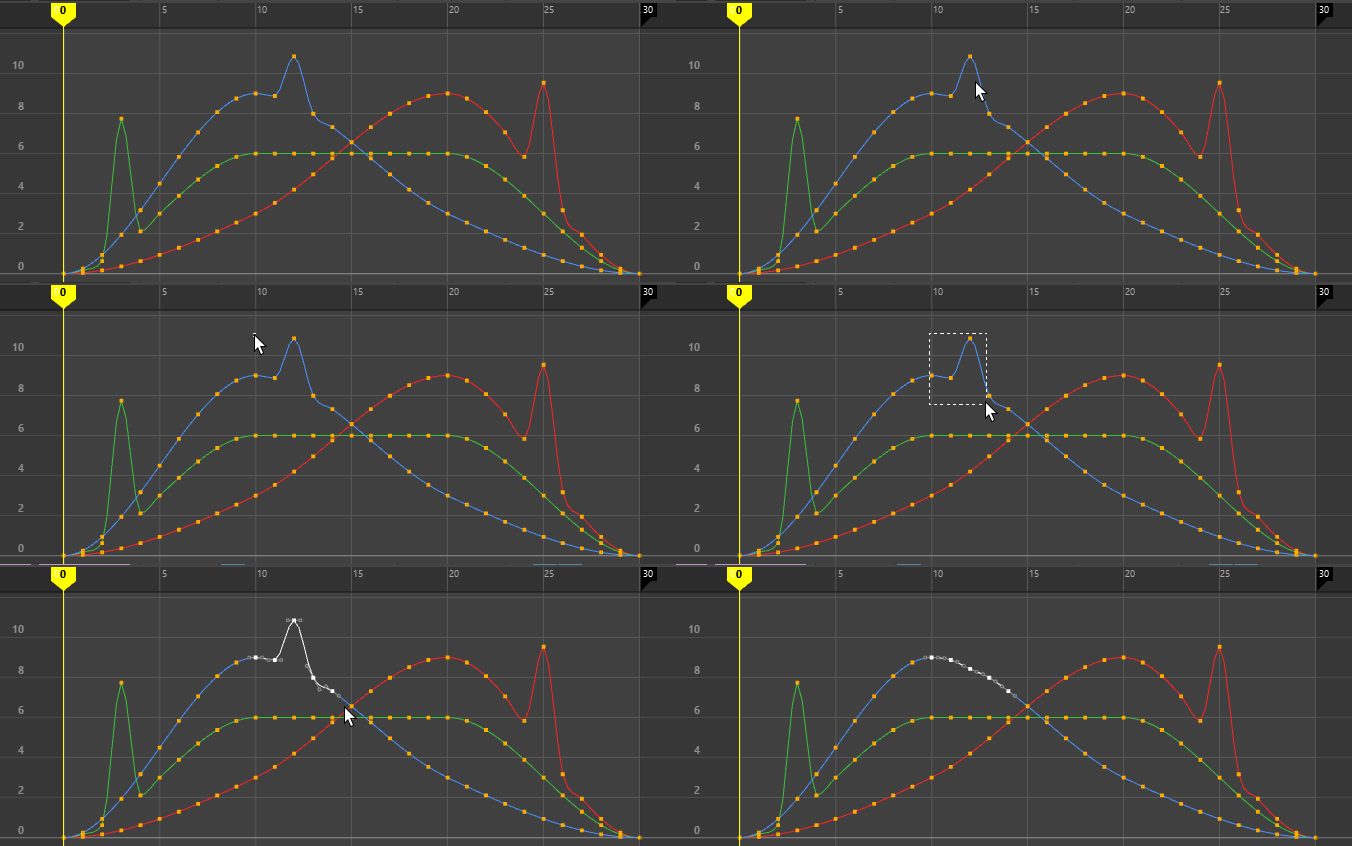
Peak Removal Filter: Preview of Filter All and Selected options
-
Select Peak Removal Filter >
 to open the
Peak Removal Filter Options where you can specify the area to filter in the Time Range options:
-
Time Range Selection All Filters all keys of the selected object's animation. Selection Filters only the keys inside the selected area. Start/End Time Slider Limits filtering to keyframes displayed on the current Time Slider. Note: Make sure the animated object is selected in the Viewport or the keys will not appear for you to filter them. - Activate the Preview option to view the effect of the filtering on the animation before you apply it.
- Key Sync Filter
-
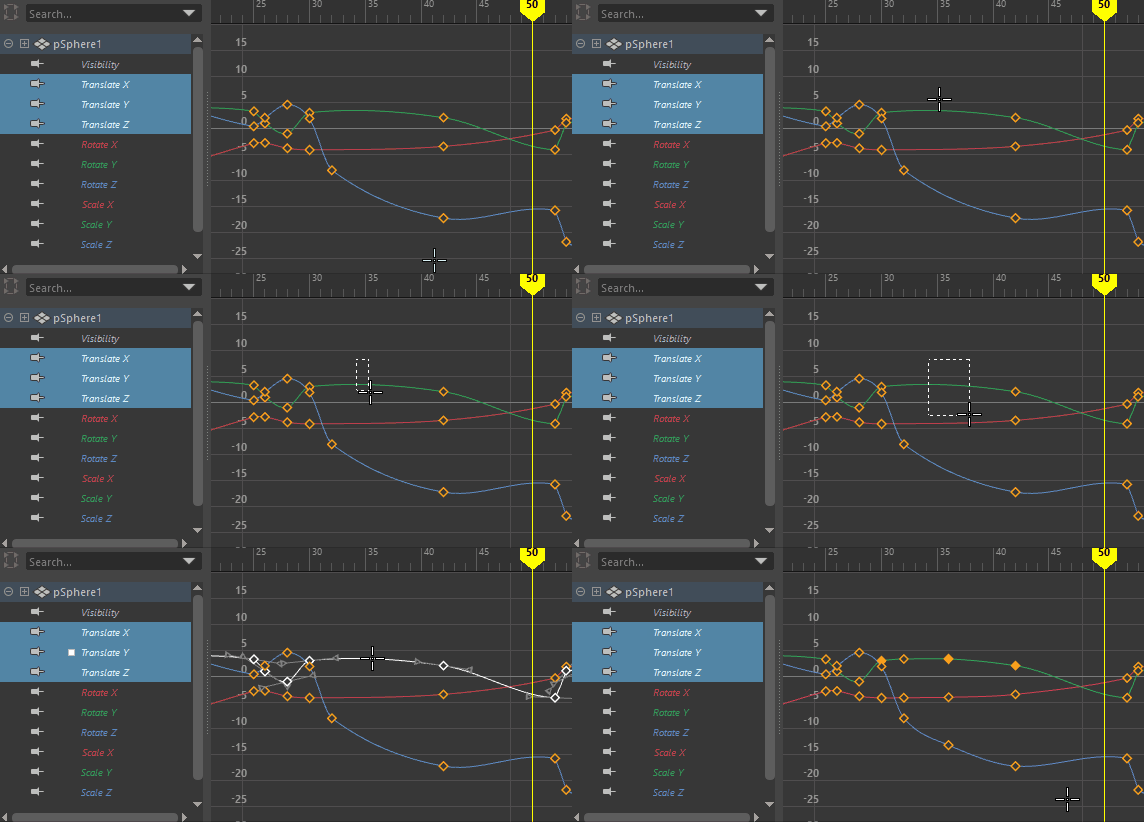
Set a key on one curve, and the Key Sync filter adds a key to the other curves
- Adds a keyframe to all curves (X, Y, Z) for each key that is encountered. For example, if an object has a keyframe set on its X animation curve, a keyframe is set on its Y and Z translation curves at exactly the same time. This lets you synchronize all keyframes on each of the object’s animation curves.
- Select
Key Sync filter >
 to open the
Key Sync filter Options.
- Resample Curve
-
Resampling creates a periodic frame rate by placing keys at uniform intervals.
To resample a curve, you select a sampling filter, which is an algorithm defining how the keys in the curve are resampled. Tangent and curve values are ignored. The filter converts animation curves with keys at either uniform or non-uniform intervals to curves with keys at a uniform interval that you specify.
Tip: The resampling filters are designed to reduce the number of keys in dense data curves. It may not produce the desired results when used on curves with few keys.Select Resample Curve >
 to open the
Resample Curve Options.
- Simplify Curve
-
Use this operation to remove keys that are not necessary to describe the shape of an animation curve. Excess keys may accumulate on an animation curve as a result of adding keys manually or performing operations such as Bake Channel. You may need to remove keys from an animation curve to reduce the graph complexity and provide larger spans for adjusting curve tangents.
Select Simplify Curve >
 to open the
Simplify Curve options.
- Change Rotation Interp
-
This menu lets you change the rotation interpolation type of existing curves.
You can change the rotation interpolation type only on rotation channels that have keyframes on all three channels (rotateX, rotateY, rotateZ). In addition, because the rotateX, rotateY and rotateZ channels always share the same interpolation type, changing interpolation for a single channel such as rotateX, will automatically change rotateY and rotateZ as well.
For more information on rotation interpolation, see Animated rotation in Maya.
-
- Independent Euler
-
Calculates the rotation using three separate angles representing rotations about the X, Y, and Z axes, and an order or rotation. In this mode, the curves that define the rotation for a given node are represented in Euler-angles, interpolation is performed on each curve independently in Euler space, and keyframes may occur at your discretion—they are not synchronized with the other sibling rotation curves at the node. You can also animate a single rotation ordinate. This is the default setting.
- Synchronized Euler
-
Creates curves that have keyframes on sibling curves locked together but with interpolation between keyframes performed in Euler-space.
It’s useful to keep rotation keyframes synchronized because rotation is a composition of the three separate rotate values. Deleting just one key on a curve can have a dramatic and unexpected effect on the interpolation.
- Quaternion Slerp
-
Interpolation is calculated using spherical linear interpolation and does not depend on the tangents of the input curves.
- Quaternion Cubic
-
Interpolation is calculated using quaternion cubic interpolation (Squad) and does not depend on the tangents of the input curves.
- Quaternion Tangent Dependent
-
Interpolation is calculated using quaternion interpolation based on the input curve tangents. For example, if the tangents are linear, Maya uses spherical linear interpolation (Slerp), and if the tangents are clamped, Maya uses cubic interpolation (Squad).
- Spreadsheet
-
Lets you edit the values and attributes of the selected animation curves in a spreadsheet format in the Attribute Editor.
- Buffer Curve
-
Select from the following options:
-
- Snapshot
-
Takes a snapshot of your curve. Use Swap Buffer Curve to switch between your curve snapshot and the current curve. See also View curves while editing.
- Reference
-
Takes a snapshot of a referenced animation curve. Use Swap Buffer Curve to switch between your 'buffer' referenced curve and the current referenced curve. See also Edit animation curves from referenced files.
- Swap Buffer Curve
-
Toggles between the original curve (the buffer curve snapshot or the referenced curve snapshot) and the current, edited curve. Lets you view and play both the curves animations. See also View curves while editing and Edit animation curves in referenced files.
- Default Tangent Weight
-
Note: This setting defines default tangent weighting for the Graph Editor as a whole and is the same as the Default Tangent Weight setting in the Animation (Settings) Preferences. To modify the tangent weighting of existing curves, use the Non-Weighted Tangents and Weighted Tangents settings, below.
Default tangent weight represents the amount of influence a tangent has on an animation curve segment. Select between two options, Weighted or Non-weighted.
- Non-Weighted Tangents
-
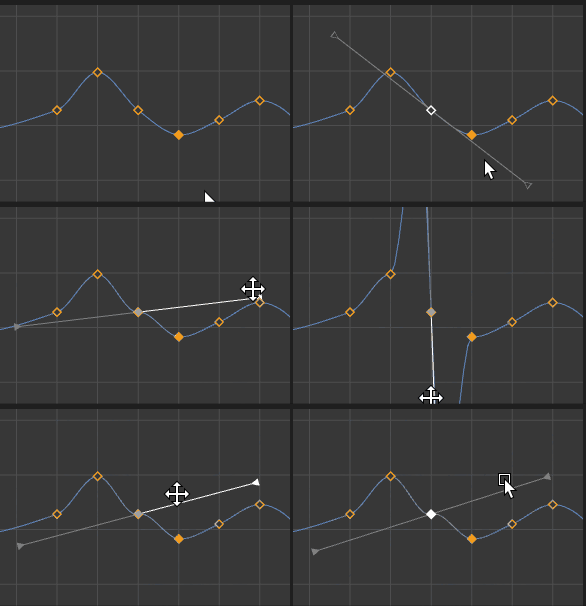
-
Note: Tangents not weighted by default.
Changes the tangent weighting of the selected curve back to Non-weighted, so that tangents are locked, and you can only adjust the angle. This is the default setting.
To change the curve’s tangent type to weighted, use Curves > Weighted.
Note: You cannot mix weighted and non-weighted tangents in the same curve. - Weighted Tangents
-

Changes the tangent weighting of the selected curve to Weighted, unlocking tangents so you can manually adjust their angle and length.
Weighted tangents represent the amount of influence a tangent’s length has on an animation curve segment. By turning on Free Tangent Length in the Graph Editor Tangents menu, you can simultaneously edit the influence and angle of the tangent quickly and intuitively. Users of desktop illustration packages will recognize the familiar Bezier-style behavior when in this mode.
Tangent weights are represented by the length of the tangent handle, and editable tangent weights are manipulated by dragging the handle’s length.
Tangents of weighted animation curves have not only an angle but also a weight. The higher the weight of a tangent, the more influence it has on the shape of the curve segment compared with the tangent at the other end of the curve segment.