The Move Weights tool lets you easily move weights from one influence to another, without having to manually reset or change the weight value.
To move weights for selected vertices
- Select the vertices with weights you want to re-assign.
- Open the
Paint Skin Weights Tool (Skin > Paint Skin Weights >
 ).
).
- In the Influences list (or in the scene), select a source influence (to move weights from), then select one or more target influences (to receive the moved weights).
- Do one of the following:
- Click the Move weights tool
 in the
Paint Skin Weights Tool.
- Select Skin > Move Weights to Influences from the main menu bar.
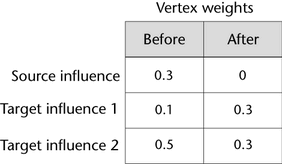
The weights of the selected vertices are moved to the target influence(s) you selected, and the skin points are now influenced only by those influences.
Note: If an influence is locked in the Paint Skin Weights Tool, it will not receive weights when you move weights from neighboring influences.For example, the following table illustrates the weight value changes for a selected vertex as you move weights from a source influence to two target influences.
 Note: In this example, if you have the Normalize Weights mode set to Interactive, weights moved to the target influences are normalized and instead result to 0.5 each.
 - Click the Move weights tool