The binding method you choose determines how initial influence weights are set on the smooth skin points as you bind skin. (The Bind Method in the Bind Skin Options lets you specify this method. See also Bind smooth skin.)
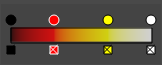
The Paint Skin Weights Tool Color Ramp used to show the effects of the binding on the shoulder joint.
Weighting based on joint proximity
Setting the Bind Method to Closest Distance tells Maya to ignore the skeleton’s hierarchy. Instead, the joint that has the next greatest influence on a smooth skin point’s weight is always the next closest joint to the point. Depending on the structure of the skeleton and the placement of the model, this joint can be much higher or lower in the skeleton’s hierarchy than the closest joint. For example, if your character’s arms are hanging down so that the forearm bones are near the hip bones, the hip bones can have the second greatest influence over the skin points for the arms. This can lead to an in appropriate influence on the weights of the arm skin points.
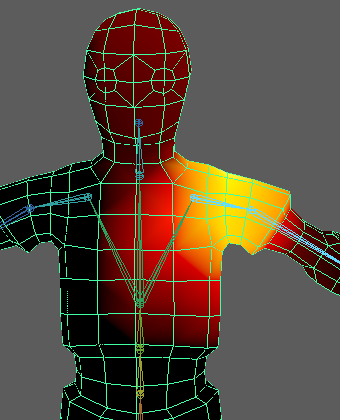
The following illustration uses the Paint Skin Weights tool to show the effect of the Closest Distance bind method. The yellow center depicts where the influence is strongest, and the black areas reflect the decrease in the bind's effect as it spreads through the mesh. With this bind method, the default settings shows the influence strongest in the shoulder, but extending as far as the top of the head. If you compare the Closest Distance and Closest in Hierarchy illustrations, they both show similar effects, although Closest in Hierarchy spreads more completely through the chest area.
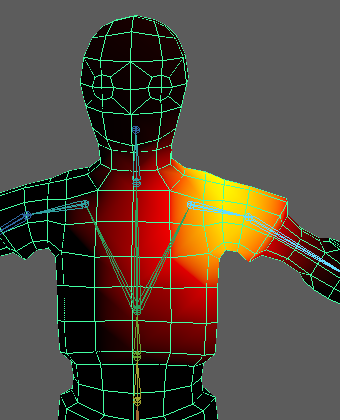
Weighting based on skeleton hierarchy
Setting the Bind Method to Closest in Hierarchy tells Maya to consider the skeleton hierarchy. The joint that will have the next greatest influence will be a relative (parent or child) of the closest joint. For example, if your character’s arms are hanging down so that the forearm bones are near the hip bones, you can make sure that the skin points for the arms do not come under the influence of the hip bones. This is because the hip bones are not near the forearm bones in the skeleton’s hierarchy even though the distance between them is small.
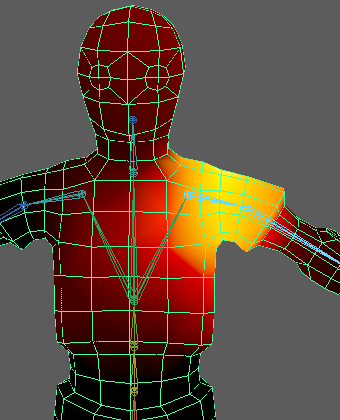
This illustration uses the Paint Skin Weights tool to show the effect of the Closest in Hierarchy bind method, where the yellow center depicts the strongest influence and the black areas show the decrease in the bind's influence. With this bind method, the default settings show how the influence of this method spreads to the character mesh's chest and head. If you compare the Closest Distance and Closest in Hierarchy illustrations, they both show similar effects, although Closest in Hierarchy extends further into the chest area.
Weighting based on Heat Map
Setting the Bind Method to Heat Map tells Maya to use a heat diffusion technique to distribute weights, and generally gives better default results than the Closest in Hierarchy and Closest Distance binding methods.
Heat Map binding sets initial weights based on each influence object inside the mesh acting as a heat source, emitting weight values onto the surrounding mesh. Higher (hotter) weight values occur closest to the object, and dissipate to lower (cooler) values as you move away from the object.
Only influence objects defined inside the mesh emit heat during Heat Map binding. For example, if you bind to a skeleton with end joints that extend outside the mesh, the end joints will not receive any weights during binding, and have no influence on the mesh. However, in a case where a bone penetrates the mesh but its joint objects do not, all influence emitted from the bone is transferred to the parent joint, even though the parent joint is outside the mesh.
The following illustration uses the Paint Skin Weights tool to show the effect of the Heat Map bind method, where the white center depicts the strongest influence and the black areas show where the effects decrease. With this bind method, the default settings show that the influence on the shoulder joint remains strongly centered on the shoulder, radiating only slightly into the chest. Unlike the Closest Distance and Closest in Hierarchy bind methods, this effect does not spread to the character mesh's head.
Weighting based on Geodesic Voxels
Setting the Bind Method to Geodesic Voxel calculates binding weights based on the geodesic distance between voxels on the skeleton and the mesh. See also Geodesic Voxel binding.
This method works well with troublesome production meshes, such as geometry that:
- contains non-manifold geometry
- is non-watertight
- has intersecting triangles
- is comprised of multiple connected components
Because the weight assignment doesn't rely on a distance calculation, you can modify weights as you manipulate the character into different poses, assessing the impact of weight assignment in context.
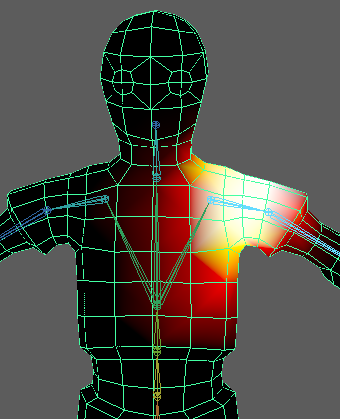
This illustration uses the Paint Skin Weights tool to show the effect of the Geodesic Voxel bind method, where the yellow center depicts the strongest influence and the black areas show the decrease in the bind's influence. With this bind method, the default settings shows how the influence of this method targets the character's shoulder joint. Unlike the Closest Distance and Closest in Hierarchy methods, the effect does not spread to the character mesh's head.
Interactive bind
As an alternative to these smooth binding methods, you can also use interactive binding, which creates a volume manipulator for each bound joint. You define the area of the mesh affected by each influence by manipulating the size and shape of these manipulators. See Interactive bind for smooth skinning.