- Windows: C:\Program Files\Autodesk\Maya<version>\resources\builtin.toolclips
- Mac OS X: /Applications/Autodesk/maya<version>/Maya.app/Contents/Resources/builtin.toolclips
- Linux: /usr/autodesk/maya<version>-x64/resources/builtin.toolclips
Main elements
The main body of the XML file is defined by a single <toolclips> element.
| Attribute | Description |
|---|---|
|
<ui> |
Specifies the location of the QML description. This file describes the layout of the default ToolClip window. By default, the ToolClipUI.qml file is located in the builtin.toolclips\ui directory. |
|
<simple> |
Specifies the location of the simplified QML UI description. This file describes the way ToolClips appear when Display tool name and shortcut only is enabled in the Help preferences. By default, the SimpleTooltip.qml file is located in the builtin.toolclips\ui directory. |
|
<locale> |
Specifies the language locale of ToolClips included in the ToolClips.xml file. The default attribute value is en_US (English). Tip: If you are localizing ToolClips to Japanese or Simplified Chinese, you can use ja_JP or zh_CN as the attribute value.
|
xml version="1.0" encoding="utf-8"
<toolclips ui="ui/ToolClipUI.qml" simple="ui/SimpleTooltip.qml" locale="en_US”>
... </toolclips>
Level 1 ToolClip
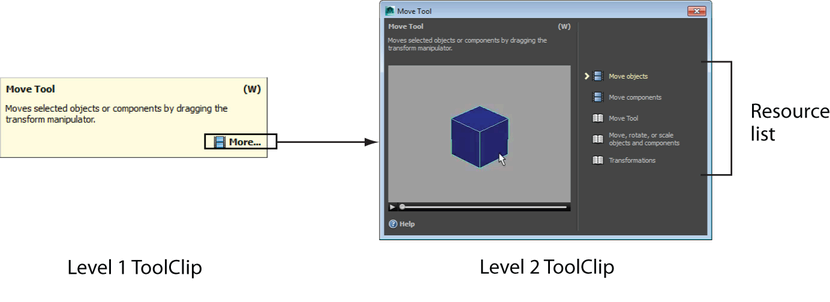
All ToolClips contain a level 1 window.

| Attribute | Description |
|---|---|
|
<toolclip> |
Encloses all level 1 and level 2 ToolClip elements. |
|
<key> |
The key name used to request the ToolClip. See Create a ToolClip.
Note:
If a key name exists in two ToolClip.xml files within the ToolClip search path, Maya uses the key name that is encountered first. |
|
<help> |
(Optional) Specifies the location of the help link that is included in the ToolClip window when a level 2 ToolClip does not exist. The location can be a URL or an internal help string (as shown in the example code below). If a location is not specified, the help link defaults to the Help home page. |
|
<title> |
The tool title that displays in the ToolClip window. |
|
<shortcut> |
(Optional) The default keyboard shortcut. Keyboard shortcuts are assigned automatically in Maya, but you can use this attribute to override what is displayed in the ToolClip window. |
|
<text> |
The summary text that displays in the ToolClip window. |
<toolclip key="moveTool" help="files/MoveTool.htm" title="Move Tool" shortcut="W">
     <text>Move selected objects or components by dragging the transform manipulator.</text>
...</toolclip>
Level 2 ToolClip

| Attribute | Description |
|---|---|
|
<expanded> |
Encloses all level 2 ToolClip data. If a ToolClip contains an expanded section, the More button appears in the level 1 ToolClip window. |
|
<default-resource> |
(Optional) Specifies that a particular video or image resource within the ToolClip's resource list can be loaded into the viewer/player when the level 2 ToolClip is opened. The <index> attribute determines which resource list item is loaded in the viewer or player. For example, set the value to 2 to display the second item in the list. By default, the <index> attribute is set to 1. |
|
<resourcelist> |
Specifies the list of resources to be displayed in the level 2 ToolClip window. You can include videos, images, and/or links to external resources. |
|
<video> |
Adds a video to the resource list. Use the <location> attribute to indicate the name of the file and the title that appears in the ToolClip window. When creating custom ToolClips, all videos must be in WebM format and located in the users.toolclips\Resources or <customdirectory>\Resources subdirectory. |
|
<image> |
Adds a image to the resource list. Use the <location> attribute to indicate the name of the file and the title that appears in the ToolClip window. When creating custom ToolClips, all images must be in JPEG or PNG format and located in the users.toolclips\Resources or <customdirectory>\Resources subdirectory. |
|
<link> |
Adds an external link to the resource list. Use the location attribute to indicate the location of the link and the title that appears in the ToolClip window. The location can be a fully qualified URL or an internal help string (as shown in the example code below). |
    <expanded>
       <default-resource index=”1”/>
        <resourcelist>
            <video location="MoveTool.webm">Move Objects</video>
            <image location=”MoveTool.jpg”>Show Objects</image>
            <link location="files/MoveTool.htm">Using the Move Tool</link>
        </resourcelist>
    </expanded>