Optimize your compositing and shader development workflows by using soloing to preview the effect of a specific node output attribute. Preview your soloing results in the Material Viewer and in the viewport.
When shading networks become complex, it can often be difficult to determine where problems may have occurred. Artists typically try to identify these issues by adding additional utility nodes, connecting them to surface shaders, and temporarily making and breaking connections. Unfortunately, this can be a very time consuming and tedious process.
To improve this workflow, use this feature to solo a shading node. Soloing allows you to preview the effect of a specific node output attribute; that is, the results of the upstream portion of the graph leading up to that node’s output attribute. By soloing a node, you see its contribution without having to modify your shading graph, and can therefore easily identify problems while working through a complex shading network.
You can solo a node by clicking on its solo icon, by using the marking menu, or by passing the name of the node to the soloMaterial MEL command. When you solo a node, you can also specify an attribute; otherwise, a default attribute is soloed.
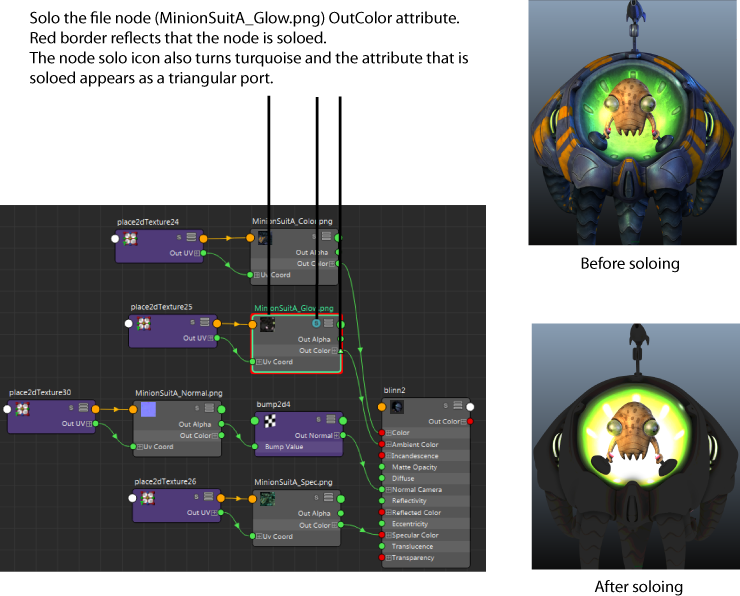
You can recognize a soloed node by its red border, by the soloing icon on the node which changes to turquoise, as well as by the soloed output port which becomes triangular.
Determining if a node can be soloed
When the node is soloed, its soloing icon turns turquoise
 , and the border of the node turns red.
Not all nodes can be soloed. A node can only be soloed if it fits either of the following criteria:
- it is a shader or a texture node (that is, its classification string is one of shader/surface, texture/2d, or texture/3d)
To query a node's classification string, use the MEL command getClassification.
- its corresponding
Node Editor template file (NE<NodeType>Template.xml) has an
NEDefaultSoloOutput view specified
The following example is from the NElambertTemplate.xml file, saved by default in the scripts\NETemplates folder. The view definition indicates that Lambert can be soloed:
<view name='NEDefaultSoloOutput' template='NElambert'>
    <property name='outColor'/>
</view>
For information about Node Editor templates and their default location, see Node Editor templates.
Soloing an attribute
A soloed attribute appears as a triangular port
 .
.
When you solo a node using the soloMaterial MEL command, you can also specify the attribute that you want to solo.
Otherwise, if you solo a node without specifying an attribute, such as by clicking on the soloing icon, Maya checks to see if you have previously soloed a specific attribute on this node. If so, that same attribute is soloed again. Otherwise, the default attribute is soloed. You can then solo a different attribute by double-clicking its port.
The NEDefaultSoloOutput view definition in the NE<NodeType>Template.xml file indicates that a node can be soloed, and the attribute that is to be soloed by default. In the example above, <property name='outColor'/> is included in the view definition, and therefore outColor is soloed by default.
For nodes that do not have an NEDefaultSoloOutput view definition in their corresponding Node Editor template file, but that can still be soloed because their classification string is one of shader/surface, texture/2d, or texture/3d, Maya solos the first of the following outputs:
- outColor
- output
- outValue
- result
When you solo a node (other than a bump node or a material node), the Material Viewer render also switches to flat view, displaying a flat plane swatch with only ambient lighting. For more information, see Solo a node and see it in flat view.