The Optical FX Attributes control the appearance of glows, halos, and lens flares.
For more information about optical effects, see Glows, halos, and lens flares.
- Active
-
Turns the optical effect on or off. Active is on by default.
- Lens Flare
-
Simulates a bright light source illuminating the surfaces of a camera’s lens. The flare intensity is determined by the Flare Intensity value. The size of the flare circles is relative to the field of view of the camera. Lens Flare is off by default. Check Lens Flare on to access Lens Flare Attributes.

Glow Type
The type of glow the light produces when viewed directly. Click the arrow to access available glow types from the drop-down list.
A light does not need glow to illuminate objects when the scene is rendered, however a light does need glow to be visible by the camera when the scene is rendered. The default Glow Type is Linear.
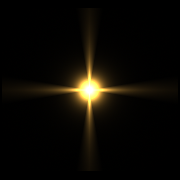
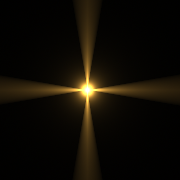
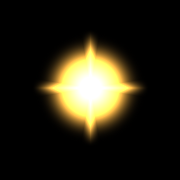
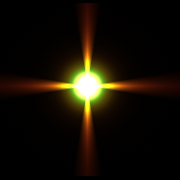
The following examples show a yellow glow (Glow Color) and all other Glow attributes left at the default settings.
- None
-
No glow appears.
- Linear
-
Glow slowly diminishes from the center of the light.
- Exponential
-
Glow quickly diminishes from the center of the light.
- Ball
-
Glow diminishes faster towards a distance (from the light center) specified by the Glow Spread value.
- Lens Flare
-
Simulates a bright light source illuminating the surfaces of several camera lenses.
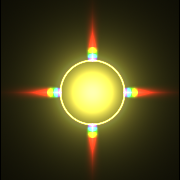
- Rim Halo
-
Forms a circular ring with a soft central glow. The size of the ring is determined by the Halo Spread value (in this example, 0.75).
Halo Type
The type of halo the light produces when viewed directly. Halo is similar to Glow, except that the fall off is more gradual and different fall-off types are available. The default setting is None. Click the arrow to access the drop-down list.
The following show the different Halo types with the default Linear Glow Type, a red Halo Color, and the Halo Spread set to 0.75.
- None
-
No halo appears.
- Linear
-
Halo slowly diminishes from the center of the light.
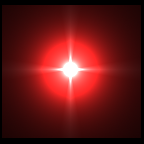
- Exponential
-
Halo quickly diminishes from the center of the light.

- Ball
-
Halo diminishes faster towards a distance (from the light center) specified by the Halo Spread value.
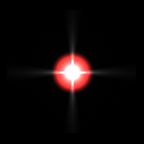
- Lens Flare
-
Simulates a bright light source illuminating the surfaces of several camera lenses.
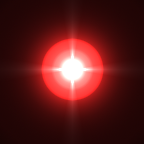
- Rim Halo
-
Forms a circular ring with a soft central glow. The size of the ring is determined by the Halo Spread value.
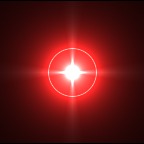
- Radial Frequency
-
Controls the smoothness of glow radial noise (see Glow Radial Noise). The slider range is 0 to 5, but you can enter values up to infinity. The default value is 0.5.
- Star Points
-
Represents the number of points on glow star filter effects (see Glow Star Level). The following examples show a Star Points value of 20 and a Star Points value of 1 which produces a comet-like effect. Use the Rotation attribute to adjust the comet’s tail.
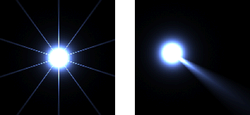
The slider range is 0 to 10 but you can enter values up to infinity. The default value is 4.
Note:A non-integer Star Points value could render with a seam or hard line at the top of a star effect.
- Rotation
-
Rotates glow noise and star effects (Glow Noise, Glow Radial Noise, and Glow Star Level) about the center of the light. The slider range is 0 to 360 (degrees) but you can enter values up to infinity. The default value is 0.
- Ignore Light
-
If on, automatically sets the threshold for the shader glow. Turn this option off if you want to manually control the amount of glow in your scene.
Glow Attributes
- Glow Color
-
The color of the light’s glow. Click the color swatch to open the Color Chooser and select a color if desired.The default setting is white.
- Glow Intensity
-
Also accessible through the material’s Special Effects attributes (see Special Effects). Controls the glow brightness. As the Glow Intensity value increases, so does the apparent size of the glow effect. A negative Glow Intensity value subtracts from other glows. (The light’s Decay Rate controls how the glow brightness decreases with distance.) The slider range is 0 to 10, but you can enter values up to infinity. The default value is 1.
- Glow Spread
-
Controls the size of the glow effect. Negative values can have odd but sometimes useful effects. The slider range is 0 to 5. The default value is 1.
- Glow Noise
-
Controls the strength of two-dimensional noise applied to the glow. The noise is generated on a plane centered at the location of the light and always oriented towards the camera. The slider range is 0 to 1. The default value is 0.
To create the illusion of illuminated smoke around a glowing light source, set the Glow Noise value to about 0.5 and slowly animate the Noise Uoffset and Noise Voffset values. The smoke appears to slowly drift by the light.
Tip:Generally, fog illumination is better than glow if you want to create smoke and fire effects because fog is a 3D effect (for example, glow noise cannot be occluded by objects).
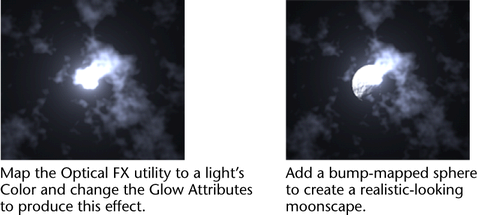
The following example shows how you can create a moody night sky simply by adjusting a few Glow Attributes. The Optical FX attributes used in this example are as follows:
- Glow Type = Exponential
- Radial Frequency = 0
- Star Points= 2
- Rotation = 300
- Glow Radial Noise
-
Randomizes the spread of the glow to simulate starburst effects and eyelashes refracting light. The slider range is 0 to 1. The default value is 0.
Negative values of Glow Radial Noise produce thicker noise. Use the Radial Frequency attribute to control the smoothness of this effect.
- Glow Star Level
-
Simulates camera star filter effects. The slider range is 0 to 4. The default value is 0. Use the Star Points attribute to set the number of points on the star. Use the Rotation attribute to rotate the star.
- Glow Opacity
-
Controls the amount the light’s glow obscures objects. Think of opacity as the opposite of transparency. The slider range is 0 to 0.5. The default value is 0.
Halo Attributes
- Halo Color
-
The color of the halo. Click the color swatch to open the Color Chooser and select another color if desired. The default setting is white.
- Halo Intensity
-
Controls the halo brightness. As the Halo Intensity value increases, so does the apparent size of the halo effect. (The light’s Decay Rate controls how halo brightness decreases with distance.) The slider range is 0 to 5. The default value is 1.
- Halo Spread
-
Controls the size of the halo effect. Halo size is generally larger than glow size when the Halo Spread and Glow Spread values are the same. The slider range is 0 to 5. The default value is 1.
Lens Flare Attributes
These attributes are only accessible if Lens Flare is turned on in Optical FX Attributes.
- Flare Color
-
The color of the lens flare circles. Click the color swatch and select another color from the Color Chooser if desired. The default color is white.
- Flare Intensity
-
Controls the flare effect’s brightness. (The light’s Decay Rate controls how the lens flare brightness decreases with distance.) The valid range is 0 to infinity. The slider range is 0 to 5. The default value is 1.
- Flare Num Circles
-
Represents the number of circles in the lens flare effect. The valid range is 0 to infinity. The slider range is 0 to 30. The default value is 20.
If the Flare Num Circles value is very large, rendering times may be long, especially if the Flare Min Size and Flare Max Size values are large and the Flare Color is textured.
- Flare Min Size, Flare Max Size
-
The size of the circles is randomized between these two values. The valid range is -infinity to infinity. The slider range is 0 to 5. The default value is 0.1 for Flare Min Size and 1 for Flare Max Size.
- Hexagon Flare
-
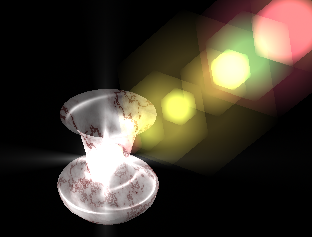
Produces hexagonal-shaped flare elements (instead of circles).
- Flare Col Spread
-
Controls the hue amount of individual circles randomized about the Flare Color. The Flare Col Spread value has no effect if the Flare Color is not at least partially saturated (for example, not white or grey). The slider range is 0 to 1. The default value is 0.5.
- Flare Focus
-
Controls the circle edge sharpness. The valid range is 0 (very blurry) to 1 (totally sharp). The default value is 0.6.
- Flare Vertical, Flare Horizontal
-
Controls the axis of the flare effect relative to the center of the image. If the light source moves, the flare appears to rotate through this point. The slider range is -1 to 1. The default value is 1.
- Flare Length
-
Controls the flare effect length relative to the light location. If Flare Length is small, all circles overlap the light. If Flare Length is large, the circles spread out across the image. The Flare Length value has no effect if the Flare Vertical and Flare Horizontal values are both 0. The slider range is 0 to 1. The default value is 1.
Noise Attributes
See also Glow Noise.
- Noise Uscale, Noise Vscale
-
Scales glow noise in the horizontal (Noise Uscale) and vertical (Noise Vscale) directions. The slider range is 0 to 5. The default value is 1.
Tip:You can use Noise Uscale and Noise Vscale to create layered fog or tall flames. Animate the Noise Uscale and Noise Vscale values from high to low values to make the noise appear to fly apart like an explosion.
- Noise Uoffset, Noise Voffset
-
Offsets glow noise in the horizontal (Noise Uoffset) and vertical (Noise Voffset) directions.
For example, you can animate the Noise Uoffset and Noise Voffset values to simulate smoke, rain, or snow moving past a light. Noise repeats after an offset of 1. The slider range is 0 to 1. The default value is 1 for Noise Uoffset and 0.5 for Noise Voffset.
- Noise Threshold
-
The cutoff value for the noise. As the Noise Threshold value approaches 0, glow noise breaks up into smaller patches. The slider range is 0 to 1. The default value is 0.5.
Tip:You can use Noise Threshold to simulate globular clusters, ejecta from explosions, snow and rain effects, especially when the Noise Uscale and Noise Vscale values are high. You can also use it to make flames and smoke more patchy.