For a description of the Single Switch utility, see Single Switch.
Switches single float attributes, like a Bump Value or Bump Depth.
You can preview your results in Viewport 2.0, or render in the Render View.
You can add a Render View, viewport, and Outliner to your Hypershade window for this workflow. Select these editors from the Window menu in the Hypershade and dock them to the Hypershade. See Customize your layout in the Hypershade.
To use the Single Switch utility
- Create a material and assign it to all the objects in the scene.
- Map a texture to the material’s
Bump Mapping attribute. Adjust the texture’s attributes and 3D placement if necessary.
 Tip:
Tip:If Alpha Is Luminance is on in the Color Balance section of the texture’s Property Editor, the rendered result is much smoother. Alpha Is Luminance is on by default.
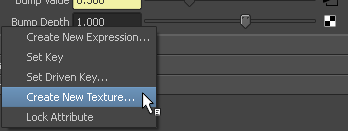
- In the
Bump 3d’s
Attribute Editor, place the cursor over the
Bump Depth attribute, then right-click
Create New Texture from the pop-up menu.
- Select the
Single Switch utility from
Maya > Utilities in the
Create Render Node window.
The Single Switch’s Property Editor appears.
- Open the Outliner and middle-select one of the objects for which you want object-specific bump mapping. Drag it to the In Shape column of the Switch Attributes section.
- Click the name displayed in the
In Shape column then click the
Map Item button (or right-click over the
In Single column and select
Map from the pop-up menu).
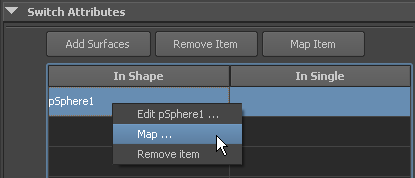
The Create Render Node window appears.
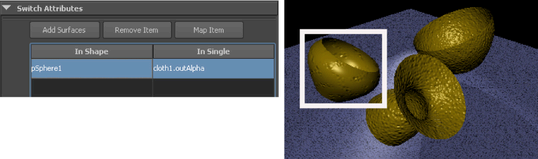
- Select another texture. The
Switch Attributes
In Single column now displays the new texture. Adjust the texture’s attributes to get the look you want. Notice that only one of the object’s bump map changes as you adjust the attributes.
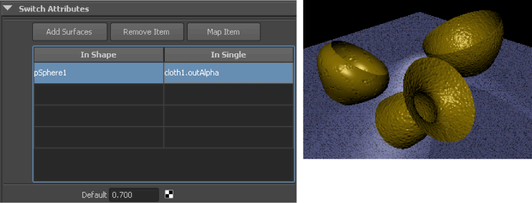
- Now change the
Default attribute in the
Single Switch’s
Property Editor. The bump maps on the other objects in the scene adjust according to the value you enter.
Click
 in the
Hypershade work area toolbar to regraph your shader network.
in the
Hypershade work area toolbar to regraph your shader network.
The following shows the shader graph in the Hypershade:
