Use the Game Exporter (File > Game Exporter) to quickly export animation in an FBX file. You can export a list of clips into a single FBX file, or save each clip into its own FBX file.
- Switch to the
Animation Clips tab at the top of the
Game Exporter window.
By default, this displays the Anim Default preset, which gives you the basic FBX options for exporting animation. See Create a Game Exporter preset for information on adding your own presets.
- Use the next drop-down menu to indicate whether you want to
Export All or
Export Selected objects.
If you have a selection set created for the animated objects, you can also select Export Object Set, then select the set itself.
Tip: If you have multiple characters in the same scene and you want to export only one of them, this is how you specify which one you want to export.The object set is maintained so you don't have to re-specify which objects to export the next time you open the file.
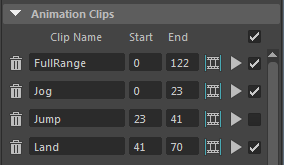
- In the
Animation Clips section, do the following to add and define as many clips as you want.
- Click
 to add a new clip.
By default, the Start and End frame for a new clip are set to the current time range in the Time Slider. You can jog through the animation in your scene to determine where the clip you want starts and ends, then enter those frame values in the Start and End fields.
- Enter a name for the clip, for example "Jog", "Jump", or "Land".
- (Optional) Click
 to frame the Animation Playback Range (Time Slider) on a specific clip.
- (Optional) Ctrl + LMB-drag the Start or End frames to adjust the playback range, and see your animation update in the viewport.
- (Optional) Right-click the
Start or
End frames and select one of the following options:
- Increment: Increase the value of the Start or End frame by 1.
- Decrement: Decrease the value of the Start or End frame by 1.
- Set to Current Time: Set the Start or End frame to the currently selected frame on the Time Slider.
- Click
 to frame the Animation Playback Range and playback only that clip.
Tip: By default each new clip is added to the bottom of the list. Right-click and select Insert Clip to add a new clip between existing ones. - Click
- In the
Settings section, edit the settings as required, and specify whether to
Save Clips to Single File, or
Save Multiple Clip Files. For details on the options available, see the
Game Exporter reference.
Note: With Save Clips to Single File on, the clips are saved as FBX takes within a single FBX file.
- In the Path section, specify the export directory you want and enter the name you want to prefix onto each clip file name.
- Click
Export.
This exports the animation, based on the Filename and Path location you set.