You use the Fireworks effect to make fireworks displays quickly and easily. The effect creates a number of rockets that fly up, leave a trail as they fly, and burst. Gravity fields are also created for all particles. Initially, the effect randomly chooses colors and positions for rocket launches and bursts. You can edit these defaults later. The fireworks are rendered in software (not hardware) as streaks.
Before you create fireworks, it is helpful to review the terminology used in the Fireworks effect.
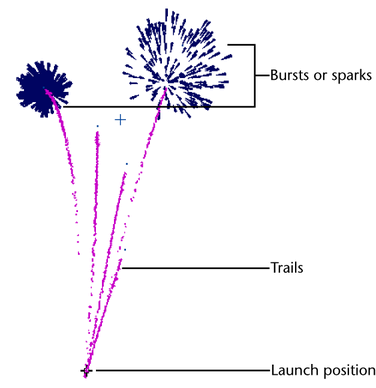
To create fireworks
- Choose >
 .
. - Set controls in the option window as needed.
For controls related to creation, see Set Fireworks creation controls.
For controls that you can edit later, see Edit general Fireworks attributes.
- Click Create in the options window or choose .
The fireworks group and rockets selection handles appear.
- Click the play button.
If you make changes to the fireworks attributes, you may need to replay the scene from frame one.
- If you want faster playback, turn off the Display Geometry attribute.
Display Geometry is near the bottom of the fireworks group attributes. When turned off, the particles appear as streaks rather than instanced cones. For details, see Display Geometry.
- To render the fireworks, make sure Display Geometry is turned on and use software rendering.
Set Fireworks creation controls
Of the numerous controls in the Create Fireworks Effect Options window, the following are described here because they relate to creation. See Fireworks Options.
Edit general Fireworks attributes
After you create the fireworks, you can adjust general, group-related attributes by editing the fireworks attributes. You can do this using the Channel Box or the Attribute Editor.
Start by selecting the fireworks group selection handle.
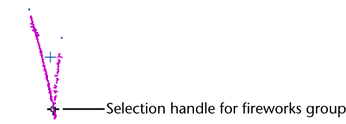
- Max Burst Speed
-
Affects how fast all rockets burst, and, consequently, how wide the bursts appear. Each particle in the burst has a random speed, and this speed is the maximum.
- Max Sparks Count, Min Sparks Count
-
Each burst consists of a number of streaks randomly distributed between these two values.
- Sparks Color Spread
-
Determines the number of colors to use per burst. The colors are selected from the palette of colors established by the Num Spark Colors option. The spread refers to the number of colors on either side of the main color. For example, a spread of one means a total of three colors: the main color, plus one color on either side of the color palette.
- Rocket Gravity
-
Sets the magnitude of the gravity field affecting rocket trajectories. This option does not affect the gravity fields for rocket trails and burst sparks. To edit those fields, open their gravity nodes in the Attribute Editor.
Attaching any fields to the rockets other than the created gravity will make the burst position unpredictable.
- Show All Burst Positions
-
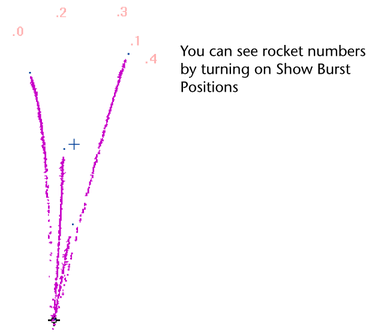
Shows you the rocket burst positions by displaying the rocket particle ID number in the view panel.
- Show All Launch Positions
-
Shows you the rocket launch positions by displaying the rocket particle ID number in the view panel.
- Trail Emit Rate
-
Sets the rate that rockets emit trails. An Trail Emit rate of 0 (zero) means no rocket trail appears.
- Trail Emit Speed
-
Sets the Trail Emit speed of the rocket trail particles. You can enter a value of 0 or more. A value of 1 leaves the speed as is. A value of 0.5 reduces the speed by half. A value of 2 doubles the speed.
- Trail Emit Spread
-
Sets the emission spread angle. This angle defines a conical region into which the rocket trail particles are emitted. You can enter any value between 0 and 1. A value of 0.5 is 90 degrees, a value of 1 is 180 degrees.
- Trail Min Tail Size, Trail Max Tail Size
-
Sets the size range for particles within the rocket trails.
- Trail Glow
-
Sets the amount of glow from the rocket trail shaders.
- Trail Incandescence
-
Sets the amount of incandescence from the rocket trail shaders.
- Sparks Min Tail Size, Sparks Max Tail Size
-
Sets the size range for particles within rocket bursts.
- Sparks Glow
-
Sets the amount of glow from the burst sparks shaders.
- Sparks Incandescence
-
Sets the amount of incandescence from the burst sparks shaders.
- Display Geometry
-
Switches between displaying particles only and displaying the cones instanced to each particle. In order to create lighting and glow when you render fireworks, there is a cone instanced to each particle, and a shader connected to each cone. During playback, the cones display more slowly than the particles. To increase the playback speed, turn off Display Geometry so that only particles appear. Before you render, turn Display Geometry back on.
Edit rocket positions, timing, and colors
You can edit the following on a per rocket basis:
- positions of the burst and launch
- frames when launch and bursts occur
- colors of the trails and bursts
To make these edits, you must first select the rocket attributes in the Attribute Editor, FireworksRocketShape node.
To select rocket attributes
- Select the rockets selection handle, placed in the center of the fireworks rockets.
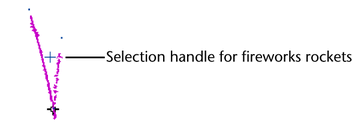
If the rockets selection handle becomes hidden behind the rocket trails, try drawing a selection box in the center of the Fireworks effect.
- Open the Attribute Editor.
- Turn off Auto Load Selected Attributes, under the List menu.
The auto load option must be off to prevent the wrong node from displaying.
- Click the FireworksRocketsShape node in the Attribute Editor.
- Navigate to the Clip Effects Attributes, Fireworks section.
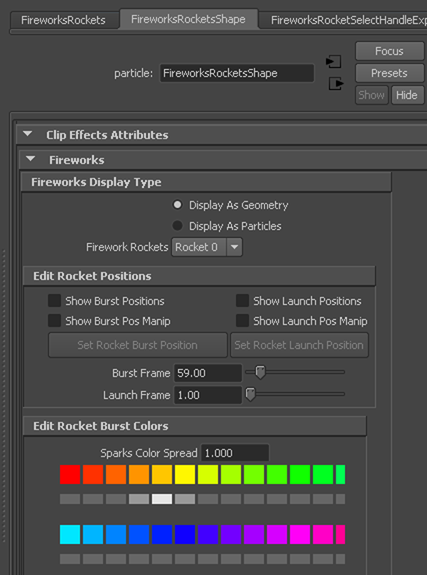
- Select the rocket you want to edit in the Firework Rockets pull-down list.

You can see the number of each rocket by turning on the Show Burst Positions or Show Launch Positions checkbox.
To edit rocket burst or launch positions
- Select the rocket attributes as explained in To select rocket attributes.
Remember to click Load Attributes if the Attribute Editor is not refreshed.
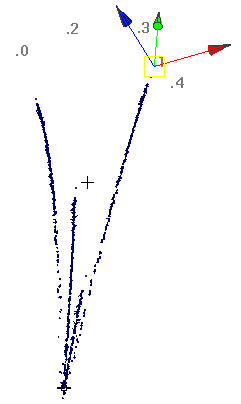
- Turn on Show Burst Pos Manip or Show Launch Pos Manip.
 Note:
Note:If the node in the Attribute Editor changes, you must turn off Auto Load Selected Attributes, under the List menu. To redisplay the FireworksRocketShape node, select the rocket group and click Load Attributes.
- Move the burst or launch manipulator as needed.
- Click Set Rocket Burst Position or Set Rocket Launch Position once the manipulator is in position.
- If the rockets have already been drawn, replay the animation from frame one to see your changes.
To edit rocket burst or launch times
- Select the rocket attributes as explained in To select rocket attributes.
Remember to click Load Attributes if the Attribute Editor is not refreshed.
- Edit the Burst Frame or Launch Frame attributes.
Maya tries to satisfy the burst time as close as possible by computing an appropriate velocity and trajectory for the rocket.
To edit rocket colors
- Select the rocket attributes as explained in To select rocket attributes.
Remember to click Load Attributes if the Attribute Editor is not refreshed.
- Edit the color attributes described below.
- Sparks Color Spread
-
Sets the number of colors used in the rocket’s burst sparks. The spread appears on either side of the main color you choose in the sparks color palette.
- Sparks color palette
-
Enables you to select a spread of colors for the rocket’s burst sparks. Click the rectangle under the main color you want, and the other colors in the spread are chosen from either side of it.

By default, the palette consists of colors chosen in consecutive order around the color wheel. You can change the palette one color at a time by clicking the color square, which opens the Color Chooser. Or, you can use the Remake Color Palette option.
- Remake Color Palette
-
If you want to replace the entire sparks color palette with a custom palette, you can specify a custom MEL procedure name. Maya looks for the custom procedure by searching your user scripts directory for a MEL script with the same name.
Your procedure should include the following syntax:
global proc vector[] myFireworksColors( int $numColors )
In this syntax, the argument $numColors specifies the total number of colors requested. The return value should be an array of vectors with the new colors in it.
If you made individual color changes, you can return to the custom or default color palette by clicking Reset from colorProcedureName.
- Edit Rocket Trail Colors
-
Shows the spread of colors for the rocket’s trail. You can change the palette one color at a time by clicking the color square, which opens the Color Chooser. The number of colors is set in the fireworks options at the time of creation. Trail colors apply to all rockets, not just the rocket you selected.
- If the rockets have already been drawn, replay the animation from frame one to see your changes.