Click Constraints in the Setup panel of the Autodesk Inventor Nastran ribbon tab:

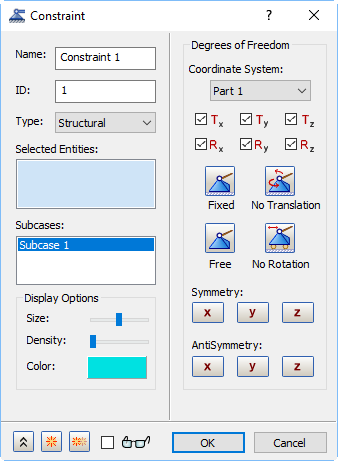
Or, right-click on Constraints in the model tree and select New from the context menu. The following dialog appears:

The form has the following main sections:
- Name: Enter a description of the constraint. For example, Back Face Fixed.
- ID: The ID of a constraint is automatically updated sequentially as new constraints are created so that it is unique to each of the constraints.
- Type: Select the type of constraint to apply to the model:
- Structural
- Pin – applies only to cylindrical faces
- Frictionless – intended for surfaces in contact; either parallel flat faces or concentric cylindrical faces
- Response Spectrum – applies only to Shock/Response Spectrum Analysis
- Thermal
- Rigid (Explicit) – applies only to a rigid body idealization (solid, shell, or line) that has a rigid material definition. The constraint defines enforced zero displacements or zero rotations.
- Selected Entities: This section lists the entities that have been selected for a constraint. A face, edge or vertex can be selected.
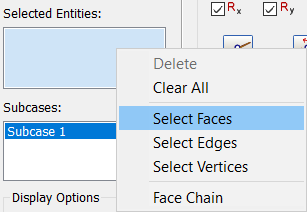
 Selection filters are available in the Selected Entities box. Right-click in the selection box and you’ll notice that
Select Faces, Select Edges, and
Select Vertices options are listed. These options allow you to set filters to select only faces, edges, and/or vertices.

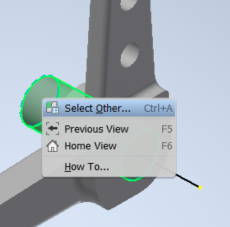
Another selection aid is available by right-clicking on or near the entity to select, and clicking Select Other.

This opens a list of adjacent bodies, faces, or edges to choose from.
You can use the Face Chain option to select a chain of tangent faces in a single click.
- Subcases: Allows you to select the subcases you want to apply the constraint to.
- Display Options: Allows you to edit the display options of the constraint.
- Degrees of Freedom: Allows you to select the degrees of freedom of the nodes associated with the selected entities that are to be constrained. For Pin constraints, you can fix any combination of radial, axial, and tangential directions.
-
 Minimize/Maximize the dialog
 New: Apply the current constraint and clear the form in preparation for defining the next constraint.
 Create Duplicate: Apply the current constraint and prepare to define the next constraint using the same settings. This feature is useful if you want to apply the same type of constraint to different entities or to apply a different type of constraint to the same entities. Only revise the settings that must change; keep the settings that are applicable to the next constraint.
 Preview: By clicking on this checkbox, you can dynamically update the constraint glyphs display. By default it is unchecked to improve performance while editing the constraints defined on multiple faces or edges in large models.
Click the links at the bottom of the page to see more information on some of these settings within the Constraints dialog.