Work with Material Libraries
Create a Material Library
- Click Render tab > System panel > Autodesk Rendering
 .
. - At the bottom of the Materials tab, click the Manage Libraries
 drop-down list and select the Create New Library option.
 - Use the Create Library dialog box to browse to a location where you want to store the library, enter the library name, and click Save.
Your library is now created. You can start adding materials to it, and organizing them into categories.
Open a Material Library
Click Render tab > System panel > Autodesk Rendering
 .
.At the bottom of the Materials tab, click the Manage Libraries
 drop down list and select the Open Existing Library option.
Use the Add Library dialog box to browse to a location where the library is located, and click Open .
The library will be added to the Library Tree on the Library panel.
Add a Material to a Library
Click Render tab > System panel > Autodesk Rendering
 .
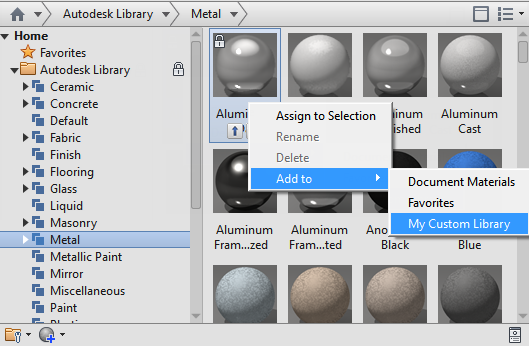
.On the Materials tab, right-click the material swatch > Add To > the name of the library where you want the material to be added. If no custom library exists, you need to create it first.

You can add the material to multiple libraries.
Tip: Alternative way to add materials to a library is to drag the swatch to the library.
Delete a Material from a Library
You can remove a material from an unlocked user library. Locked materials cannot be removed.
Click Render tab > System panel > Autodesk Rendering
 .
.On the Materials tab, go to your custom library, select the material swatch, and press Delete.
Tip: Alternatively, right-click the material and click Delete on the context menu.
Search for a Material in the Library
Click Render tab > System panel > Autodesk Rendering
 .
.In the search box at the top of the Materials tab, enter the name of the material.
The material library panel lists material libraries that contain matches for the search phrase you entered.

To clear the search and view the unfiltered library, click the X in the search box.