Place column headings and revision rows at the top or bottom of the schedule.
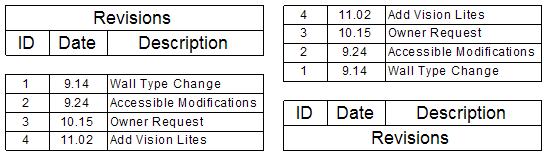
Revision schedules can display information in various ways. Some design firms use a top-down approach, with column headings and revision rows starting at the top of the schedule. Other design firms use a bottom-up approach, with column headings and revision rows starting at the bottom of the schedule. In either case, the revision schedule sorts the rows using the settings specified on the Sorting/Grouping tab of the Revision Properties dialog.
To change the way that revision schedules display information
- Open the title block for editing.
- In the Project Browser, under Views (all)
 Schedules, click Revision Schedule.
 - On the Properties palette, for Appearance, click Edit.
- On the Appearance tab of the Revision Properties dialog, for Build schedule, select one of the following values:
- Top-down: Column headings display at the top of the revision schedule. Revision rows start at the top of the schedule and go down.
- Bottom-up: Column headings display at the bottom of the revision schedule. Revision rows start at the bottom of the schedule and go up.
- Click the Sorting/Grouping tab of the Revision Properties dialog. Make sure that the revision schedule is sorted as desired.
- Click OK.
- If needed, adjust the position of the revision schedule on the title block.
- In the drawing area, select the revision schedule of the title block.
The status bar displays Schedule Graphics : Schedule Graphics : Revision Schedule.
- Drag the revision schedule to the desired location.
- In the drawing area, select the revision schedule of the title block.
- To save the title block, on the Quick Access toolbar, click
 (Save).
 - Load the title block into a project.