Run the Simulation
In this step, we start the flow simulation. It takes about 10 minutes to run.
1. Click Solve from the Setup tab:

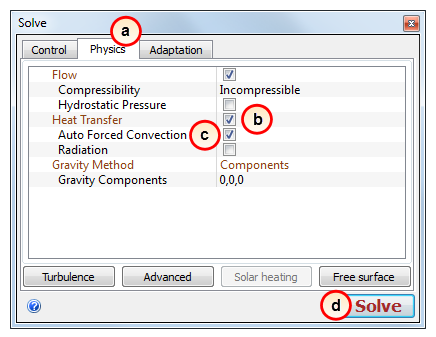
2. After we enable heat transfer, we can start the simulation:
- a. Click the Physics tab.
- b. Check Heat Transfer.
- c. Check Auto Forced Convection.
- d. Click Solve.

Note: For the first 100 iterations, the Temperature results do not change. Auto Forced Convection runs 100 flow-only iterations before solving for heat transfer. We can do this because the air moves fast enough to eliminate buoyancy effects. If buoyancy was relevant, we would solve flow and heat transfer together.
While it is running, you can see the results as they are computed!
Here are some things to notice:
- a. The Convergence Plot shows the condition of the calculation during the simulation. When the lines go flat, the solution is no longer changing, and the simulation is complete.
- b. To get a bigger view of the model, minimize the Output Bar by clicking the Output Bar button.
- c. The results update during the simulation. You can view them with the Results controls.

The Output bar displays Analysis completed successfully when the simulation finishes:

Next, we visualize the results!