Rendering > Render Settings > Raytracing Quality
In the Raytracing Quality tab, parameters for illumination, photon tracing, various sampling qualities, trace depth, and materials can be set globally.
Once you're finished customizing the render settings, use the Render Summary for a summary of things, such as total renders and files, and more. When finished setting attributes, use the buttons, at the bottom of the module to start image calculations.
Illumination Mode
Video captions: Open Render Settings and select the Raytracing Quality tab. Select Precomputed + Shadows from the Interactive menu and Full Global Illumination from the Stillframe menu. Activate Raytracing in the toolbar. You are in the interactive rendering mode, as long as you do not activate the Antialias button. If you don’t use the mouse, you are in stillframe mode when you activate antialiasing. As soon as you cease navigation, VREd will automatically switch to the stillframe mode and start smoothing the rendering. You can, therefore, define several illumination modes for interactive and stillframe. For example, if you want to move with interactive frame rates, use Precomputed Illumination mode. If you want to finish your navigation in order to look at your scene from a specific perspective to see real shadows, use Precomputed + Shadows mode. If you want to export any images via rendering, you have to use the stillframe settings.
Enables the choice of different illumination modes for interactive and still frame rendering in raytracing. It allows working in a precomputed mode for fast interaction with the scene and automatic switching to full global illumination for still frame rendering. Five modes are available:
Precomputed - This mode does not compute direct reflections, nor does it compute refractions or any other sophisticated visual effects.
Video captions: Open Render Settings and select the Raytracing Quality tab. Please select Precomputed Illumination as the illumination mode in Interactive. Activate Raytracing in the toolbar. As you can see, there is no change to the main look of the scene. In the mode, Precomputed Illumination, HDR is still set as basic lighting. Besides, ambient occlusion is also still used for shading. Now, real reflections and refractions of the scene are used. Open the Material Editor and change your default environment to Is Visible. You can now see the default material on the sky dome geometry used in your scene. Open the Scenegraph and hide the sky dome geometry. All the specular mirrorings in the surrounding areas will disappear. This suggests you should work with a surrounding geometry in raytracing. When working with surrounding geometry, no interactive feedback is displayed. During the transformations of your objects, you can see an interactive update in specular mirrorings. Precomputed illumination is the fastest raytracing illumination mode within VRED.
Precomputed + Reflections - This mode uses precomputed ambient occlusion and indirect illumination for rendering and calculates specular reflections and refractions and correct shadows from light sources. This mode is comparable to VRED OpenGL rendering mode.
Precomputed + Shadows - This mode uses precomputed image-based lighting and indirect illumination, but doesn’t use precomputed ambient occlusion values. Instead, it calculates shadows based on the active environment.
Video captions: Open Render Settings and select the Raytracing Quality tab. Select Precomputed + as the illumination mode in Interactive. Activate Raytracing in the toolbar. In the Precomputed + Shadows mode, HDR is still the basic lighting. Also, real mirroring and reflections are used from the scene. No prepared ambient occlusion is used. Real shadows are calculated on the basic of HDR materials. Open the Material Editor and select the default environment to switch it to Is Visible. You need a surrounding geometry to see the reflections and shadowing of the HDR in your scene. You can now include another surrounding file. You will now see any modification of the shadow cast. Rotate the shadow material around the Z axis and see how the shadows change direction in syncope. Of course, the shadows are being calculated anew and interactively for every geometry. Use the illumination Precomputed + Shadows mode for excellent results with minimal render times.
Precomputed + IBL - This mode uses precomputed indirect illumination and samples the environment.
Video captions: Open the Render Settings, via the Quick Access Bar. Choose as render mode, Precomputed + IBL. Activate Raytracing. HDR is not the lighting default. When hiding environments, the render view appears turns black. Real shadows of the scene are calculated. Furthermore, reflections and refractions are continued being calculated. Precomputed + IBL offers, in addition, the possibility to determine glossy reflections and respectively display them. Open the Material Editor, via the Quick Access Bar, and create a new plastic material. Change the color to black and set the Roughness to a value of 0.01. Apply the material to a geometry. Create any geometry and place it above your geometry. You can see the glossy reflections are being calculated. Switch the render mode to Precomputed + Shadows. As you can see, in the Precomputed + Shadow mode, no glossy reflections are generated.
Full Global Illumination - This mode doesn’t use precomputed values, but accurately samples everything in a physically-based approach. Other features, like Photon Mapping, require the render mode to be set to Full Global Illumination.
Video captions: Open Render Settings and select the Raytracing Quality tab. Select Full Global Illumination mode from the Interactive menu. Activate Raytracing in the toolbar. In the Full Global Illumination mode, the complete scene will be calculated. Here you can find specular reflections, glossy reflections, refractions, direct shadow cast, and indirect lighting. Open the Material Editor and select the default environment to switch it to Is Visible. If you now hide the surrounding geometry, there will be no basic lighting in your scene. Use Full Global Illumination for best quality results.
Photon Tracing
Video captions: In the following, for the demonstration of photon tracing, we create a cube as a special environment. Open the Scene menu in the menu bar and create a box, via Create Geometry. If necessary, position the box with space around your object. Open the Render Settings, via the Quick Access Bar, and under Raytracing Quality, in the Illumination Mode section, in for Interactive and Still Frame, Full Global Illumination. The render view appears black, as the object is not being lit by any light source. All up the Light Editor, under Scene, in the main menu bar. With the help of the right mouse button, open the Light Editor context menu and create a new light source. Alter the type of the light in the Area Light section, under Shape, into a Sphere light. Increase the Intensity of the light to the value of 10 and scale your light source with the help of the Transform parameter, which you can call upon via the Quick Access Bar. Position the light source as you please. Open the Render Settings and select the Photo Tracing section. Under Mode, choose Indirect Only to enable photon tracing. Indirect lighting of the scene is exclusively displayed by photons. To demonstrate this, we switch the Mode from Full Global Illumination to Precomputed + IBL. As you can see, the only difference for the indirect lighting is the emitted photons. In Full GI, you additionally have glossy reflections. You, actually, only have indirect lighting where photons land. It’s important to strike a good balance between the number of photons and the radius to illuminate the whole scene. The optimal case in reality would be an infinite amount of photons with an infinitely small radius. As this is not possible, an estimation is attempted with values like count and radius to reach a satisfactory result. With Photon Radius, you can control the radius of a single photon. Activate Antialias. You can see that no noise-free image is generated. This signals that the balance between the count and the radius has not yet been found. Change the radius and the count of the photos respectively. By increasing the count and scaling the radius, more dark areas were able to be covered by photons, reducing the noise. You have the possibility to enable Use Automatic Photon Radius, to ensure that no dark areas appear in the image. Here, depending on the number of photons, the result can occasionally be falsified.
Photon Tracing provides an approach to calculate the global illumination of a scene. The default full global illumination mode in VRED provides high-quality results, but may require longer calculation times. Photon Tracing can reduce the time required to render a clean image by a larger margin, especially in indoor scenarios, such as car interiors or architectural indoor scenes.
VRED provides different photon mapping modes.
Caustics + Indirect - Uses Photon Tracing to calculate indirect illumination and caustics due to specular materials in a scene. Important for transparent and semi-transparent objects, such as glass or water in a pool, where light bounces off these surfaces and also illuminates them.
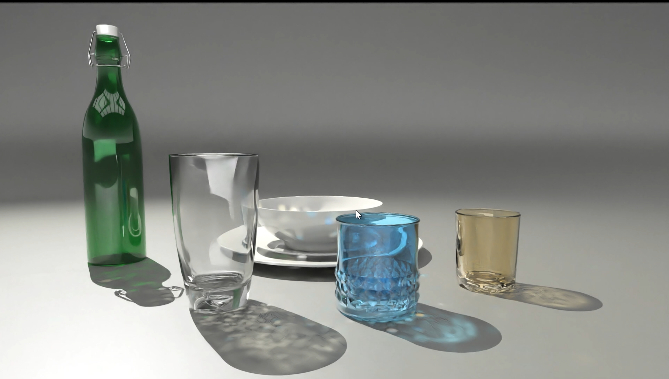
For the most physically accurate lighting effects, try combining global illumination with Final Gather.
Video captions: Open the Scenegraph via the Quick Access Bar and pull up the Scenegraph menu with the help of the right mouse button menu. Create a material group. Subordinate it, via drag and drop, to your geometry. If necessary, open the Material Editor and create a new glass material. Change the exterior transparency of the material to a bluish color tone. As the refraction index, set a value of 1.2 and activate Solid Shadows. Assign the material, via drag and drop, to the material group. Create another material. This time, select a plastic material. Change the Diffuse Color to a darker color tone and give Roughness a value of 2. Assign the material to your floor plane. Select your environment HDR in the Material Editor, and in the color Correction section, set the exposure value to 0 to deactivate the HDR lighting in your scene. This is done for demonstration purposes to make caustics visible in our scene. Call upon, if necessary, the Light Editor in the Scene menu. Activate the light source that was set up in advance by selecting Enabled. To generate a new light source, select the plus symbol in the Light Editor and choose a type of light. Open the Render Settings, via the Quick Access Bar, and in the Raytracing Quality tab, open Illumination Mode to get to its settings. To get caustics to be displayed, Full Global Illumination is necessary as render mode. Expand the Photon Tracing section and choose, under Mode, Caustics + Indirect to activate photon tracing with caustics. Via Interactive Count, the number of expelled photons can be set. This parameter refers to the interactive rendering. Change the value to 500 000 to radiate this many photons. Move your geometry to make the created caustics recognizable on your floor plane. Raise the number of photons as you please to increase the display of the created caustics. For performance reasons, the number of photons is being reduced again. Select your light source with the help of the Scenegraph and move it as you please in your render view. Changes in the caustics through moving the light source are displayed interactively. Increase the intensity of the light source. Open the Render Settings and increase the photon count for interactive and still to one million. Stillframe Count defines the amount of photon used for the image computation process. Activate the antialiasing.
Sets the number of reflections taken into account during raytracing, when calculating the color of a photon or ray.
Specifies the number of photons sent into the scene for each image sample. Specifying a photon count of 100,000 photons, while having set the image samples set to 256, results in 25,600,000 photons send into the scene for a frame. The higher the number of sent photons, the less pixelated the output is.
Uses a pre-process to lookup the 16 closest photons for each photon in the scene and calculates two times the average lookup radius. This feature works for most situations.
Specifies the radius around a hitpoint used by the raytracer to look for photons. A larger radius allows the raytracer to find more photons, but may result in slower lookup times.
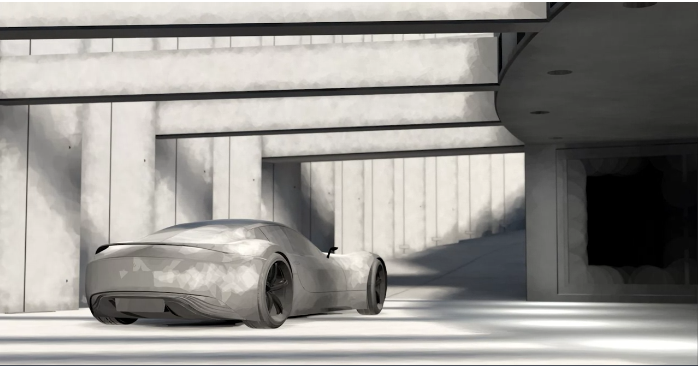
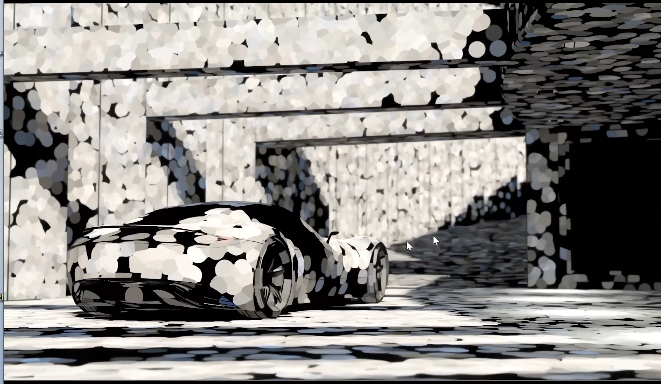
There are two ways to use the photon map. The first approach is always used for caustic photons. It gathers photons around a hitpoint to calculate the incoming illumination. This approach gives fast interactive performance and can calculate all light paths in a scene, but it may require a high photon count to get a clean image. The other approach is to use final gathering. In final gathering, a one bounce indirect illumination is performed before evaluating the Photon Maps. This is the default Photon Tracing approach in VRED since it generates high-quality images in a short time. Setting the final gather quality to Off enables the first approach while setting it to any other value uses the second approach.
Video captions: In this case, a cube was created in advance, acting as spatial surroundings. In the main menu bar, open the Light Editor, under Scene. Activate the available light source necessary. Change the render mode with the help of the Render Settings to Full Global Illumination. Open the Photon Tracing section and select Indirect Only to activate photon tracing. For more information on photon tracing, look up the Photon Tracing tutorial. Set the number of photons to 500 000. In general, many photons are needed to illuminate a scene. Different color values and the impact of photons can cause noise in the image. To remedy this, Final Gather was added. Activate Final Gather by setting the final gather quality to a value between 1 and 4. Final Gather creates a radiance photon for every 8th photon. Via a radiance, the information from neighboring photons is collected and stored in a final gather map. Final Gather Radius defines the radius of this information gathering process from a radiance photon.
Sets the lookup radius used to find the nearest final gather point during Raytracing. Using a smaller radius increases performance, but requires more photons to avoid dark regions.
To evaluate the final gather points, use the Indirect Illumination Rendering with photon mapping and final gathering turned on. For a good quality result, the final gather points should have few black regions where no photons are stored.
Setting the Final Gather Quality (Interactive Final Gather/Still Frame Final Gather values) to 1 or higher, the update frequency of the Photon Map may be set. By default, the Photon Maps are updated for each image sample, sending many photons into the scene. If Final Gather Quality is set to Off, it is often sufficient to update the Photon Map only once per frame and use it for each image sample to reduce the render times.
On Each Sample - Updates the Photon Map for each image sample. This is the default setting, since it also works for scenes with animated objects that may otherwise cause flickering.
On Scene Change - The Photon Map is updated once per frame, unless Motion Blur is activated. Since caustics require many photons, the Caustic Map is still updated for each sample, while the indirect illumination Photon Map is only updated once. This setting often results in the best rendering performance, but requires a much higher photon count to receive artefact-free results, particularly when rendering scenes with animated objects. The result may flicker in regions with a low photon count. This is why this mode should only be used for scenes with static geometry and materials.
When activated, glossy reflections are evaluated by the final gather map, rather than path tracing. This reduces the render time, but results in less accurate reflections.
When activated, the photon map is not automatically updated.
Photon Mapping - Only available for the Texture bake type when Photon Tracing is enabled.
Use this when baking, as it is helpful for calculating difficult lighting scenarios. The Ray Light requires photon mapping; therefore, illumination from ray lights can only be baked into lightmaps, not vertices. Photon mapping calculations are distributed over all GPUs, reducing the bottleneck that can occur during photon tracing. See the Photon Tracing section for more information.
IBL Sampling Quality
Sets the interactive IBL sampling quality.
Video captions: Open Render Settings and select the Raytracing Quality tab. Select Precomputed + Shadows from the Interactive and Stillframe menus. Activate Raytracing in the toolbar. Open the Lightsource Sampling Quality section. Increase Interactive quality up to 2. You can immediately see a less noisy result in your interactive window. Activate Statistics in the toolbar. You can now quality the usage tradeoff due to increasing interactive samples. Switch back to quality 1 and compare the difference in the Current FPS (frames per second). You can, thus, weigh up whether you want to work in a performance or quality-oriented way.
Sets the still frame IBL sampling quality.
Reflection/Refraction Sampling Quality
Trace Depth
Material Overrides
Each material can bring its own settings for material properties, illumination mode, IBL sampling quality, reflection/refraction quality, and trace depth. For each material, different overrides can be set separately in the Material Editor's Raytracing Settings.
Predetermined, all overrides are globally activated. That means, you can use different render settings for each material. This can be deactivated here, so the special material settings are ignored.
Overrides the global allow material setting for interactive or still frame rendering.
Overrides the global set illumination modes for interactive or still frame rendering.
Video captions: Open Render Settings and select the Raytracing Quality tab. Select Precomputed Illumination as the Interactive and Stillframe modes. Activate Raytracing in the toolbar. Open the Material Editor. Select the tire geometry in the render window, in order to see the material properties. Open the raytracing section. Activate the function, Override Illumination Mode, select Precomputed + IBL for both the interactive and stillframe modes. Now your scene will be calculated in Precomputed Illumination and the tire material in Precomputed + IBL. This means that glossy reflections and correct shadowing will be visible on the tire. Select Shadow Material. Open the Raytracing section. Activate the function, Override Illumination Mode, select Precomputed + Shadows for both the interactive and stillframe modes. Now, shadows will always be calculated in the Precomputed + Shadows mode. Activate the function, Override Shadow Sampling Quality and select setting 2 for interactive and stillframe quality. Now, shadows will be calculated in higher quality. Play around with the several render modes and settings to achieve the optimal quality and performance for you.
Overrides the global IBL Sampling quality for sampling the environment map.
Overrides the global sampling quality for reflections/refractions.
Overrides the global set trace depth modes for interactive or still-frame rendering.