Oculus/Meta
VRED supports the Oculus Rift and Rift S, and Meta Quest Series.
When a controller is detected, a hand is rendered at its tracked pose. See Hands in VR for more information.
| Rift Controller | Quest Controller |
|---|---|
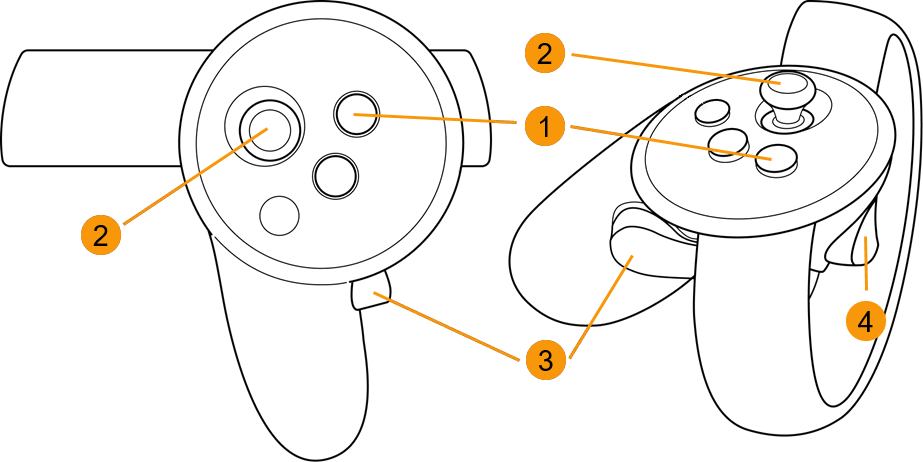 |
 |
 VR Menu (Menu button)
 Teleport (Trackpad)
 Tooltips (Grip)
 Pointer (Trigger)
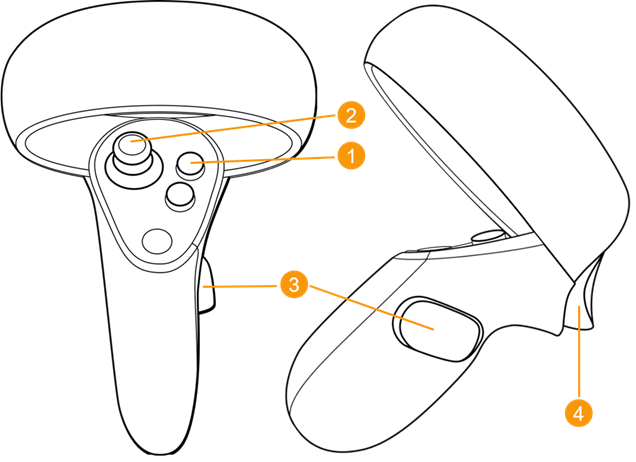
The Oculus Touch controllers only work in OpenXR HMD mode.
You can use the Python functions, vrDeviceService, vrdVRDevice, and vrdDeviceInteraction, for Oculus Rift controllers. Load the example file (File > Open Examples > OculusTouchExample.vpb), then select Edit > Script Editor to see an example of this in use.
VRED supports the use of the Oculus via OpenXR and OpenVR (which goes through SteamVR).
Before continuing, you will need a NVIDIA Quadro graphics card or better. Next, the Oculus software must be installed and Oculus hardware set up.
How to Set Up and Activate Your Oculus Rift with VRED
The HP Reverb G2 hardware uses both OpenXR and OpenVR (which uses SteamVR). An internet connection is initially required for the VRED controller bindings (controller button mapping). Once the controller bindings are loaded, the internet is not required.
For OpenVR, you must install the SteamVR software. If you haven't installed it, go to https://store.steampowered.com/steamvr and click Install Steam. Once installed, click the VR button at the top of the screen to install SteamVR.
- Load a scene into VRED.
- From the menu bar, select View > Display, then select either OpenXR HMD for working in XR or OpenVR HMD for VR to activate the device. For OpenVR HMD, if SteamVR is not running yet, wait a moment, as it will start automatically.
Setting Eye Separation
Use the hardware slider on the Oculus headset to set the distance between your eyes. This value can be overwritten in VRED by selecting Visualization > Stereo > Stereo Settings > Eye Separation.
Foveated Rendering is not currently supported.
How to Start the VR Experience at a Certain Point in a Scene
If you need to start the VR experience at a certain point in your scene, such as 1 meter in front of an object, do the following:
Create a viewpoint (Scene > Camera Editor, right-click and select Create > Viewpoint) on the floor of the scene, where you want to stand in VR.
Note:To create this viewpoint, see How to Create Viewpoints.
Activate Oculus Rift.
Activate the pre-defined viewpoint.
For more of a detailed explanation on the coordinate systems, see the VRED Camera section.
Tracking Origin Type
The default tracking type for the Oculus Rift are different, depending in the HMD mode used.
For OpenVR, the default is Seated mode, which is eye level. To change the tracking origin type to Room Scale, use a Python function found in Python for Oculus Rift.
For OpenXR, the default is Room Scale.
For information on Tracking values, see the Oculus Developer documentation.
For navigation, viewpoints, and matching virtual and real-world floor level, you can use some Python functions (see the Enabling Standing Mode example) or follow the instructions in these:
Camera Transformation and Tracking Space
Camera placement is the first thing you should set. The transformation (translation and rotation) of the VRED active camera defines the origin/location of the scene's tracking space and how it is oriented. Ideally, you should start with the scene set to Z-up. Next, you need to determine whether the camera is positioned at eye level/Seated mode (the default) or floor level/Standing mode.
Seated mode (Oculus Rift's Eye Level)
By default, VRED's Oculus Rift mode starts up in Seated mode and reports tracking values relative to any calibrated default headset pose. For example, sitting at the desk with the headset on.
The VRED camera should be positioned approximately where the user's eyes will be in the scene, since this is not automatically done in VRED. After activating Oculus Rift display mode, the position and orientation of the current active camera is the same as it was in Desktop mode, which is likely not suitable for VR.
There are always two things that will impact the final view in the headset:
- HMD calibration (setup of tracking space)
- VRED camera position and orientation
Headset (HMD) calibration - For example, the headset was on the desk pointing in one direction when turned on. Now, on your head, your eye level has changed and so has the direction you are looking.
Note:To recalibrate the tracking origin, use the Python function
resetOculusRiftOrientation()in VRED. In Seated mode,resetOculusRiftOrientation()resets the tracking origin to where the headset currently is. It also sets the preferred looking direction to where the headset is currently looking (yaw angle).
- VRED Camera - Should be positioned approximately where the user's eyes will be in the scene, since this is not automatically done in VRED. The camera up-vector should always set to 0, 0, 1 (Z-axis in VRED's world coordinate system).
Standing mode (Oculus Rift's Floor Level)
Standing mode is also known as Room Scale. It reports tracking values relative to a position on the floor that was set up during the initial calibration. Standing mode is defined as follows:
The VRED camera should be positioned approximately at floor level in the scene. If the VRED camera is looking at the front of a car, you will look at the front of the car in VR, when you are looking with your headset toward the sensors. This is the preferred forward-facing direction (looking towards the sensors).
There are always two things that will impact the final view in the headset:
VRED camera position and orientation
HMD calibration (setup of tracking space)
Note:The calibration tracking origin can be changed by using the Python function
resetOculusRiftOrientation()in VRED. In Standing mode,resetOculusRiftOrientation()sets the tracking origin to the position on the floor below the headset. It also sets the preferred looking direction to where the headset is currently looking (yaw angle).
The camera up-vector must always be set to 0, 0, 1 (Z-axis in VRED's world coordinate system).
Here are some additional links for things you might want to do:
- Floor Level and Initial Position (Room Scale Mode)
- How to Set Floor Level by Changing Camera Translation
- How to Create Viewpoints
Why NOT TO Use a Mouse to Navigate
Navigating with a mouse in the viewport changes the transformation of the active camera. It is possible to transform the active camera while VR is running, but this could result in the camera no longer sitting at floor level or being rotated incorrectly. This is why navigation with a mouse, while in VR, is not recommended.