Learn how to set up and implement Vault Server and Client.
Before You Begin
Before setting up the Vault, it is recommended to perform the following steps:
Understand the Vault Architecture
Autodesk Vault consists of two main components that make up its architecture: the Vault Client and the Vault Server. The client allows you to perform document management functions, such as checking files in and out and copying designs. The server stores the master copies of all your documents and designs. Each component is explained in more detail in this topic.
System Requirements
Before installation, verify that your hardware meets the minimum system requirements. See system requirements for more information about Autodesk Vault system requirements.
Anti-virus software can affect installation and performance of the Vault software. See How to improve performance when running Autodesk Vault with antivirus software? for more information.
Getting Started
Install the Vault Server
The Vault Server uses a Microsoft SQL Server for the backend database. The server keeps all design and documentation files in a shared, secure, and centralized location and manages access to that data. To learn about the Vault Server and managing vault, see Vault Server Administration.
There are three types of Vault Server installations: Quick Start Single Site, Customized Single Site, and Distributed Teams installation. The most robust way is to install the Vault Server on a separate computer dedicated to Vault and allow the clients to communicate with the server. See Vault Server Installation for more information.
Manage Vault
When you install the Vault Server, a new vault needs to be created to get started. You can create a new Vault or restore an existing Vault in the Vault Server Console (ADMS).
Vault can create and manage multiple vaults. When working with various vaults, the data is separate and can't be shared across vaults. To learn about how vaults and databases work, see Manage Vaults and Databases.
Install the Vault Client
A Vault Client is any application that connects to the Vault Server to perform vault operations such as check-in or check-out or copying designs. The Vault Server must be installed and configured before a client can access the server. See Install the Vault Client for more information.
- Before installing the Vault Client, close all Autodesk and Microsoft applications and disable any virus scanning software.
- Remove all historical data before loading any data into the Vault.
- Ensure that the Vault Client release that you are installing matches the release year of the Vault Server that you installed. See Upgrading Vault for more information.
- All Vault CAD add-ins are installed with Vault Client. CAD software installed after the Vault Client is installed automatically includes the Vault add-in available.
Setup Vault with Inventor
If using Inventor, set up Vault for using a default Inventor project file and to enforce a consistent client working folder. See the help topic for more information.
Upload Data to Vault
Use the Vault Autoloader utility to upload existing Inventor assemblies, parts, and libraries into the Vault.
The Autoloader utility is designed to produce clean, reliable results when loading data in a format that allows the Vault to work most efficiently in the long term. It is recommended to use this tool to perform your initial data load. Then, upon completion, you can leverage its resultant folder structure and Inventor project file for all your work. See Autoloader for more information.
Vault Settings Options
- Enforcing Unique File Names
- Disable Check in of Design Files
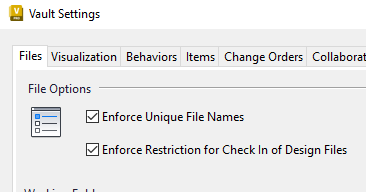
Enforce Unique File Names
After bulk loading historical data to the Vault, turn on "Enforce Unique File Names".
By default, unique file names are not enforced in the Vault. The only restriction is that two files with the same name cannot exist in the same folder. With unique file names enforced, files in the Vault must each have a unique, identifying name. See Enforcing Unique File Names for more information.
Enforce Restriction for Check In of Design Files
The "Enforce Restriction for Check In of Design Files" option prevents users from uploading restricted files into the Vault. By default, this option is checked. See Manage File Restriction for more information.
Add Files to a Vault with the Inventor Vault Add-in
Upload all data to the Vault using Vault add-ins for Inventor to check in new files to Vault. See Adding Files to a Vault with the Inventor Vault Add-in for more information.
Backup Your Vault
Always make sure you have a valid backup of your vaulted data. It is essential to use the backup feature in Vault Server Console (ADMS) to back up your vault. See Back Up or Restore a Vault for more information.
See this support article on Vault Disaster Recovery Plan (DRP) to understand how DRP can be implemented in the event of a disaster.
Run a SQL Maintenance Plan
Run a SQL Maintenance plan once per week. This ensures that the database is always optimized for performance. See Server Maintenance Part 6: Create SQL Maintenance Plan for SQL Standard and Express edition.