Configure how data is displayed as well as the type of content displayed in your revision tables. You can also configure which Vault properties are mapped to the revision table.
|
Feature |
Details |
|---|---|
|
|
Load suggested settings |
|
|
Loads the default settings for the dialog. |
|
|
Restores all changes in the Revision Table settings dialog to the settings used the last time the dialog was opened. |
|
Mappings Tab |
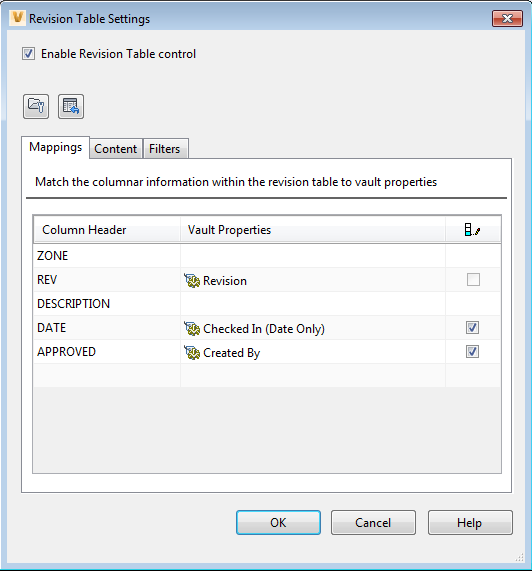
On the Mappings tab, you can map Vault Properties to the Revision Table columns.  |
|
Column Header |
Column name that displays in the revision table. |
|
Vault Properties |
The name of the Vault property that you have mapped to the associated revision table column. The value for this property will automatically appear in the column field in the revision table for the drawing. |
|
|
Released vs. non-released bias control. Select the check box for any row where you want the system to update the revision table with released only information. If the check box for a row is not selected, then the latest information from the vault is used. |
|
Content Tab |
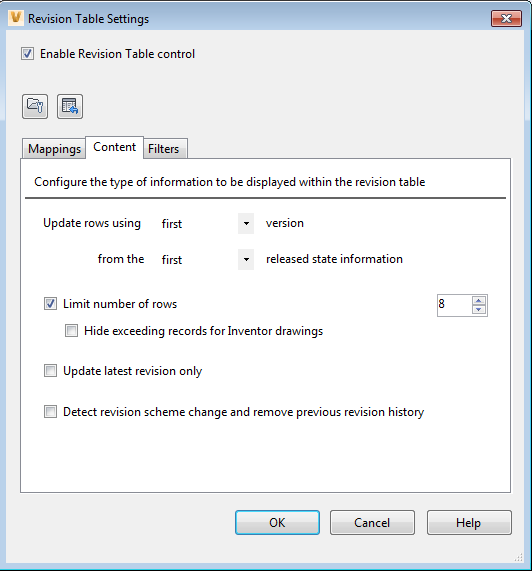
On the Content tab, you can enforce the type of information that is displayed in the revision table.  |
|
Update rows using... |
Select versions control. Select the version and the released state that you want to apply to revision history records. |
|
Limit number of rows check box |
If you want to limit the number of rows displayed in the revision table, select the Limit number of rows check box. Specify the limit for the number of rows that you want displayed by selected a value from the value spinner. Note: When the Limit number of rows option is turned ON, the exceeding records are deleted by default. In Inventor drawings, you can also choose to hide these exceeding records instead of deleting them.
|
|
Hide exceeding records for Inventor drawings check box |
Select this check box to hide instead of delete additional Inventor drawings records. |
|
Update latest revision only |
Select this check box to update the mapped values only for the latest revision row within the revision table. All other mapped values in previous historical revision rows will not be updated even if the data is non-equivalent in the vault .
Note: Even with the Update latest revision only enabled, the Vault Revision Table feature will continue to remove revision rows which are not found in the Vault.
|
|
Detect revision scheme change and remove previous revision history |
If you are using multiple revision schemes, select this check box to ensure that the current revision scheme is used. Historical revision rows of an older revision scheme are replaced with the current revision scheme. |
|
Filters Tab |
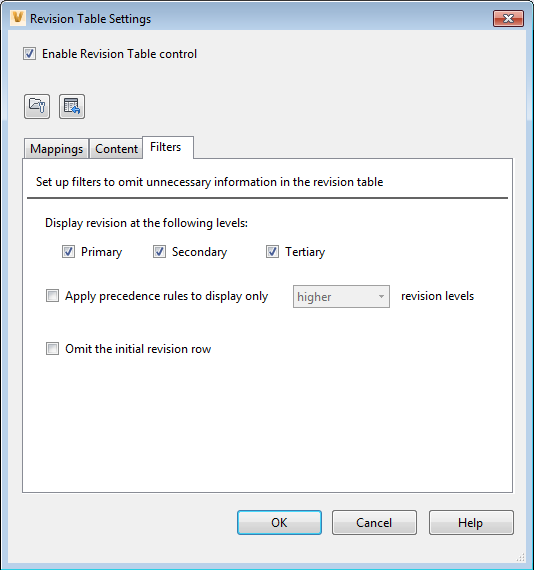
On the Filters tab, you can further refine the data displayed in the revision table by applying revision level filters.  |
|
Display revision at the following levels |
Select the check box for each revision level that you want displayed in the revision table. For example, if you have a drawing marked as revision B.2.1, and you only select the Primary and Secondary check boxes, then only B.2 will display in the revision table. Refer to Revision Schemes for more information about Primary, Secondary, and Tertiary revision levels. |
|
Apply precedence rules to display only X revision levels |
When multiple revision levels exist within a revision group, it is necessary to identify which level of revision that you want displayed. Enable this check box and select whether you want the highest or lowest revision levels displayed in the revision table. This selection takes precedence over the Display revision at the following levels option. |
|
Omit the initial revision row |
Select this check box to omit the initial revision row from the revision table. Some users find that if the initial revision value (e.g., A) is already in the title block for the revision table, having it repeated as the first revision row is unnecessary. By selecting this check box, the first revision row in the revision table becomes the next revision value (e.g., A.1) . |
Vault Revision Table Workflows
Access the Revision Table Settings Dialog Full View
-
- In the Vault Client, select .
Select the Behaviors tab and click Revision Table.
- In the Inventor or AutoCAD application, select Vault Options on the Vault ribbon and click the Settings button for Configure Revision Table.
- In the Vault Client, select .
- Select the Enable Revision Table control check box if it is not already selected.
The full view for the Revision Table Settings Dialog displays.
The Revision Table Settings dialog can be accessed two ways:
Automatically Fill in Settings
- If you want to load the settings recommended by the system, click Load suggested settings
 .
.
- If you want to restore the settings that were used when the dialog was last opened, click Revert all changes
 .
.
When the dialog first opens, the fields are empty. You can start entering your own values, load settings suggested by the system, or revert all changes to the previous settings.
Map Vault Properties to Revision Table Columns
- On the Revision Table Settings dialog, select the Mappings tab.
- Click on a blank field under Column Header and enter a value to create a column heading for the revision table.
- Click on the corresponding field in the Vault Properties column and select the property that you want to map to the Column Header from the drop-down list.
Note: The system property 'Revision' is a key mapping and must be mapped to at least one of the column headers.
- Select the check box in the released bias control column if you want only released values for the assigned property to display in the revision table. Clear this check box if you want the latest value for the property to display instead.
- Repeat the last three steps for additional entries.
- Click OK to save your settings.
Configure Whether the First or Last Version of a Revision Value is Used
- On the Revision Table Settings dialog, select the Content tab.
- In the Update rows using line, select whether you want to display values for the first or last version of the revision.
- On the next line, select whether or not you want the first or last version values for released state information.
- Click OK to save your settings.
When working with revisions, it is possible to have multiple versions of a drawing within one revision. You can determine whether you want the first version of the revision or the last version of the revision's data displayed in the revision table on the Content tab.
Limit the Number of Rows in the Revision Table
- On the Revision Table Settings dialog, select the Content tab.
- Select the Limit number of rows check box.
- Identify how many rows the revision table is limited to displaying by entering a value or using the up and down arrows to change the current value.
Note: When the Limit number of rows option is turned ON, the exceeding records are deleted by default. In Inventor drawings, you can also choose to hide these exceeding records instead of deleting them.
- Click OK to save your settings.
You can enforce how many revision rows are displayed in a revision table by enforcing a limit on the number of rows. Additionally, you can identify just how many rows you want the limit to be.
Update Latest Revision Row
- On the Revision Table Settings dialog, select the Content tab.
- Enable the Update latest revision only check box to update the mapped values only for the latest revision row within the revision table. All other mapped values in previous historical revision rows will not be updated even if the data is non-equivalent in the vault .
Note: Even with the Update latest revision only enabled, the Vault Revision Table feature will continue to remove revision rows which are not found in the Vault.
- Click OK to save your settings.
Detect Revision Scheme Change
- On the Revision Table Settings dialog, select the Content tab.
- Select the Detect revision scheme change and remove previous revision history check box to replace historical revision rows with the current revision scheme information.
- Click OK to save your settings.
If you are using multiple revision schemes, you can ensure that the current revision scheme is used instead of historical revision data.
Configure the Revision Levels that are Displayed
- On the Revision Table Settings dialog, select the Filters tab.
- Select check box for each revision level that you want displayed in the revision table.
- When multiple revision levels exist within a revision group, it is necessary to identify which level of revision that you want displayed. Enable the
Apply precedence rules... check box and select whether you want the highest or lowest revision levels displayed in the revision table.
Note: This selection takes precedence over the Display revision at the following levels option.
- Click OK to save your settings.
You can control how many revision levels are shown in the revision table. For example, if you use tertiary revision levels (e.g., B.2.1), you can determine whether just the B shows, the B.2, or all three levels (B.2.1).
Omit the Initial Revision Row
- On the Revision Table Settings dialog, select the Filters tab.
- Select the Omit the initial revision row check box.
- Click OK to save your settings.
Some users find that if the initial revision value (e.g., A) is already in the title block for the revision table, having it repeated as the first revision row is unnecessary. You can configure the revision tables to omit the first revision value and start the first row with the next revision value(e.g, A.1).


