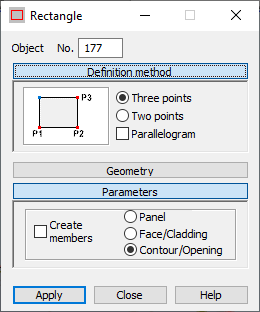
This option defines rectangles (parallelogrames). Open the Rectangle dialog using either method:
- Click Geometry > Objects > Rectangle.
- Click
 .
.

The dialog has 4 parts:
- Object field, which specifies the number of the object
- Definition Method
- Geometry
- Parameters.
When the Rectangle dialog is fully opened, clicking Definition Method, Geometry, or Parameters minimizes the corresponding part of the dialog so it displays only the options used at a given time. When the window is minimized, clicking one of the button extends the dialog.
Definition Method
Under Definition Method, the options for defining a rectangle are located.

|
The rectangle (parallelogram) is defined using 3 apexes of rectangle. |

|
The rectangle is defined using 2 opposite apexes of rectangle. |
When Parallelogram is selected, a parallelogram is defined (the angles do not need to be right angles). When cleared, a rectangle is always created.
Geometry
Coordinates for points P1, P2, and P3 can be entered in the corresponding fields under Geometry. The number of these points depends on the method used to create the rectangle. You can also specify a plane for the rectangle clicking one of the buttons: XY, XZ or YZ.
- Specify the coordinates of the appropriate apexes of the rectangle (graphically or enter them in the appropriate fields).
- Specify the coordinates for the first apex of the rectangle by clicking the P1 field (using the mouse in the drawing area or entering the coordinates of the appropriate point) and entering the length of the sides of the rectangle in the P2 and P3 fields.
Parameters
Create Members option is available only when Discretization is selected. When selected, the circle consists of member elements (individual parts of a circle will be members).
When the Create members option under Parameters is cleared, the following options become available: Panel, Face / Cladding and Contour / Opening.
- Panel - When selected, the rectangle is defined as a panel with default parameters. A number and the following panel properties: reinforcement type and thickness are assigned by default.
- Face / Cladding - When selected, the rectangle is defined as a face without the assigned properties such as reinforcement type and thickness; however, cladding parameters can be specified. This type of object can be used 2 ways:
- It can be a face of a volumetric structure (solid)
- When distributing planar loads onto members, the cladding attribute determines the method and direction of the load distribution. Arbitrary loads (planar, linear, and point loads) can be applied to a cladding, and then distributed on members.
- Contour / Opening - When selected, the rectangle is only a contour with neither panel nor cladding properties assigned. If this contour is within a panel or another contour, an opening is created in it. However, if this contour is assigned:
- Thickness, the contour is a panel.
- Cladding, the contour is a face.
To define a rectangle:
- Select a method for defining the rectangle.
- Define the coordinates for the characteristic points on the rectangle:
- Using text: Enter the coordinates for the individual points in the dialog under Geometry and click Apply.
- raphically: Click in P1 under Geometry, and switch to the graphic layout. Click on the point representing the first point on the rectangle, then click on the consecutive points.
- A method combining the graphic and text definition.