This section explains how to organize the data for a new project, including some configuration options to consider.
To set a new working folder
Set a new working folder as the location to store data shortcut projects.
The default working folder for data shortcut projects is C:\Users\Public\Documents\Autodesk\Civil 3D Projects. The default working folder is also used for Autodesk Vault projects and local (non-Vault) Survey projects.
If you work with Autodesk Vault, local Survey, and data shortcut projects, you should have separate working folders for each project type, for ease of management.
- In Toolspace, on the Prospector tab, right-click
 .
.
- Navigate to the desired folder and select it.
To create a new template for data shortcut projects
Create a new template if the sample template is not suitable.
To create your own project template, copy the default template, _Sample Project and save it with a new name. To maintain the automatic storage of new data shortcut XML files, do not change the _Shortcuts folder and its subfolders. Your new project template appears on the list of templates when you create a new data shortcut folder.
- Navigate to the folder C:\Users\Public\Documents\Autodesk\Civil 3D Project Templates.
- Copy the folder _Sample Project, then paste it in the same location and rename it. This is your new template.
- Open your new template and review the structure of folders and subfolders.
- Do not change the top-level folder, _Shortcuts, or any folders inside it, but feel free to change the names of other folders and their hierarchical structure.
To create a new data shortcut folder
Create a new folder for storing a set of related project drawings and data shortcuts.
Create a folder name, which should reflect the project name, and specify whether to use a project template to organize your data.
The figures show the structure created by the default project template.
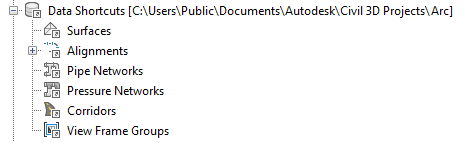
Shortcut project template: the Prospector tree icons
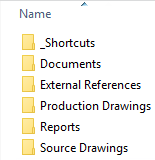
Shortcut project template: the working folder
Using a project template is a best practice that you will appreciate as your collection of projects and data expands.
![]() Tutorial Exercise: Setting Up a Data Shortcut Folder
Tutorial Exercise: Setting Up a Data Shortcut Folder
- In Toolspace, on the Prospector tab, right-click .
- In the New Data Shortcut Folder dialog box, specify a name, and optionally a text description of the project folder.
- Optionally, select Use Project Template, browse to another location for the project template folder, and click the name of a project template.
- Click OK. The new project folder is created in the working folder.
To set the data shortcuts folder
Specify the project path for data shortcuts.
The path to the current data shortcuts folder (also known as the project folder) is specified on the Data Shortcuts node in Toolspace, on the Prospector tab.
The project folder typically contains both the data shortcuts and the source objects for data references.
Data references that you create in the active drawing come from the active project folder.
Setting or changing the data shortcuts folder reloads the shortcuts into all drawings in that folder. You can reload the shortcuts to apply changes made in the Data Shortcut Editor window.
- In Toolspace, on the Prospector tab, right-click Data Shortcuts and click Set Data Shortcuts Folder.
- In the Set Data Shortcuts dialog box, click the name of the project you want to work with.
- Check that the new project path is displayed on the Data Shortcuts node on the Prospector tab.
To define the project search paths
When a drawing is opened, data shortcuts to projects are resolved based on project information stored in the current user’s (based on Windows login) ShortcutFolders.xml file, which contains working folders for the project. This file should not be edited manually, as it is maintained by the system.
If the project is not found in this file, additional search paths can be provided in the Project Files Search Path, defined on the Files tab of the Options dialog box. This may be useful in situations where multiple users on different machines want to share data across a network. In this case, shortcut projects can be placed in a server location, and search paths defined on each client machine to point to that location.
- Click
 Options.
- In the Options Dialog, select the Files tab.
- Select the Project Files Search Path item, and click Add.
- Select the newly added project, and click Add.
- Enter the search path for the data shortcuts project. The path should be in Universal Naming Convention (UNC) format.
- Click OK.