- Select a sample line. Click
 Find.
Find. - Click the Material List tab.
- If you have not yet added materials to the sample line group, add the required materials. Note: You can add material list definitions on the Material List tab, or you can use the Compute Materials command. for more information, see To Generate a Material List for a Sample Line Group.
- At the
 Material List level, click the Gap column. The Define Gaps dialog box is displayed.
 - Use Define Gaps dialog box to define a list of gaps along the alignment. In this dialog box, you define the start and end chainages of the gaps for the entire material list. In Step 7 you use the Apply Gaps dialog box to control the gaps for each individual material.
- Click OK to return to the Material List tab.
- At the
 Material level, click the Gap column. The Apply Gaps dialog box is displayed.
 - In the Apply Gaps dialog box, clear the Apply Gaps check box for any material for which gaps should not be applied. For example, if Cut or Fill material is found throughout the length of the alignment with no gaps, clear the Apply check boxes for those gaps.
- For materials for which you want to apply gaps, keep the Apply check box selected and define the Run Out and Run In distances. These distances apply to the material before and after the gaps.
In the following illustration, the green areas 1 and 2 represent gaps in the material (5). Gap 1 does not have a run out distance. However, Gap 1 has a run in distance of 40m as represented by the red area number 3.
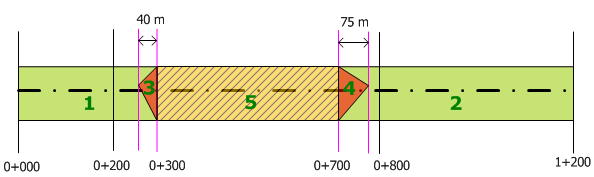
Gap 2 has a run out distance of 75m as represented by the red area number 4.
These gaps would be defined as follows:
- Start Chainage: 0+000
- End Chainage: 0+300
- Run Out Distance: 0.00
- Run In Distance: 40.00
Gap 1
- Start Chainage: 0+700
- End Chainage: 1+200
- Run Out Distance: 75.00
- Run In Distance: 0.00
Gap 2