Add a fixed transition to the end of a fixed or floating element.
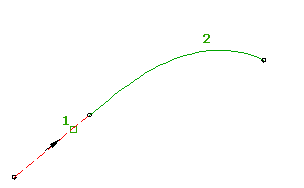
Depending on the desired solution, a fixed transition can be defined by various parameters, which cannot be edited after creation. When the attachment element (1) is edited, the defining parameter (2) does not change.
- Click the alignment. Click
 Find.
Find. - On the Alignment Layout Tools toolbar, click
 Fixed Transition.
 The current transition definition is displayed on the command line. For more information about changing the default transition definition, see To Work With Curve and Transition Settings for Alignments.
- Select the element for a start point and a direction.
- Specify the transition type: either Compound, Incurve, Outcurve, or Point.
- Specify the curve direction: either Clockwise or Counterclockwise.
- Specify a start radius by either picking two points in the drawing or entering a value on the command line. Note: If the alignment has design criteria applied to it, the minimum radius and transition length values for the current design speed are displayed on the command line. Specify new values, or press Enter to accept the minimums.
- At the prompt Specify transition in length or [A/aNgle] specify whether to define the transition by length or sweep angle.
- Specify the length or start angle by either picking two points in the drawing or entering a value on the command line.
- Specify the end radius by picking two points in the drawing or entering a value on the command line.