Moving an existing data shortcut project to Autodesk Docs must be done with care.
Multiple problems can arise if Civil 3D data shortcut projects with existing references are saved to the cloud without preparation.
Cleaning up files
Before migrating the files, perform drawing and file maintenance and management to minimise the time required to migrate and access data; not only in Autodesk Docs, but these drawing maintenance procedures should also be used with all Civil 3D drawings.
- Check for drawing errors
- Remove unused data
- Locate redundant objects
- Repair drawings
- Use Map 3D Clean-up
- Delete corrupt data
- Remove unneeded objects
For more information, see Maintaining Clean Drawings.
Using Desktop Connector to migrate existing projects to Autodesk Docs
It is recommended to move the whole project by dragging the top folder and dropping it into the destination Autodesk Docs folder on the connected drive using Windows Explorer.
This method uploads the files to Autodesk Docs using Desktop Connector, which contains functionality that uploads and relinks the xrefs and data shortcut references within a data shortcut project. By using this method, most of the file references in the project can be copied to the same folder in Autodesk Docs and the path can be maintained.
As the project is uploaded, Desktop Connector examines each file to determine its links and dependencies. Keep this in mind while uploading projects to Autodesk Docs. When first moving a Civil 3D project, expect it to take time for Desktop Connector to sync the files. It can take up to several hours (depending on internet bandwidth and the size of the project).
To migrate a data shortcut project, you need to upload all the project data including the host and source drawings. Uploading only the data shortcut project folder (_Shortcuts) or a single data shortcut .xml file to Autodesk Docs is not sufficient to migrate the project or enable collaboration in Autodesk Docs.
When you use Windows Explorer to upload data shortcut project drawings using the connected drive, the reference information in the host drawings will be automatically updated to point to the new paths in Autodesk Docs, but the information in the data shortcut .xml files will not be updated. This will not affect the data shortcut mechanism. As long as the source drawings remain in the same path relative to the working folder, the data shortcuts will be found and resolved.
Before migrating an existing project, it is recommended that you review and update your project data if needed before uploading it:
- The following are data integrity issues that impact migration:
- Duplicated data uploaded to the cloud, which will result in unexpected file overwriting.
- Incorrect data reference (DREF) or external reference (XREF) paths.
- Paths that are too long for Desktop Connector to handle (greater than 244 characters).
- Duplicated path structure.
- Desktop Connector doesn't know where to upload source files that are outside of the host's folder, so they are uploaded to a folder called Related data. This results in one source being uploaded to multiple places on Autodesk Docs makes it difficult to apply changes to all host files. For more information, see The Related Data Folder section below.
- Using file types that are unsupported by Autodesk Docs will result in a failure to upload relevant files. For information about file types that are supported in Autodesk Docs, see Supported Files in the Autodesk Docs Help.
- The following are other data issues that impact work efficiency:
- Drawing corruption.
- Redundant or unclean data.
- Check folder paths to ensure that they do not exceed the path length limit and rearrange folders if needed to shorten the path length. For more information, see Docs - Long Path in the Desktop Connector Help.
- Update the paths of references so that they are relative paths instead of absolute paths.
Note: Using relative paths can prevent issues from occurring when uploading data using the Autodesk Docs website or when uploading files that are not in the same folder structure.
- Repair broken links to references and avoid creating circular xrefs.
- Set the xref reference type to Overlay instead of Attach.
- Remove duplicate, unused or corrupt data.
- Consider rearranging the folder structure and updating links so that all files are in the same folder structure. If referenced files are not in the same folder structure as the host drawings, the referenced files will be uploaded into the Related data folder within the host drawing's folder and the links in the host drawing to the referenced files will be recreated. For more information, see The Related Data folder section below. To avoid the creation of a Related data folder, you can either move the referenced files into the same folder structure as the host drawings and update the links or you can use the following steps when uploading:
- Update the paths of the references so that they are relative paths instead of absolute paths.
- Upload the folder that contains the referenced files. When uploading folder by folder, the same relative folder structure that exists locally should be created in Autodesk Docs so that the paths to the referenced files are maintained.
- After uploading the folder that contains the referenced files, rename or move the local folder so that its location cannot be found by Desktop Connector. Renaming or moving the local folder that contains the referenced files prevents the referenced files from being uploaded to a related data folder when their host drawings are uploaded.
- Upload the folder that contains the host drawings. Upload this folder to a location in Autodesk Docs that will preserve the same relative folder structure that exists locally so that the paths to the referenced files are maintained.
Note: Even if the above requirements are met, a Related data folder may still be created for other linked files when you upload an existing project.
After the files are uploaded, you can set the working folder in Civil 3D to the Autodesk Docs project location and select the data shortcut project folder, and then proceed to review the project.
After the project is uploaded, some referenced files, such as surface data source files, may need to be relinked.
The Related Data folder
When uploading files to Autodesk Docs, it is recommended that files that are referenced by host drawings as external references or data shortcut references, and files referenced by templates, are organised inside the same folder structure as the host drawing (such as in the same folder or in a subfolder).
If referenced files are not in the same folder structure, the referenced files will be uploaded into the Related data folder within the host drawing's folder and the links in the host drawing to the referenced files will be recreated.
The Related data folder will be created inside the destination folder for the host drawing. For example, if the host drawing is named Align-4.dwg and a referenced file is located in Program Files\Autodesk\AutoCAD 2024\C3D\Help\Civil Tutorials\, a Related data folder would be created as follows: <destination folder>\Align-4\Related data\Program Files\Autodesk\AutoCAD 2024\C3D\Help\Civil Tutorials\. The referenced file will be placed inside this folder.
A message will be displayed in the Event Viewer when this occurs. You can redirect the links to data shortcuts using the Manage Data Shortcuts command.
You can move the source file from the Related data folder to another folder in Autodesk Docs. If you move the source file, the reference is maintained.
The creation of a Related data folder may cause the specified path and file name for uploaded files to exceed the limit of 244 characters. For more information, see Docs - Long Path in the Desktop Connector Help.
Clean up external references
Path clean-up should occur regardless of the type of reference. When uploading to the cloud, Desktop Connector will scan for dependencies and upload everything needed by the project. This includes aerial imagery, external point databases, point clouds, XML, DWG, DGN, PDF, Navisworks or Microsoft Excel files associated with the project.
Note that files attached via MAPIINSERT command or MAPCONNECT features will not be uploaded to Autodesk Docs automatically.
Leaving xrefs as full paths will cause Autodesk Docs to replicate your project folder structure each time it encounters the referenced file. Not only does this cause a confusing structure with unexpected folders, but it will create multiple copies of the referenced file. This can also cause folders with path lengths longer than 244 characters.
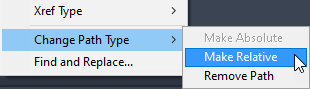
Check all project files before migrating to Autodesk Docs. In Civil 3D, verify that all external references are attached with Relative path. In the External Reference Manager, multiple files can be selected and modified using the Make Relative command.
Drawing templates
Instead of moving existing drawing templates (DWT files) that have references to files in Autodesk Docs, it is suggested that you create a new template. If you would like to move customised templates to Autodesk Docs, you will need to update references manually after uploading the template to Autodesk Docs.
References that need to be updated manually
Some files do not maintain their links when a project is migrated to Autodesk Docs. For more information, see About External Files and Data that Require Attention.