Interface
Clone panel

Contains the basic options for cloning an object.
- Object to Clone (None)
- Click this button, and then select an object in the scene to be cloned.
- How Many
- Specifies the number of clones to be generated.
- Copy/Instance/Reference
- Lets you specify how the object is cloned. It can be cloned as a copy, an instance, or a reference.
- Clone Hierarchy
- When on, all objects linked to the selected object are cloned as well, with the hierarchical structure retained intact for each clone.
- Clone Controllers
- When on, any controllers (that is, animation) associated with the selected object are cloned as well.
- Generate Clones
- Click this button to create the specified number of clones of the object whose name appears on the Object To Clone button.
Cloned objects are all created in the same location; to distribute them, you must set distribution options on the Position panel, and then click the Generate Locations button.
After you generate clones, the original object and its newly created clones are scatter objects; that is, they're selected in the list in the All Ops panel (Select Objects To Transform), and are thus subject to subsequent operations on the Position, Rotation, and Scale panels. You can change this selection via the All Ops panel
 Select Objects to Transform function or by generating clones again.
Position panel

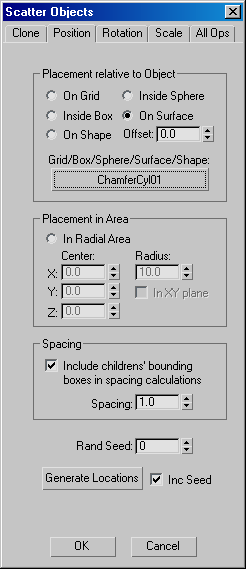
Contains options for positioning objects using a reference (distribution) object. You can distribute objects randomly over the surface of a grid or other object, along a shape, or within the volume of a box or a sphere. You can choose only one option from the first two group boxes.
Placement Relative to Object group
- On Grid/Inside Sphere/Inside Box/On Surface/On Shape
- Choose the appropriate item before selecting the reference object.
- On Grid distributes the scatter objects over the surface of a grid object.
- Inside Box and Inside Sphere distribute the scatter objects within the volume of a primitive box or sphere object, respectively.
- On Surface distributes the scatter objects over the surface of any renderable object. For example, you can create a landscape object for use as a distribution surface by applying a Noise modifier to a patch grid.
- On Shape distributes the scatter objects along a shape object: a spline or NURBS curve. If the shape consists of more than one curve, Scatter uses the lowest-numbered curve (typically the first one added).
- Offset
- When using On Surface, specifies a consistent distance above the surface (using surface normals) for distribution. Available only when On Surface is chosen.
- Grid/Box/Sphere/Surface/Shape (None)
- Click this button, and then select an object in the scene to be used as a reference object. Listed objects are limited to the chosen category.
Note: With the Grid, Box, and Sphere choices, you can use only a grid helper object, a primitive sphere, or a primitive box as a reference object. A primitive sphere or box that has been converted to a editable mesh object can't be used as a reference object. Also, the appropriate radio button (see the first item in this group) must be chosen before you select a reference object.
Placement in Area group
Contains options for positioning scatter objects in a radial area, without using a reference object.
- In Radial Area
- Distributes the scatter objects randomly in a spherical or circular arrangement, using the remaining controls in this group box.
- Center
- Specifies the center of the distribution in world coordinates.
- Radius
- Specifies the maximum distance from the center within which objects are to be positioned.
- In XY Plane
- Specifies that objects are to be distributed on the world XY plane only, resulting in a disc-like array.
Spacing group
- Include children's bounding boxes in spacing calculations
- When on, all of a hierarchical scatter object's sub-objects are considered when determining spacing. When off, only the selected object is considered.
- Spacing
- Specifies the minimum distance between scatter objects. The Spacing setting is multiplied by the size of the object's bounding sphere to determine how close objects can get. If Spacing is left at 1.0, the default, objects normally cannot be positioned within each others' bounding spheres. If Spacing is set to 2.0, objects are separated by a distance equal to or greater than the size of the bounding sphere.
- Rand Seed
- Specifies a seed value for randomizing scatter objects' locations. If, for example, you use the same value for clones of a delegate and then a master object, each pair ends up in the same place. If a scene has more than one crowd, each should use a different seed to avoid having identical configurations.
- Generate Locations
- Click this button to produce a set of locations for all scatter objects; that is, cloned objects or objects selected with the Select Objects To Transform button.
- Inc[rement] Seed
-
When on, and you click the Generate Locations button, Scatter adds 1 to the Rand Seed value, and redistributes the objects using the new random seed. Default=on.
Rotation panel

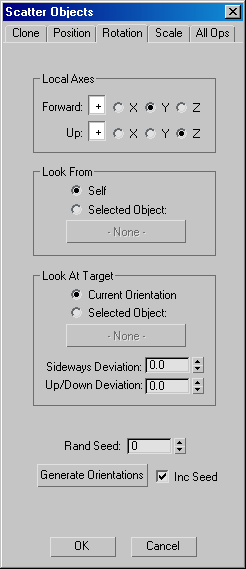
Contains options for orienting scatter objects. You can specify alternative forward and up axes, plus a target object toward which the objects will point. In addition, you can specify a source object; when using both source and target objects, the objects are rotated so they're parallel to the line between the two.
Local Axes group
Use these settings to designate alternative forward and up axes. The default settings match the delegate axes.
- Forward
- +/-/X/Y/Z: Specifies which axis of the objects points forward, for use with the Look At Target option. When the + button is active, the default condition, the positive chosen axis is used. Click the + button to use the negative axis.
- Up
-
+/-/X/Y/Z: Specifies which axis of the objects points upward; this axis is aligned with the world Z-axis. When the + button is active, the default condition, the positive chosen axis is used. Click the + button to use the negative axis.
Note: You cannot specify the same axis as Local Forward and Local Up simultaneously. If you choose an axis for one that's already chosen for the other, character studio switches the other to a different axis.
Look From group
- Self/Selected Object
-
Determines the direction from which the objects look. By default, each object looks from its own position (Self), so that when several objects are looking at a single target, each is oriented differently. To orient each object so that it's parallel to an imaginary line between two objects (the "from" object and the "to" object), choose Selected Object and specify the object with the (None) button.
- None (label)
-
When choosing Selected Object as the Look From object, use this button to specify the "from" direction. Click the button, and then select an object from which the objects are to look.
Look At Target group
- Current Orientation/Selected Object
- Determines the direction toward which the scatter objects look. By default, each object retains its current orientation. To orient each scatter object so that it's parallel to an imaginary line between two objects (the "look from" object and the "look at target" object), choose Selected Object and specify the object with the (None) button.
- None (label)
- Use this button to specify the "to" direction. Click the button, and then select an object toward which the scatter objects are to look.
- Sideways Deviation
- Sets a maximum deviation angle in degrees for the objects' sideways orientation. If the scatter objects should look in an object's general direction but may look at a spot to either side of the target, use Sideways Deviation to set the maximum amount by which they can deviate from the calculated angle. The actual deviation amount for each object is calculated at random, based on the Deviation settings and the Rand Seed setting. Range=0.0 to 180.0.
- Up/Down Deviation
- Sets a maximum deviation angle in degrees for the objects' up/down orientation.
If scatter objects should look in an object's general direction but may look at a spot above or below the target, use Up/Down Deviation to set the maximum amount by which they can deviate from the calculated angle. The actual deviation amount for each scatter object is calculated at random, based on the Deviation settings and the Rand Seed setting. Range=0.0 to 180.0.
- Rand Seed
- Specifies a seed value for randomizing the scatter objects' orientations, based on the Deviation settings.
If you use the same value for clones of a delegate and then a master object, each pair ends up with the same orientation. If a scene has more than one crowd, each should use a different seed to avoid having identical configurations.
- Generate Orientations
- Click this button to produce a set of orientations for all scatter objects; that is, cloned objects or objects selected with the Select Objects To Transform button.
- Inc[rement] Seed
- When on, and you click the Generate Orientations button, Scatter adds 1 to the Rand Seed value, and reorients the scatter objects using the new random seed. Default=on.
Scale panel

Contains options for scaling scatter objects. You can apply uniform or non-uniform scaling, with optional per-axis deviation for scaling variation.
Each axis group has a "Same As" option that lets you scale that axis by the same amount as another. To prevent non-uniform scaling, set two axes to be the same as the third. For example, set scaling in the X group, and then in the Y and Z groups, turn on Same as X.
X group
- Scale
- Sets scaling on the X-axis as a multiplier. Default=1.0.
- Deviation
- Sets the maximum factor for randomization of scaling. For each scatter object, Deviation is multiplied by a random number between 0.0 and 1.0, and then added to the Scale multiplier.
- Same As Y/Z
- Lets you use the same scaling as on the Y- or Z-axis, whether explicit or randomized. When you specify an axis, the parameters group for that axis becomes unavailable.
Y group
- Scale
- Sets scaling on the Y-axis as a multiplier. Default=1.0.
- Deviation
- Sets the maximum factor for randomization of scaling. For each scatter object, Deviation is multiplied by a random number between 0.0 and 1.0, and then added to the Scale multiplier.
- Same As X/Z
- Lets you use the same scaling as on the X- or Z-axis, whether explicit or randomized. When you specify an axis, the parameters group for that axis becomes unavailable.
Z group
- Scale
- Sets scaling on the Z-axis as a multiplier. Default=1.0.
- Deviation
- Sets the maximum factor for randomization of scaling. For each scatter object, Deviation is multiplied by a random number between 0.0 and 1.0, and then added to the Scale multiplier.
- Same As X/Y
- Lets you use the same scaling as on the X- or Y-axis, whether explicit or randomized. When you specify an axis, the parameters group for that axis becomes unavailable.
- Rand Seed
-
Specifies a seed value for randomizing the clones' scales, based on the Deviation settings. If you use the same value for clones of a delegate and then a master object, each pair ends up with the same scaling factor.
- Generate Scales
-
Click this button to scale all scatter objects; that is, cloned objects or objects selected with the Select Objects To Transform button.
- Inc[rement] Seed
-
When on, and you click the Generate Scales button, Scatter adds 1 to the Rand Seed value, and re-scales the scatter objects using the new random seed. Default=on.
All Ops panel

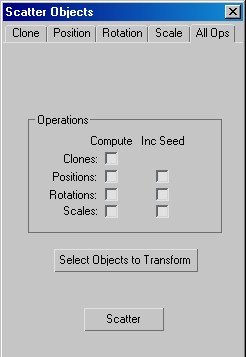
This panel lets you perform various permutations of cloning and transform operations in a single step, with or without successive randomization.
Operations group
- Compute Clones
- Turn on to clone the object chosen with the Object To Clone button. When you click the Scatter button, the object is cloned, and then any specified transforms are applied to the clones.
Turning on Clones makes the Select Objects To Transform button unavailable. The object to clone and cloning parameters must be specified on the Clone panel.
- Compute Positions/Rotations/Scales
- Any options in this column that are turned on when you click the Scatter button cause the respective transforms to be applied to the current selection (see Select Objects To Transform, below) according to the settings on the Position panel, Rotation panel, and Scale panel.
- Inc[rement] Seed Positions/Rotations/Scales
- Any options in this column that are turned on cause the respective Rand Seed settings to be incremented by 1 each time you click the Scatter button.
Use this option to experiment with various randomized transform combinations for your clones.
- Select Objects to Transform
- Lets you designate objects to be affected by clicking the Scatter button.
Clicking this button opens a version of the Select dialog that's unique to Scatter Objects functionality. If you've performed one or more cloning operations during the current session, the results of the most recent cloning are selected by default, including the original cloned object. For example, if you created 10 clones, 11 objects are selected. You can use the Select dialog to alter or replace this selection.
Note: The results of the most recent cloning operation remain selected even if you close and later reopen the Scatter Objects dialog. - Scatter
- Performs any cloning and/or transforms that are turned on.