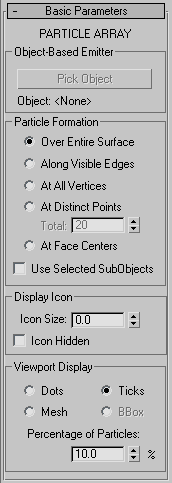
The items on the Basic Parameters rollout let you create and adjust the size of the particle system, and pick the distribution object. In addition, they let you specify the initial distribution of the particles in relation to the geometry of the distribution object, and the initial velocity of the particles from the distribution object. From here, you can also specify how the particles appear in the viewport.
Interface

Object-Based Emitter group
- Pick Object
- After you create the particle-system object, the Pick Object button becomes available. Click this button, and then click to select an object in your scene. The selected object becomes the object-based emitter, and is used either as the source geometry over which particles form, or the source geometry used to create particles that appear to be fragments of the object.
- Object text field
- Displays the name of the picked object.
Particle Formation group
These options determine how standard particles are initially distributed over the surface of the object-based emitter. These controls are available only when the picked object is used as a distribution grid for standard particles, MetaParticles, or instanced geometry; see Particle Type rollout. When Object Fragments is chosen in the Particle Type rollout, these controls are unavailable.
- Over Entire Surface (The default.) Emits particles randomly over the entire surface of the object-based emitter.
- Along Visible Edges Emits particles randomly from the visible edges of the object.
- At All Vertices Emits particles from the vertices of the object.
- At Distinct Points Places a specified number of emitter points randomly over the surface of the object.
Total Specifies the number of emitter points used when At Distinct Points is chosen.
- At Face Centers Emits particles from the center of each triangular face.
- Use Selected SubObjects
- With mesh-based emitters, and to a limited extent with patch-based emitters, limits the source of the particle stream to the sub-object selection passed up the modifier stack in the object-based emitter. For example, if your emitter object is a cylinder converted to an editable mesh, and the top cap of that cylinder is selected at the Face or Polygon sub-object level, if Use Selected SubObjects is on and Particle Formation group
 At Face Centers is on, the particles will stream only from the top cap of the cylinder. Default=off.
 The type of particle formation you specify determines the type of sub-object geometry used, as follows:
- Over Entire Surface Faces
- Along Visible Edges Edges
- At All Vertices Vertices
- At Distinct Points Faces
- At Face Centers Faces
If you’ve converted your object to an editable mesh, and selected different sub-object sections of it with vertex, edge, and face selection, as you switch particle formation options, you’ll see the particles emit from different areas of the object.
Note: Use Selected SubObjects is applicable to patch object emitters only at the patch and element sub-object levels, and is not applicable NURBS objects used as emitters.Tip: You can best see the emission patterns by first setting Speed on the Particle Generation rollout Particle Motion group to 0. Move to a frame in which the particles appear, and then choose the various particle formation options.
Display Icon group
Adjusts the display of the particle-system icon in the viewports. (The particle-system icon is usually called the "emitter." In this case, however, it doesn't actually emit particles, so we're avoiding the term.)
- Icon Size
- Sets the overall size of the icon, in units.
- Icon Hidden
- When on, the PArray icon is hidden in the viewports. Note that the icon does not render, in any case. Default=off.
Viewport Display group
Specifies how the particles are displayed in the viewports.
- Dots Displays the particles as dots.
- Ticks Displays the particles as crosses.
- Mesh Displays the particles as mesh objects. This results in slower viewport redraws.
- BBox For instanced geometry only, this displays each instanced particle, whether a single object, a hierarchy, or a group, as a bounding box.
- Percentage of Particles
- This spinner specifies the number particles displayed in the viewports as a percentage of the number of rendered particles. Default=10 percent.
Set the display percentage to 100 percent if you want to see the same number of particles as will be rendered in your scene. However, this can considerably slow viewport display.