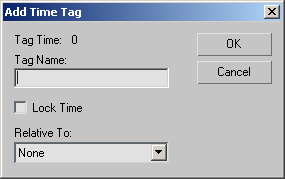
Use the Add Time Tag dialog to define a time tag for the current spot in time.
Procedures
To use time tags:
- Move to the spot in time where you want to add a tag.
- Click the Time Tag button, and choose Add Tag from the menu.
- In the Add Time Tag dialog, enter the name of the tag. Choose whether to lock it to time and whether to make it relative to another tag, and click OK.
The name of the tag appears in the tag slot, and will reappear whenever you go to that spot in time.
To jump to a defined tag, click the Time Tag slot and choose the tag name from the list.
To rename, delete, or change the properties of a tag, click the Time Tag field and choose Edit Tag.
Interface

- Tag Time
-
Displays the current frame, to which the tag will be assigned.
- Tag Name
-
Enter the name of the tag. You can create a long tag name in this field, but the tag slot will display only 15 characters.
- Lock Time
-
Locks the tag to the current frame, regardless of subsequent scaling of time.
For example, with Lock Time off, if you have a tag named "Forty" at frame 40, and you scale time up 200 percent, the Forty tag will be at frame 80. If Lock Time is on, the Forty tag remains at frame 40.
- Relative To
-
Lets you assign another tag to which the current tag will maintain a relative offset.
For example, if you have a tag at frame 10 called First and you create a second tag at frame 30 called Second, if you move the position of First to frame 25, Second will move to frame 45 to maintain the 20-frame offset between the two tags.
This is a one-way offset. If you change the time position of the second tag in the example, the first tag is not affected. Circular dependencies are not allowed: you can't have First relative to Second and Second relative to First.