Right-clicking a material or map node displays a menu that has a variety of options for displaying and managing the material or map.
The right-click menu also appears when multiple material or map nodes are selected. This way, you can apply an option to multiple nodes at once; for example, to show additional parameters for a group of nodes. If the option you choose does not apply to a node in the selection (for example, Show Material for a controller node), the option is ignored.
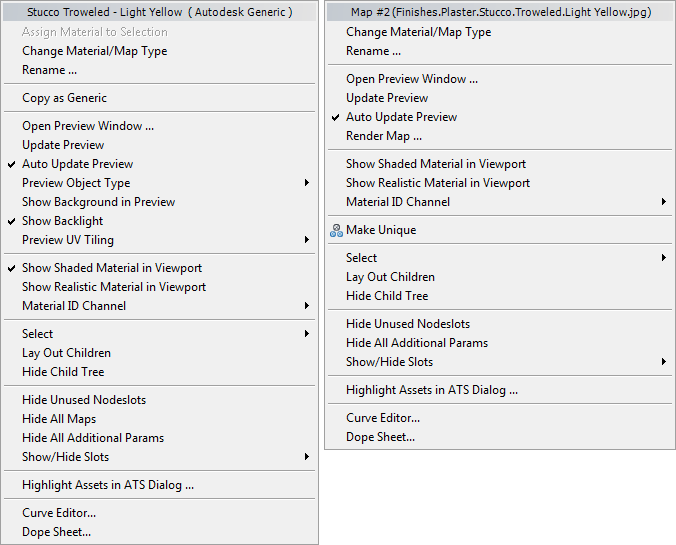
Left: Right-click menu for a material
Right: Right-click menu for a map
- Assign Material to Selection
- This choice appears only for material nodes.
Assigns the current material to all objects in the current selection.
Keyboard shortcut: A
Menu choice: Material menu
 Assign Material to Selection
Toolbar button:
 (Assign Material to Selection)
- Change Material/Map Type
- Opens the Material/Map Browser as a dialog so you can choose a different type for the material or map.
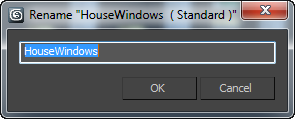
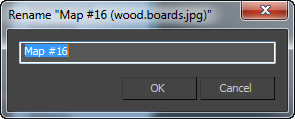
- Rename
- Opens a dialog that lets you rename the material or map.
- Edit Bitmap
- This choice appears only for map nodes that are Bitmaps.
If you have specified a bitmap editor such as Paint or Photoshop, choosing Edit Bitmap launches that editor and opens the current bitmap in the editor.
You can specify a bitmap editor in the Slate Material Editor Options dialog.
If you have not specified a bitmap editor before, 3ds Max opens a file dialog that lets you choose one. This program then becomes the default bitmap editor.
_____
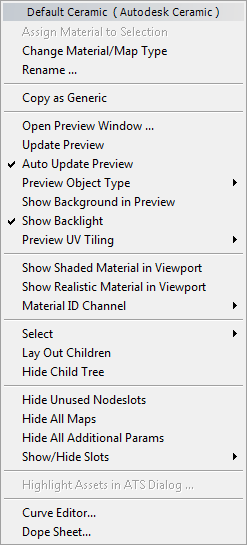
Right-click menu for an Autodesk Material node
- Copy as Generic
- Appears for Autodesk Material nodes other than an Autodesk Generic node. Converts the Autodesk Material to an Autodesk Generic node, and displays the node in the active View of the Slate Material Editor. If the original material includes maps, the map nodes are copied as well.
This option can lose some type-specific information. For example, Autodesk Generic does not have a Flecks component such as Autodesk Metallic Paint does.
_____
- Open Preview Window
- Opens a Preview window.
- Update Preview
- When Auto Update Preview is off, use this to update the preview in the title bar of the node.
Note: This choice affects only the title bar of the node. Open Preview windows have their own Auto/Update controls, which are independent of the node display.
- Auto Update Preview
- When on, changes to material settings automatically update the preview in the title bar of the node. Default=on.
Note: This toggle affects only the title bar of the node. Open Preview windows have their own Auto/Update controls, which are independent of the node display.
When Auto Update Preview is turned off, a small “not” icon appears in the preview on the title bar of the node.

Preview icon when Auto Update is turned off
- Render Map
- This choice appears only for map nodes. Opens the Render Map dialog so you can render a preview of the map, possibly animated.
To view a preview of an animated map, save the preview to a file, then use Rendering
View Image File.
- Preview Object Type
- This choice appears only for material nodes.
Lets you choose the sample object that appears in previews:
- Sphere (The default.)
- Cylinder
- Box
Note: This choice applies to both open Preview windows and the title bar of the material node. - Show Background in Preview
- This choice appears only for material nodes.
Turning on Show Background In Preview adds a multicolored checkered background to the Preview window for that material. The pattern background is helpful when you want to see effects of opacity and transparency. Default=off.
Note: This choice applies to both open Preview windows and the title bar of the material node.
Left: Background on
Right: Background off
Toolbar button:
 (Show Background in Preview)
- Show Backlight
- This choice appears only for material nodes.
When on, previews show a backlight. When off, the backlight is turned off. Default=on.
Note: This choice applies to both open Preview windows and the title bar of the material node.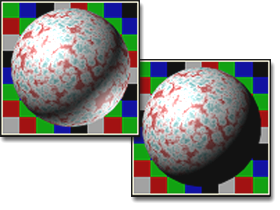
Left: Backlight on
Right: Backlight off
The effect is most easily seen with the sample spheres, where the backlight highlights the lower-right edge of the sphere.
Backlight is especially useful whenever you're creating metal and Strauss materials. Backlight lets you see and adjust the specular highlight created by glancing light, which is much brighter on metals.
- Preview UV Tiling
- This choice appears only for material nodes.
Adjusts the repetition of the map pattern on the sample object in previews.
Note: This choice applies to both open Preview windows and the title bar of the material node.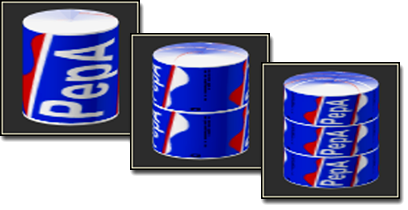
1x1, 2x2, and 3x3 sample tiling
The tiling pattern you set with this option affects only previews. It has no effect on the tiling on the geometry in the scene, which you control with parameters in the map's own coordinates rollout.
- 1x (The default.) Tile once in both the U and V dimensions. This is equivalent to no tiling at all.
- 2x Tile twice in U and V.
- 3x Tile three times in U and V.
The choices specify the number of times the pattern repeats over the surface of the sample object. Because maps are mapped spherically around the sample sphere, the tiling repetition covers the entire surface of the sphere. The sample cylinder maps cylindrically. The sample box uses box mapping: The tiling appears on each side of the cube.
_____
- Show Shaded Map in Viewport
- When on, 3ds Max displays the map in viewports. When off, viewports don’t show the map, and display only the material’s underlying color. Default=off.
For a legacy viewport driver (not Nitrous), if the map is assigned to more than one material (or more than one component of the same material), the Slate Material Editor opens a pop-up menu that lets you choose the material for which the map will be displayed or hidden in viewports. This also happens if the node is a material used as a sub-material by more than one material.
Toolbar button:
 (Show Shaded Map in Viewport)
- Show Realistic Map in Viewport
- Uses the hardware display and enables viewport display of all maps for the active material. Default=off.
For a legacy viewport driver (not Nitrous), if the map is assigned to more than one material (or more than one component of the same material), the Slate Material Editor opens a pop-up menu that lets you choose the material for which the map will be displayed or hidden in viewports. This also happens if the node is a material used as a sub-material by more than one material.
Note: If you are using a legacy viewport driver instead of Nitrous, these options read "Standard" and "Hardware" rather than "Shaded" and "Realistic," as they did in versions of 3ds Max prior to 3ds Max 2012.Toolbar button:
 (Show Realistic Map in Viewport)
- Material ID Channel
- The choices on this submenu tag a material as a target for a Video Post effect or a rendering effect, or for storing with a rendered image saved in RLA or RPF file format (so that the channel value can be used in a post-processing application). The material ID value is the counterpart of a G-buffer value for objects.
Zero (#0), the default, indicates that no material ID channel is assigned.
A value from #1 to #15 means to apply a Video Post or rendering effect that uses this channel ID to this material.
For example, you might want a material to glow wherever it appears in the scene. The material is in the Material Editor and the glow comes from a rendering effect. First, you add a Glow rendering effect and set it up so that it operates on ID #1. Use Material ID Channel to give the material an ID number of #1, then apply the material to objects in the scene in the usual way.
To save the channel data with the rendering, use the RLA or RPF format.
_____
- Make Unique
- This appears if you right-click a map node that is an instance. (Branching output wires indicate an instanced map.) Make Unique makes the node unique by duplicating it.
This choice is equivalent to Make Branch Unique on the right-click menu for a wire: Children of the node you are duplicating are duplicated as well.
_____
- Select
-
- Select Children Selects the children of the node you right-clicked.
- Deselect Children Deselects the children of the node you right-clicked.
- Select Tree Selects all nodes that belong to the tree whose node you right-clicked.
-
Select by Material (This choice appears only for material nodes.)
Select By Material allows you to select objects based on the active material in the Material Editor. Choosing this command opens the Select Objects dialog, which works like Select From Scene . All objects that have the selected material applied to them are highlighted in the list.
Note: Hidden objects don't appear in this list, even if the material is applied to them. However, in the Material/Map Browser, you can choose Browse From: Scene, turn on By Object, and then browse from the scene. This lists all objects in the scene, hidden and unhidden, along with their assigned materials.Toolbar button:
 (Select by Material)
- Lay Out Children
- Automatically arranges the layout of the children of the currently selected node.
Keyboard shortcut: C
Menu choice: View
Lay Out Children
Toolbar button:
 (Lay Out Children)
- Hide Child Tree
- When on, the View hides children of the currently selected node. When off, child nodes are displayed. Default=off.
When child nodes are hidden, you can tell which slots have maps, because their sockets are displayed in green instead of blue.

Green-colored sockets indicate that even though child nodes are hidden, the first two slots of this material have a map.
_____
- Hide Unused Nodeslots
- For a selected node, toggles display of the unused slots when the node is expanded.
Keyboard shortcut: H
Menu choice: View
Hide Unused Nodeslots
Toolbar button:
 (Hide Unused Nodeslots)
- Hide/Show All Maps
- Hides or shows all map slots for this node.
The nodes themselves remain visible, but the wires to them are hidden, and the node is collapsed or expanded.
- Hide/Show All Additional Params
- Hides or shows the Additional Param[eter]s section for this node.
- Hide/Show All mr Connection
- Hides or shows the mr Connection section for this node.
- Show/Hide Slots
- Displays submenus that let you choose which material or map components to display as node slots.
- Maps (Appears only for materials, and for maps that have mappable components.) This submenu lists the individual mappable components of the material or map, such as color values and numeric settings. Choose a component to either hide it or display it.
- Additional Params This submenu lists the additional, nonmappable settings for the material or map. Choose a component to either hide it or display it.
When Additional Parameters or mr Connection settings are displayed, they have their own Open/Close (+/–) icon, like the node itself.
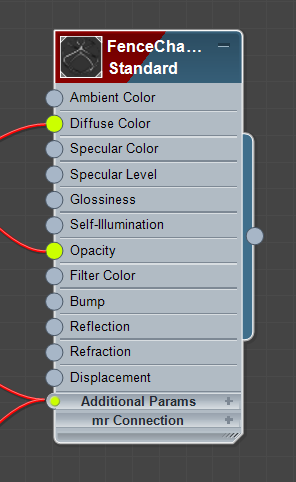
A node with the Additional Params displayed but closed
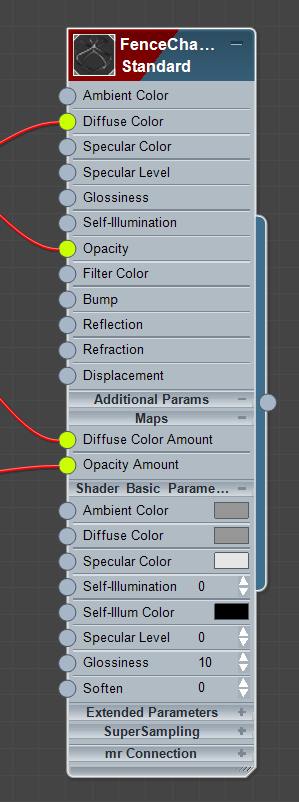
The same node with the list of Additional Params
Shader Basic Params group openedNote: You can edit the value of additional parameters in the node display itself. In general, though, it is easier to edit parameters using the Parameter Editor.Both the Maps and Additional Params submenus have two choices that follow the individual component entries:
- Show All Shows all maps or additional parameters.
- Hide All Hides all maps or additional parameters.
_____
This section of the menu appears only if there are multiple views.
- Move Tree to View
- Moves the tree to which the node belongs to the View you choose. A submenu shows the names of Views that are not active.
- Make Unique
- If you right-click a material node that has an instance on another View, this gives you the option to make the current material unique, or to shift focus to the other instance. These choices are on a submenu:
- Make Unique Makes the current material instance unique.
- Pan to Instance on [View] Changes focus to the instance on the View you choose. The chosen View becomes the active View.
There are as many of these entries as there are instances of the map on other Views.
_____
- Highlight Assets in ATS Dialog
- Opens the Asset Tracking dialog, which shows the status of external files used by Bitmaps. If you click this option for a Bitmap node, the associated file is highlighted in the Asset Tracking dialog.
_____
- Curve Editor
- Opens Track View in the Curve Editor mode. If the material or map has animation, the animated track is displayed. If the material or map has multiple animated tracks, only the first is displayed, and you must navigate in the Controller window to find the others.
- Dope Sheet
- Opens Track View in the Dope Sheet mode. If the material or map has animation, the animated track is displayed. If the material or map has multiple animated tracks, only the first is displayed, and you must navigate in the Controller window to find the others.