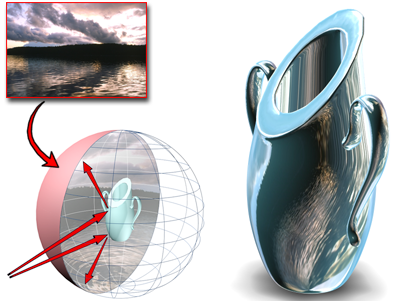
You can use a bitmap file or procedural map to control the reflectivity of an object surface.

Click the Material Editor icon on the Main toolbar or press M. Click and hold the icon to show the flyout.

Using a Reflection map
You can use three kinds of Reflection maps: basic, automatic, and flat-mirror.
- A basic Reflection map creates the illusion of chrome, glass, or metal by applying a map to the geometry so that the image looks like a reflection on the surface.
- An automatic Reflection map does not use mapping coordinates, but instead looks outward from the center of the object and maps what it “sees” onto the surface.
Another way to generate reflections automatically is to assign a Raytrace map to be the reflection map.
- A flat-mirror Reflection map is applied to a series of coplanar faces and reflects objects facing it, exactly like a real mirror.
The most common use of Reflection maps in a realistic scene is to add just a touch of reflection to an otherwise non-reflective surface. By default, Reflection map strength is 100 percent, as it is for other maps. For many kinds of surfaces, however, reducing the strength gives the most realistic result. A polished table top, for example, primarily shows a wood grain; the reflections are secondary.
Reflection maps don't need mapping coordinates because they're locked to the world coordinate system, not to the geometry. The illusion of a reflection is created because the map doesn't move with the object, but with changes in the view, as do real reflections.
Reflection maps look more realistic if you increase the Glossiness and Specular Level values in the Basic Parameters rollout. They are also affected by the diffuse and ambient color values. The darker the color, the stronger the mirror effect.
Even when the Amount spinner is at 100, the Reflection map is tinted by the ambient, diffuse, and specular colors.
Procedures
To create an automatic reflection:
- Click the map button labeled Reflection.
3ds Max opens the Material/Map Browser.
- Choose Maps
 Standard
  Reflect/Refract, and then click OK.
Alternatively, you can use the
 Slate Material Editor to
wire a Reflect/Refract map node to the Reflection component.
- On the parent materials’ Maps rollout, adjust the Amount to control how reflective the material is. At 100 percent, the material is fully reflective.
To use a bitmap as a Reflection map:
- Click the map button labeled Reflection.
- 3ds Max opens the Material/Map Browser.
- Choose Maps
 Standard
  Bitmap, and then click OK.
Alternatively, you can use the
 Slate Material Editor to
wire a Bitmap node to the Reflection component.
3ds Max opens a file dialog.
- Use the file dialog to choose the bitmap file.
- On the parent materials’ Maps rollout, adjust the Amount to control how reflective the material is. At 100 percent, the material is fully reflective.