You can use a bitmap file or procedural map to apply an image to the material's specular color component. The map's image appears only in the specular highlight areas.

Click the Material Editor icon on the Main toolbar or press M. Click and hold the icon to show the flyout.
-

 Material Editor > Standard Material > Maps rollout > Specular button
-
Material Editor > Raytrace Material > Maps rollout > Spec. Color button
-
Material Editor > Arch & Design Material > General Maps rollout > Main Maps group > Reflection Color button
-
Material Editor > Other materials that have a Specular Color component
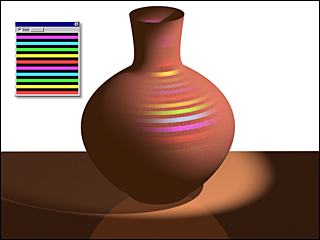
Using a map to define the specular highlight
When the Amount value on the Maps rollout is 100, all specular color is provided by the map.
Use Specular maps primarily for special effects such as placing an image in a reflection. The important thing to remember is that, unlike Specular Level or Glossiness maps, which alter the intensity and location of specular highlights, the Specular map alters the color of specular highlights.
Procedures
To map the specular color:
- Click the map button for Specular Color.
3ds Max opens the Material/Map Browser.
- Choose from the list of map types, and then click OK.
(If you choose Bitmap as the map type, 3ds Max opens a file dialog that lets you choose the image file.)
- Use the map controls to set up the map.
Alternatively, you can use the
![]() Slate Material Editor to
wire a map node to the Specular Color component.
Slate Material Editor to
wire a map node to the Specular Color component.