The Grid Distribution Method creates a uniform set of clones in a 1D, 2D, or 3D grid pattern.

 Modify panel > Make a selection >
Modifier List > Object-Space Modifiers > Array >
Distribution rollout >
Grid
- Default menu: Make a selection > Modifiers menu > Parametric Deformers > Array > Distribution rollout > Grid
The Grid Distribution Method creates a uniform set of clones in a 1D, 2D, or 3D grid pattern. The following example uses the Grid Distribution method to create a set of chairs. See
Create a set of chairs using the Array Modifier for a detailed workflow example.


Interface
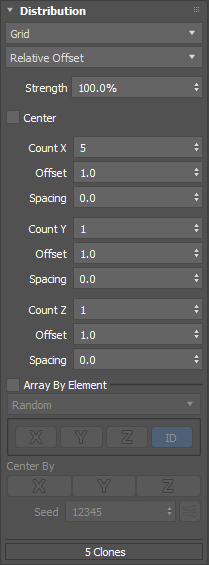
- Layout method
- Lets you select the way clones are arrayed in the viewport.
Note: The options that appear below the Layout method drop-down list update dynamically based on your selection.
-
- Total Dimension
- Creates the number of clones defined in the Count X, Count Y, and Count Z parameters and places them within the specified Width, Length, and Height.
- Relative Offset
- (Default) Creates the number of clones defined in the Count X, Count Y, and Count Z parameters, and places them relative to the source object's bounding box.
- When
Offset for the X, Y, or Z axis is set to 1.0 (default), each clone is placed next to each other.
Note: An Offset value that is less than 1.0 can cause clones to overlap. An Offset value that is greater than 1.0 introduces a space between the clones.
- Fill
- Creates the number of clones required to fill the specified
Width,
Length or
Height. New clones are inserted or removed at the end of the array.
Tip: You can use the Offset and Spacing parameters to adjust the number of clones that can fit within the specified Width, Length, or Height.
- Strength
- Sets the position of the clones relative to the array's origin. The default value is 100%.
- Center
- Repositions the array so it is centered around the original object's origin. This parameter is off by default.
- Dynamic Spacing
- Available only in the Fill Layout method.
- Inserts new clones between the first and last clone instead of appending clones to the end of the array.
- Count X, Y, Z
- Sets the number of clones placed along the local X, Y, or Z axis.
- Width, Length, Height
- Sets a fixed Width, Length, and Height within which clones are placed.
- Offset
- Sets the distance to the next clone on the X, Y, or Z axis in relative clone dimensions. The default is 1.0.
- Spacing
- Sets the distance between each clone on the X, Y, or Z axis. Spacing is measured in
display units.
Tip: The Spacing parameter can reproduce the effects of the Offset parameter, but it is especially useful when a specific numerical distance is required.
- Array By Element
- If the source object has multiple elements and this option is enabled, you can select from the following Array By Element methods to control the arrangement of clones.
- Random: Each element is randomly used as a potential clone. In the following example, a 5 (Count X) x 5 (Count Y) x 1 (Count Z) is used.
-
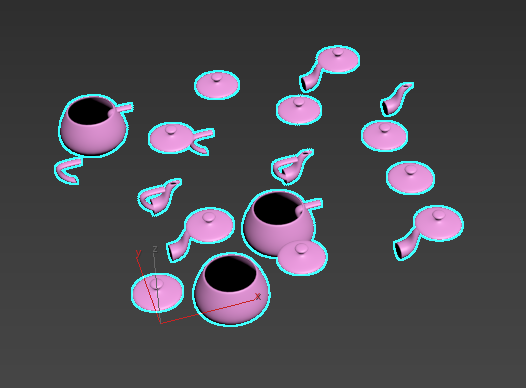 Tip: This option can be used to create a collection of objects, like books in a bookcase or bricks in a wall.
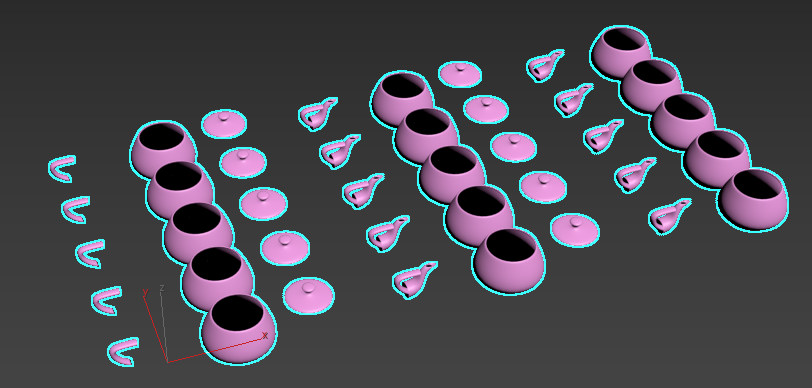
 - Ordered: Elements are arranged in sequential order based on a selected orientation (X, Y, Z) or Clone IDs. In the following example, the elements of the teapot appear in sequential order along the X-axis, repeating after the array has cycled through all four elements. A 10 (Count X) x 5 (Count Y) x 1 (Count Z) grid is used.
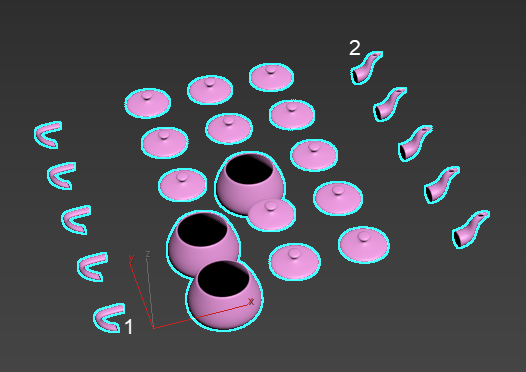
- First Middle Last: The first and last clone remain the same, and the remaining clones are arranged randomly. In the following example element 1 is the first clone and element 2 is the last clone. The other clones in these rows along the X-axis. A 5 (Count X) x 5 (Count Y) x 1 (Count Z) is used.
Note: A First Middle Last arrangement requires at least four elements in the object to provide the expected result.
- Center By
- When Array By Element is enabled, Center By is also enabled.
- Sets the pivot of each clone on the X, Y, and/or Z axis to its center. Multiple axes can be selected simultaneously.
- When creating an array composed of elements to be used as clones this makes it easy to lay out the individual elements along an axis so that they don't need to reside at the same location relative to the pivot. When disabled, each element uses its relative position to the source object's pivot point.
- Pack Elements
- Available only in the Fill layout method.
- Tightly packs clones along the X axis. When enabled, the first clone moves, so its minimum X position is aligned to the pivot of the source object.
Tip: This is useful if the elements have varying widths, because they are placed as close together as possible.
- Seed
- Sets a random number seed for the selection of elements to be used as clones.
- Seed Randomization
- Click
 to randomize the seed value.