The OpenColorIO color-space assignment rules automatically assign an initial color space to input image files based on string patterns in their file names or paths. You can edit the rules to match the color spaces and file-naming conventions that you typically use. Image-based textures get converted from the assigned input space to the rendering space for shading calculations. When you specify an image to use as a texture in a scene, you can always set its color space manually if the automatically-assigned color space is incorrect.
- Basic rules use glob syntax to match a pattern in a file's full path and name and/or a pattern in its extension. They are easy to understand and create, but lack flexibility — for example, two separate rules are required to match both the .jpg and .jpeg extensions.
- Regex rules use regular expressions to match a pattern anywhere in a file's full name including its path and extension. This allows for additional capabilities if you are familiar with regex.
- The Default rule cannot be moved or deleted but you can change the color space that it assigns. The Default rule is always applied last if no other rule matches. In 3ds Max's default config, it assigns images to the color space that has the "default" role, which is sRGB in that config.
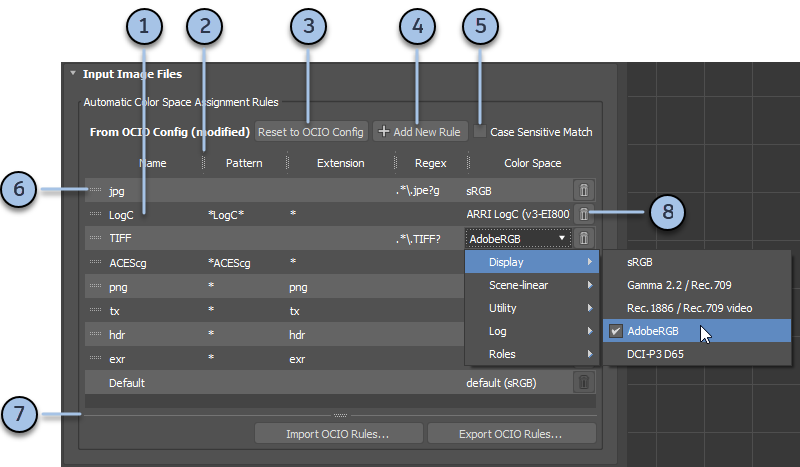
- Double-click in a table cell to modify a rule's Name, Pattern, Extension, Regex string, or the Color Space that it assigns. A rule can be basic or regex-based but not both — if you set Pattern or Extension then the Regex column is automatically cleared and vice versa.
- Drag a vertical separator in the table's header to resize the columns.
- If the rules have been modified from those stored in the active OCIO config file, you can click Reset to OCIO Config to discard all modifications.
- Click Add New Rule to add another row for a new rule to the top of the table.
- Set Case Sensitive Match to control whether the Pattern and Regex strings are treated as case-sensitive when matching file names. The Extension string is not case-sensitive unless it contains glob tokens — for example, [e][x][r] matches "exr" but not "EXR".
- Drag one of the grippers at the left of a row to reorder the rules. The rules are tested in order from top to bottom. The first rule that matches a file is the rule that gets applied.
- Drag the horizontal bar at the bottom to resize the table.
- Click the trash-can icon to delete the corresponding rule.
A rule's name is used for identification only. It gets shown in the Select Bitmap Image File dialog and other places to indicate which rule was responsible for assigning a color space automatically. Each name must be unique.
Whenever the rules change, any existing textures whose color space was set to Automatic get re-assigned as appropriate. Textures whose color space was set manually do not change.
Basic Rules
To edit a basic rule, enter strings to match in the Pattern and Extension columns using glob syntax. Set Pattern to * if you want a rule to consider only the extension, or set Extension to * if you want a rule to consider only a file's path and name.
The following table summarizes the glob syntax used for matching strings:
| String | Pattern | Example |
|---|---|---|
| ? | Any one character. | ?pecular matches specular and Specular, as well as Xpecular and many others. |
| * | Zero or more characters. | *diffuse matches
diffuse at the end of the path.
diffuse* matches diffuse at the beginning of the path. *diffuse* matches diffuse anywhere in the path. Tip: Put an asterisk at the beginning of every pattern so that image files get matched in any directory.
|
| [chars] | Any one of the specified characters. | *[nN]ormal* matches normal or Normal anywhere in the path. |
| [char1-char2] | Any character in the range. | *[0-9] matches any path ending with a numeral. |
| [!chars_or_range] | Any character except those specified. | *[!0-9] matches any path that does not end with a numeral. |
| / | Escapes the next character, that is, treats the next character as a literal, instead of part of the pattern matching syntax. | */[*/]* matches a pair of square brackets anywhere in the path. |
Regex Rules
- .* matches any character any number of times (in this situation, any arbitrary path and file name), then
- \. matches a literal period, then
- jp matches the letter j followed by the letter p, then
- e? matches an optional letter e, then
- g matches the final letter g.
Sharing Rules Between Scenes
You can share rules between scenes by exporting them from one scene and then importing them into others. The scenes should use the same config, or at least the automatically-assigned color spaces should exist with the same names in all configs used by the scenes. If an imported rule refers to a color space that is not defined in the current config, the automatically-assigned space is set to the default space and messages appear on the Color Management tab of the Render Message Window.
As an alternative to these procedures, you can set up all of the color-management settings and then click Save As System Defaults. In this way, all settings including the rules are used by new scenes. Then to import the rules and all other settings into an existing scene, open the scene and click Load System Defaults.
To export color-space assignment rules
- Edit the color space assignment rules to match your file-naming conventions and the color spaces that you typically use as closely as possible.
- Click Export OCIO Rules.
- Select a file name and location for the exported config. The new .ocio file contains the current rules together with the spaces, transforms, and other settings of the current config.
Note that if you want to use the new file as a config on its own rather than simply as a container for transferring rules, you should save it in the same folder as the current config so that the files for any externally-defined color transforms can be found at the same relative locations — this is not a requirement when using 3ds Max's built-in config because the transforms are embedded in the file.
To import color-space assignment rules
- Open a scene whose rules you want to replace.
- Click Import OCIO Rules.
- Select the .ocio or .ocioz file that contains the rules you want to import.
If an imported rule refers to a color space that is not defined in the current config, the automatically-assigned space is set to the default space and messages appear on the Color Management tab of the Render Message Window.