The Color Management Settings dialog controls how colors are transformed for input, rendering, and display.
The Color Management Settings dialog is modeless and dockable. By default, the viewports and interface update immediately as you change options — to revert the last change, press Ctrl+Z to undo in the normal way. When you are done, simply close the dialog.
Alternatively if you prefer the changes not to be applied immediately, you can turn off Apply Color Management Changes automatically and then click Apply Color Management Settings to update the scene once you have finished changing options.

You first select a Color Management Mode and then set options for the selected mode. The color management settings are saved with each scene, and the saved settings are used when each scene is re-opened.
- Click Save As System Settings to use the current settings as the default for new scenes.
- Click Load System Defaults to restore the last-saved system settings.
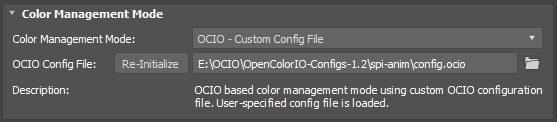
Color Management Mode
The mode controls which color management system to use for the scene, and the dialog box updates to reflect the settings that are available for each mode. For information about the principles of color management and the differences between the modes, see Color Management.
- Unmanaged
- Not recommended. No color management is performed. Instead, all colors are treated as raw, untransformed values for input, rendering, and display. There are no options for this mode.
- Gamma Workflow
- The legacy gamma-based color management mode. Colors are treated in the same way as in versions of 3ds Max prior to 2024. Gamma encoding is removed from color inputs, and then re-applied for display and output after the lighting calculations have been performed. This mode assumes that the primaries of the monitor are Rec.709/sRGB and those primaries are also used for rendering. See "Gamma Workflow options" below.
- OCIO - 3ds Max Default
- OpenColorIO-based color management using 3ds Max's built-in configuration file. This configuration is based on ACES, the Academy Color Encoding System. It offers a choice of color spaces and transforms that are suitable for a modern pipeline. See "OCIO options" below.
- OCIO - Custom Config File
- Similar to OCIO - 3ds Max Default but with the option to specify a custom configuration file, such as one that has been especially developed for your project or studio. See "OCIO options" below.
- OCIO - Environment Variable
- Uses the configuration file specified by the
OCIO environment variable. This is an environment variable that can be set to the path and name of a configuration file to be used by various OCIO-enabled applications in order to ensure consistency across a content pipeline. See "OCIO options" below.
Note: If the OCIO environment variable has not been set to the full path of a valid OCIO config file on your system, the Description includes the message "No config file is loaded..." and colors will not be managed.
Gamma Workflow options
There is only one option for the Gamma Workflow mode.
- Gamma
- Enter the gamma value for compensating between display code values and display luminance. The default gamma of 2.2 closely approximates the sRGB gamma curve.
OCIO options
- OCIO - Custom Config File requires you to enter a path for OCIO Config File.
- OCIO - 3ds Max Default does not have a Re-Initialize button since it does not use variables.
In all OCIO-based modes, the choices in the drop-down menus reflect the color spaces and transforms defined in the config file (either 3ds Max's built-in config or another one).
When using an OCIO mode, it is recommended to use <no exposure control> for the Exposure Control. For more details, see Exposure and Color Management.
- OCIO Config File
- Specifies the absolute path and name of an OCIO configuration file (.ocio) or archive file (.ocioz) that defines the available color spaces, transforms, and other options. This file must be available for all machines used to edit and render the scene.
With OCIO - Environment Variable, this text box displays the resolved path of the OCIO environment variable and cannot be edited.
Note: If there are any issues loading the specified config file, messages appear on the Color Management tab of the Render Message Window. - Re-Initialize
- Updates the spaces and transforms in memory from the config file on disk. Click this button, for example, if you have a config file that uses context variables like $shot that have been changed or if the config file has been changed in any other way during the current session of 3ds Max.
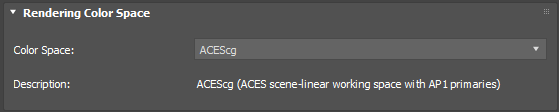
Rendering Color Space
- Color Space
-
The color space in which shading calculations are performed. Color inputs are transformed into this space for rendering, and rendered images are transformed from this space for viewing.
 The following rendering spaces are available in 3ds Max's default config file — all of them are scene-linear (that is, values are directly proportional to the amount of light energy in the scene), which is necessary to be compatible with modern renderers. If you are using a custom config, different spaces may be available.
- ACEScg: ACES scene-linear working space using the AP1 primary chromaticities for red, green, and blue. This color space is part of the Academy Color Encoding System, and is designed to be appropriate for computer graphic operations like compositing and 3D rendering. It encompasses both the Rec-2020 gamut and the DCI-P3 gamut for a range of white points.
- scene-linear Rec.709-sRGB: A working space that uses the same primaries as sRGB and HDTV (Rec. 709), but with scene-linear color values. This is a common rendering space but it has a very limited gamut, meaning that it can represent only a relatively small range of colors when compared to digital cinema or film. For this reason it is often desirable to use a rendering space with a wider gamut, especially when rendering 3D elements that will be composited together with footage from digital cameras or scanned film plates.
- scene-linear DCI-P3 D65: A working space that uses the same primaries as a DCI/SMPTE "P3" reference projector, but with scene-linear color values and the D65 white point. The advantage of using this color space is that it can represent all the colors available on a modern projector. In addition, there is little risk of producing colors that are out-of-gamut for a projector, which might cause unpleasant surprises if the content is ever viewed in the future on a device with a wider gamut.
- scene-linear Rec.2020: A working space that uses the same primaries as UHDTV and HDR TV, but with scene-linear color values. The standard for HDR TV is actually Rec.2100, but it uses the same primaries. This space can represent any color that is theoretically possible for UHDTV or HDR TV, but since the Rec.2020 primaries are on the spectral locus there are no actual displays that are able to accurately show the full gamut of colors.
Note: Any literal color values (including solid colors and other color parameters) in the scene are assumed to be in the rendering space, but they are not converted when you change the rendering space in a scene that has already been set up. This can result in final colors that were not intended, so it's best to set up color management at the start of a new scene or project.
Displays and Views
Controls how the color values of the rendering space values appear in various windows and UI elements. Use Global Default to control all elements at once, or turn on Show Advanced Settings to set options for various elements individually.
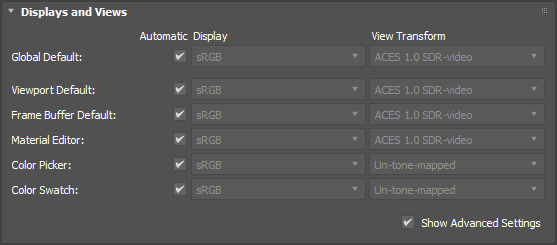
- Global Default: Controls any of the individual elements (available when Show Advanced Settings is on) that are set to Automatic. Note that Color Picker and Color Swatch have a different default for View Transform.
- Viewport Default: The default settings for the viewports. You can change the settings for a specific viewport on the Color Management tab of the Active Viewport Settings dialog box available from the Shading viewport label menu. Note that the Color Management tab is available on the Active Viewport Settings dialog box only when using an OCIO color management mode.
- Frame Buffer Default: The default settings for the Rendered Frame Window. You can change these on-the-fly on the Rendered Frame Window's toolbar.
- Material Editor: The settings for thumbnails in the Material Editor.
- Color Picker: The settings used by the Color Selector dialog box.
- Color Swatch: The settings used by color swatches. Note that some swatches are not color-managed, such as object color.
- Automatic
- Uses the Global Default settings or in the case of Global Default itself, uses the default choices from the OCIO configuration file. Turn Automatic off to set Display and View options manually.
- Display
- Select the option that best matches the calibration state of your display. The choices available in
3ds Max's default config file are listed below. If you are using a custom config, your choices may be different.
- sRGB: sRGB primaries and gamma.
- Gamma 2.2/Rec. 709: Rec. 709/sRGB primaries and a gamma of 2.2.
- Rec. 1886/Rec. 709: Rec. 709 video.
- AdobeRGB: Adobe RGB (1998) color space.
- DCI-P3 D65: digital cinema "P3" projector with an artistic white point of D65.
If you are using a custom config, select Display before selecting View Transform because the available views might depend on the display. This is not the case for 3ds Max's default config file, however.
- View Transform
- Select the view transform (tone map) to convert the scene-referred colors from the rendering space to display-referred colors for previewing. For normal previewing, choose the same transform that will be used for the final image. The choices available in
3ds Max's default config file are listed below. If you are using a custom config, your choices may be different.
- ACES 1.0 SDR-video: Applies the ACES tone map for standard-dynamic-range video. This uses an S-shaped curve to roll off the highlights leaving room near 1 for very bright values. It also boosts the saturation and contrast to give the sort of response that's familiar from digital cinema and photography.
- Un-tone-mapped: Displays the rendering-space values directly on the display device with no tone-mapping. Values above 1.0 are simply clipped before being encoded for display. This is how many image-editing applications display images.
- Log: Applies a logarithmic tone map for diagnostic purposes. This is useful for showing a wide range of colors from very dark to very bright at the same time.
- Raw: Shows the untransformed rendering-space values for diagnostic purposes. No gamma is applied for display.
Input Image Files
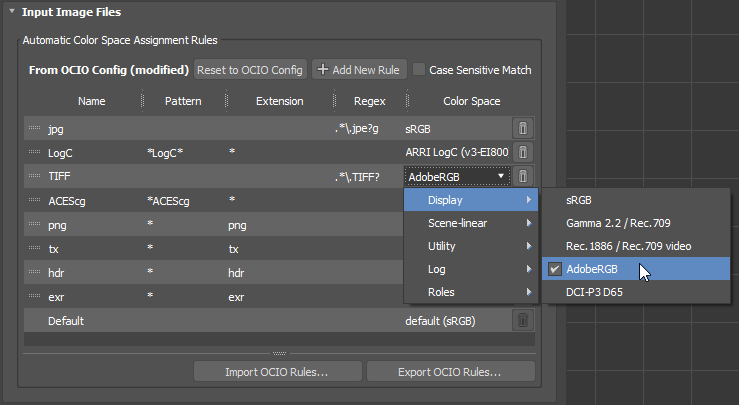
- Automatic Color Space Assignment Rules
- The table shows the rules that automatically assign color spaces to input images based on file name and path. Image-based textures are converted from the assigned input space to the rendering space for shading calculations. Note that when you specify an image to use as a texture in a scene, you can always change the automatically-assigned color space if it is incorrect.
- The initial rules are defined in the configuration file, but you can edit them here to match the color spaces and file-naming conventions that you typically use. For the full details, see
To Edit Color-space Assignment Rules.
- Double-click in a table cell to change a rule's name, file name pattern, extension, regex pattern, or the color space that it assigns. Note that a rule can be based either on a file's full path and extension using glob syntax, or using regular expressions (regex), but not both. If you modify Pattern or Extension, the Regex column gets cleared automatically and vice versa.
- Click Add New Rule to add a row for a new rule at the top of the list.
- Drag one of the grippers at the left of a row to reorder the rules. The rules are tested in order from top to bottom. The first rule that matches a file is the rule that gets applied. Note that the Default rule cannot be moved and is always applied last if no other rule matches. In 3ds Max's default config, it assigns images to the color space that has the "default" role, which is sRGB in that config.
- Click the trash-can icon at the right of a rule to delete it. You cannot delete the Default rule.
- If the rules have been modified, the Reset to OCIO Config button appears. Click it if you want to restore the rules that are set in the selected config file.
Whenever the rules change, any existing textures whose color space was set to Automatic get re-assigned as appropriate. Textures whose color space was set manually do not change.
- Case Sensitive Match
- Controls whether the Pattern and Regex strings are treated as case-sensitive when matching file names. The Extension string is not case-sensitive unless it contains glob tokens — for example, [e][x][r] matches "exr" but not "EXR".
- Import OCIO Rules
- Replaces the color-space assignment rules with those from another OCIO config file (*.ocio or *.ocioz). The other settings in the config file that you select are not imported. If an imported rule refers to a color space that is not defined in the current config, the automatically-assigned space is set to the default space and messages appear on the Color Management tab of the Render Message Window.
- Export OCIO Rules
- Exports the current rules into a new .ocio file, together with the spaces, transforms, and other settings of the current config.
Note that if you want to use the new file as a config on its own rather than simply as a container for transferring rules, you should save it in the same folder as the current config so that the files for any externally-defined color transforms can be found at the same relative locations — this is not a requirement when using 3ds Max's built-in config because the transforms are embedded in the file.
Render Output Defaults
Controls the color transform to be applied to rendered output files by default. When rendering to file, you still have the option to change the transform if you don't want to use the default that is set here.

- Conversion
- Specifies the type of transform to apply to rendered output files.
- No Conversion: Saves the untransformed rendering-space values. This is the best choice if the images will be processed further, because the full dynamic range is available for operations like compositing and grading.
- Color Space Conversion: Lets you select a transform from the Color Space drop-down to convert colors from the rendering space to another one. For example, you can match the color space of specific files such as those from a digital camera if that space is available in the config file.
- Display / View Transform: Lets you apply any available combination of
Display and
View transforms to rendered images. When using
3ds Max's default config file:
- For a photographic response on a standard monitor such as for an image posted on a web page, set Display to sRGB and View to ACES 1.0 SDR-video.
- To emulate older workflows where colors above 1.0 are simply clipped, set Display to sRGB and View to Un-tone-mapped.
- You can use other combinations for specific purposes, for example, to bake in a photographic tone map like ACES 1.0 SDR-video for a different display such as DCI-P3 D65.
- Color Space
- When Conversion is set to Color Space Conversion, select a color space for rendered files. The list of choices depends on the config file. With 3ds Max's default config file, you can select any space that is supported for image inputs.
- Display
- When Conversion is set to Display / View Transform, select a display to encode rendered images for. The list of choices depends on the displays available in the config file.
- View Transform
- When Conversion is set to Display / View Transform, select a tone map. The list of choices depends on the view transforms available in the config file.