Rendering Your First Scene
This tutorial leads you through a simple example of how to render a scene in Maya using Arnold.
It assumes you have already:
- Installed Arnold for Maya.
- Set up licensing (if you don't want watermarks in your renders).
- Loaded the plug-in.
Start Maya.
The first step is to tell Maya to use Arnold as the current renderer. In the Render Settings dialog (from the top menu bar, Window > Rendering Editors > Render Settings), set Arnold Renderer from the "Render Using" drop-down menu.
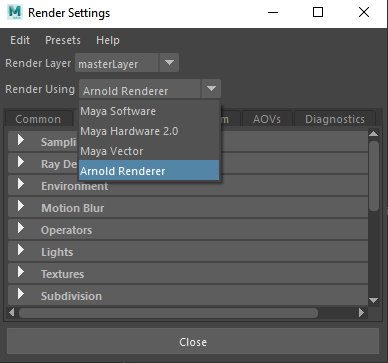
Note how the renderer options are organized in groups (this is discussed further in sub-topics of the Arnold Render Settings topic).
- Next, create a plane to act as a floor. Click on the Polygons tab of the Maya Shelf, and select the icon for Polygon Plane icon from the icons shown below (a flat plane). Click to place the corner of the plane and drag to size the plane.

- Select the floor plane and then examine the attribute editor (ctrl-A will display the attribute editor if necessary). By default, the Maya Lambert material is assigned. Select the lambert1 tab and then click on the Color attribute (under 'Common Material Attributes') and choose a more interesting color than the default gray (let's choose blue for this example).

Next, create a sphere, again by choosing from the Polygons tab of the Maya shelf, and place it on the floor plane. By default, the sphere will intersect the floor plane in the y-axis (this will be obvious in shaded view, which you can switch to by pressing the '5' key while in the main view). This is fine for now, leave it where it is.
For this object, let's assign a new material instead of the default. Select the sphere, hold the right mouse button down until the shortcut menu appears, and select 'Assign New Material' from the shortcut menu.
This brings up the following menu from which you can select what material you want. Note that Arnold's built-in shaders all have the prefix ‘Ai’. Choose a standard_surface shader.

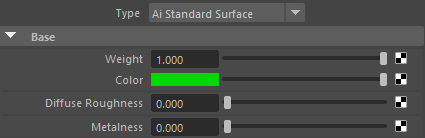
- Now if you look at the attribute editor while the sphere is selected you will see the attributes of the standard_surface shader. For now, just select a green color for the base_color.
- Next, we'll create another object. Let's choose a cylinder this time. Place it in the scene, select it and bring up the 'Assign New Material' menu from the right-click shortcut menu as before.
- Assign another new standard_surface shader. This time, set the base_color to red. You should now have a scene that looks something like this.

- Now we’re ready to open the Render View window (Windows > Rendering Editors > Render View or clicking on the
 icon).
 - Start an interactive render by going to the menu Arnold-> Render. This will open the Arnold RenderView window and start a render.
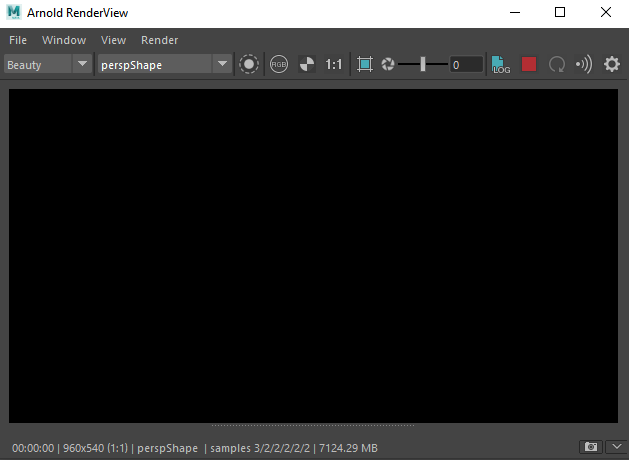
…and the render is black. Don't panic! We just need to add some lights.
- We can choose from the Maya standard set of lights. Create a point light (select the Rendering tab on the Maya shelf and point_light from the selection of lights shown underneath).
- By default, the point light will be located at the origin of the scene, and if you still have the Arnold RenderView window open, and depending on where you placed the other objects, straight away you should see that some color bleeding is visible.

You may need to move the light to see the shadow better.

- You may still find that the scene is a little dark for your taste. It's worth mentioning at this point that lights in Arnold use quadratic decay by default (because that is what happens in the real world, and Arnold is designed to work with a physically accurate approach to modeling and lighting). This is different from the default behavior in Maya, where lights are by default set to have no decay. In fact, the decay setting for the light under the Point Light Attributes section of the light's Attribute Editor will have no effect, since this is a Maya control.
You can also address the 'too dark' issue by either altering the intensity of the light or changing the Exposure attribute. You should choose intensities (and the scale of the model) accordingly, and then use the exposure setting to fine-tune.
- If you increase the radius of the light (select the point light, go to the Attribute Editor, expand the Arnold tab, and alter the radius), you get soft shadows.
- Let's increase the size of the highlight on the sphere's shader. Select the sphere, bring up the Attribute Editor, open the specular group of the standard_surface shader, and increase the specular_roughness attribute to around 0.3.

The result of all these changes is available instantly in the Arnold RenderView window, so you work interactively changing materials and lighting without having to re-render to see the effect of your changes (simply wait slightly longer for a better quality render if you've got things set up correctly).
That's the end of this short introductory tutorial. Now that you know how to assign and edit Arnold shaders, and alter Arnold settings of lights, it might be useful to play around with various settings for a few minutes before reading on.
Once you have finished this tutorial, try exploring some of the learning sample scenes and have a go at rendering them too. There is also another introduction to MtoA tutorial here.