Detail only a part of the elements contained in a camera or a model view with camera properties, by selecting the desired elements.
To detail selected elements in a camera or a model view with camera properties:
- Select the camera or the model view box and right-click to select Advance Properties from the contextual menu.
- In the Camera dialog, go to the Select objects for camera tab.
Note: For model views, the options on the Select objects for camera tab are available only if you check the Create automatic drawing box in the Camera properties tab.
- In the Select objects for camera tab choose one of the available options to detail the elements inside the camera or model view:
Option Description Consider all objects inside the viewport This option is selected by default when you create a new camera or model view. When this option is selected, all the elements inside the camera view range will be represented in the camera detail. Select objects for camera detailing When this option is selected, only the selected elements inside the camera view range will be detailed in camera details. Select and review the elements using the  (Select objects,
 (Mark objects), or Reset selection buttons.
The Select objects button will let you select the elements to be detailed in the camera drawing. When you finish your selection, the number of selected objects appears in the dialog. You can add or remove (Shift click on the element to remove) multiple elements at once by using a window selection or one at a time by clicking on each element. If you use the Select objects button, the previously selected elements are highlighted, making them easier to identify and modify the selection, if needed.
Search Query Add the elements of a previously saved search query to the elements that are detailed by the selected camera. Note : You can use this option when "Select objects for camera detailing" is selected. All the saved queries from the model will automatically appear in the drop-down list in the same order they are found in the Project Explorer.
Example
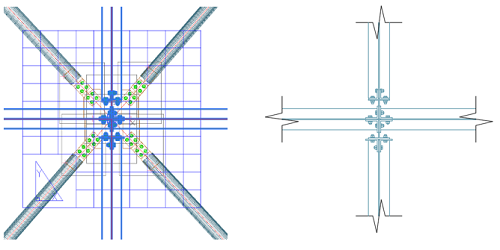
In the case of a camera containing a node where several beams and braces intersect, you can obtain a camera detail drawing showing only the beams and their respective connections:
The
(Mark objects) button highlights the selected elements in red. The elements will remain marked until you use the
Clear marked objects option in Advance Steel Tool Palette  Selection.

Use the Reset selection button to return to 0 objects selected and start a new selection of the elements to be included in the camera detail.
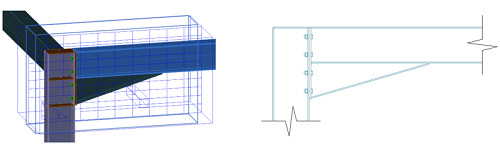
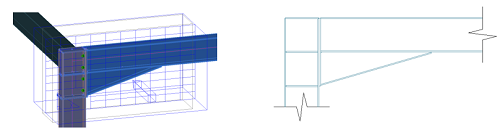
If some of the connection elements (e.g. bolts) do not need to appear in the camera detail, the entire connection box should not be selected - only select the other connection elements except the bolts to be included in the camera selection.
You can also select elements outside of the camera view range, but they will not appear in the camera detail and their modification will not trigger an update required of the camera detail.
Changing the camera from a state where only the selected elements are detailed to a state where all the elements in the camera view range are selected will not reset the object selection. In this case, all the elements in the camera view range will appear in the detail, the Select objects, Mark objects and Reset selection buttons will be unavailable, but the selected objects counter will still show the number of elements in the earlier selection. Switching back to the Select objects for camera detailing option, will restore the previous selection.
Search Queries in Camera Selection
Use the Search Query option in the camera dialog Select objects for camera tab, to add the elements of a previously saved search query to the elements that are detailed by the selected camera.
You can use this option when "Select objects for camera detailing" is selected. All the saved queries from the model will automatically appear in the drop-down list in the same order they are found in the Project Explorer.
You can also select individual elements using the "Select objects" button. Those elements will always be detailed, even if the search query you use is set up to exclude those elements for the query run.
The "Mark selection" button will mark all the elements that will be detailed by the camera, either the elements selected individually, or the ones identified by the search query. If other elements were previously marked in the model, the "Mark selection" button will additionally mark the elements detailed by the camera.
The "Reset all" button will clear the marking of both the objects selected individually and of all the search queries set up for the selected camera.
The "Clear marking" button will clear the marking of all the elements previously highlighted in the model. This will allow you to better see the elements detailed by the camera when you use the "Mark selection' button.
Elements that are added to a camera using a query, but that are not included in the viewport of the respective camera, will not appear in the camera detail. Also, adding, removing, or modifying elements included in a selected query, but outside the viewport, will not trigger an update required notification of the camera detail.