The following properties can be set for a door. Note that some properties are available only during adding a door, or for door tools.
| Property | Special Condition | Description | How to set |
|---|---|---|---|
| General Category | |||
| Description | User-defined description of the door. Note: You can add a description to a door object or to a door tool.
|
Click the description icon and enter a description text. | |
| Layer key/Layer Overrides | Door tools only | If you do not want to use the door layer assignment specified in the layer key style of the drawing, you can specify a layer key and layer key overrides for the door tool. | Click the icon for Layer key or Layer override, and select a layer key or a layer override. Layer overrides are now available for all layer key styles. |
| Layer | Door object only/not during door insertion | When you insert a door, the layer assignment is defined either by the layer key style used for the drawing, or by the layer key and layer overrides in the door tool. You can change the layer later with the Layer property. | Click the drop-down list and select a layer. |
| Style | Specifies the door style. The style defined in the door tool is the default. | Click the drop-down list and select a style. | |
| Style Location | Door tools only | Specifies the drawing file containing the style used for this door tool. | Click the drop-down list and either select a file, or click Browse to navigate to the file containing the style you want to use for this tool. |
| Bound Spaces | Defines if this door can be used as a boundary when generating associative spaces. This setting is relevant only for standalone doors. Note: If a door, window, or opening is anchored in a wall, the Bound Spaces setting of the wall is used for the opening, too.
|
Click the drop-down list and select a setting. Options
|
|
| Dimensions Category | |||
| Standard sizes | In the door style, you can define a number of standard sizes. When you add a door, you can select one of the predefined sizes. | Click the drop-down list, and select a standard size. | |
| Rise | available only for Gothic, Arch, and Peak Pentagon door shapes | Specifies the height of a pointed or arched top of the door. Illustration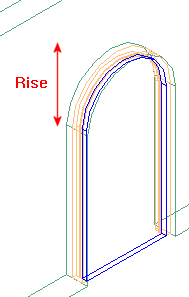 |
Enter a value for Rise, or click |
| Leaf width | Uneven, Uneven-Dhung, and Uneven Opposing door types only | Determines the width of the door panel in an uneven door type Illustration |
Enter a value for Leaf width, or click |
| Width/Height | If no standard sizes have been defined in the door style, or you do want to use a different size, you can edit the width and height of the door. | ||
| Measure to | Specifies whether the width and height of the door is measured to the inside of the door frame or the outside. When a door is measured to the outside of the frame it is smaller by the amount that is deducted for the frame. Illustration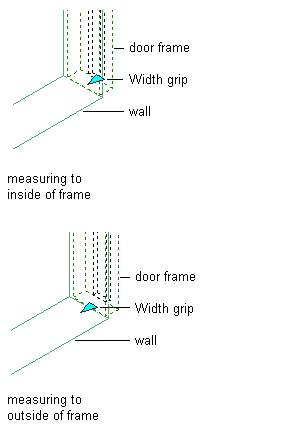 |
Click the drop-down list and select Inside of Frame or Outside of Frame. | |
| Swing Angle | Lets you determine at which opening angle the door will be displayed. Swing angle and display propertiesThe swing angle can also be determined in the display properties of the door style. The settings in the style override properties setting. Illustration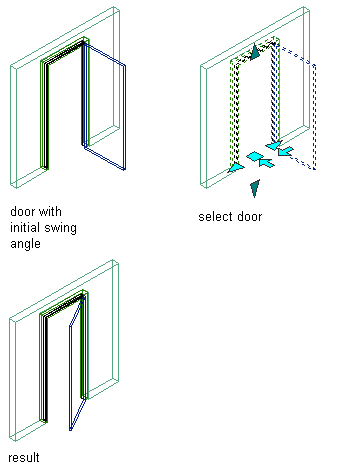 |
Enter a value. | |
| Location Category | |||
| Position along wall | Only during adding a door/anchored walls | Specifies the insertion point of the door relative to the wall or door/window assembly. You have the following options:
|
Click the drop-down list and select Unconstrained or Offset/Center. |
| Automatic Offset | Only during adding an anchored door | Specifies the offset from the wall end during insertion if you have chosen Offset/Center for Position along wall | Enter a value for Automatic Offset, or click |
| Vertical Alignment | anchored doors only | Lets you specify if the vertical height of the door should be measured to the door threshold or the door head. | Click the drop-down list and select Threshold or Head. |
| Head Height/Threshold Height | anchored doors only | Depending on the vertical alignment you chose, you can modify either the head height or the threshold height of the door. For example, if you want to create an elevated threshold, you select Threshold for Vertical Alignment, and then enter the elevation of the threshold under Threshold height. | Enter a value for Head Height or Threshold height, or click |
| Anchor | anchored doors only/not available for door tools | The anchor worksheet lets you change the position and rotation of the door in relation to the wall it is anchored to. | Click the Anchor worksheet, and enter the desired values there. |
| Additional Information | freestanding doors only/not available for door tools | The additional information worksheet lets you change the position of a a freestanding door relative to the WCS or UCS. | Click the Additional Information worksheet, and enter the desired values there. |
| Endcaps Category | |||
| Opening Endcap | anchored doors only/not available for door tools | Lets you define an endcap style for the door where it is connected to the wall. | Click the drop-down list, and select an endcap style. If you select By Wall Style, the wall endcaps will be used. |