Use this procedure to edit the geometry of a profile that determines the shape of a custom opening. You can save the changes to the existing profile or to a new profile.
- Select the opening that has the shape you want to change, and click
 .
. 
A temporary profile is created for you to edit the geometry of the custom opening.
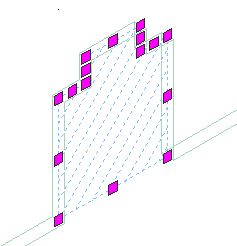
A temporary profile for editing a custom opening
- Note: After you perform an editing task from the Edit in Place tab, you may need to select the profile again to perform another editing task. If you do not see the editing commands that you expect on the ribbon, select the profile, and click Edit in Place once again.Edit the profile:
If you want to… Then… change the shape of the perimeter of the profile or its rings select the profile, and use edge and vertex grips to adjust the shape. The Edge grip has three edit modes: Offset, Add Vertex, and Convert to Arc. The default mode is Offset, which offsets the selected edge in a direction that is perpendicular to the midpoint of the edge. Depending on the shape of the profile and the edge you choose to modify, neighboring lines are extended or trimmed, and new lines are added, as necessary.
Use the Add Vertex edit mode to add a vertex to the selected edge, and create a new edge. If the selected edge is an arc, the new edge is an arc, as well.
Convert to Arc changes the selected edge to an arc and stretches the midpoint of the edge. The edge grip for an arc also has a Stretch mode, so that you can stretch the midpoint of the edge after it has been converted to an arc.
add vertices to the profile select an Edge grip, and press Ctrl to switch to the Add Vertex edit mode. Move the edge to the desired location and click, or enter a value and press Enter. remove vertices from the profile select the Vertex grip for the vertex you want to remove, and press Ctrl to switch to the Remove edit mode. Move the cursor off the selected vertex, and click. replace an existing ring of the profile with new geometry select the profile, and click .  Select the ring to replace, and select the new geometry. Press Enter to keep the geometry, or enter y (Yes) to erase it.
 add a ring to the profile draw the linework in place on the temporary profile. Select the profile, and click .  Select the geometry to define the ring. Press Enter to keep the geometry, or enter y (Yes) to erase it.
 remove a ring from the profile select the profile, and click .  Select the ring to remove, and press Enter. This option does not appear if the profile has only one ring.
Profile for custom opening after editing
- Save or discard the changes:
If you want to… Then… restore the opening to its original shape click Cancel . 
save the changes to the current profile click Finish .  The opening uses the edited profile to define its geometry. Any other objects or styles that use this profile are also updated with the edited geometry.
 save the changes to a new profile select the profile, and click .  Enter a name for the new profile, and click OK. The opening uses the new profile to define its geometry. Other styles or objects that use the original profile are not affected.