Profiles that are assigned to objects in the drawing provide in place editing, so that you can change the shape of the profile (and thereby the component) on screen. The edit in place mode is a special editing mode where object components can be edited, but other editing capabilities are limited. For example when you are in edit in place mode, you cannot save and close the drawing. Upon exiting the edit in place mode, you can choose if the changes should discarded, overwrite the existing profile definition, or if a new profile definition should be created.
Entering the edit in place mode
Editing the profile
Ending the edit in place mode
- Insert an object with the desired profile into the drawing.
- Select the object and do one of the following:
- On the contextual tab of the object on the ribbon, select the Edit in Place command. Depending on the object, the edit in place command can be located in different panels. Also, some objects like walls or curtain walls can have multiple profile-based components. In this case, first select the appropriate panel for the component, and then the associated Edit in Place command.

- Select the Edit Profile in Place command from the context menu of the object. If an object has multiple profile-based components, first select the correct submenu, for example Sweeps
 Edit in Place.
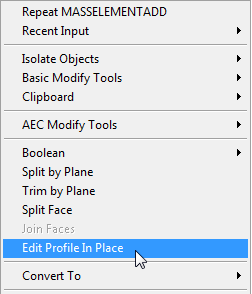
The edit in place mode is characterized by the following user interface changes:
- On the ribbon, the contextual Edit in Place tab for the selected component is displayed.

Edit in Place tab for Wall Endcaps
- Grips on editable profiles display in a magenta color to identify an edit in place grip mode.
- A number of commands, such as closing or saving the drawing, are deactivated while the in-place edit mode is active. In order to access them, you must exit the in-place edit mode first.
- On the contextual tab of the object on the ribbon, select the Edit in Place command. Depending on the object, the edit in place command can be located in different panels. Also, some objects like walls or curtain walls can have multiple profile-based components. In this case, first select the appropriate panel for the component, and then the associated Edit in Place command.
- Select the profile you want to edit.
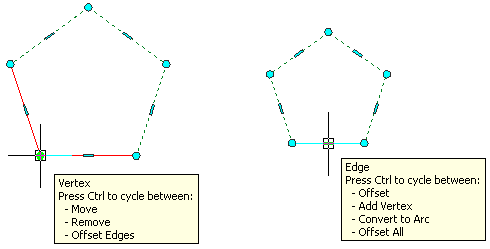
Grip-edit options for profiles
- Use the grips, the ribbon, or the context menu in order to make any of the following changes to the profile:
If you want to... Then... move a Vertex select the vertex grip, and move it. add a Vertex - Grips: Select the edge grip that is closest to the location of the new vertex. Then, press Ctrl once and use the preview image to place the new vertex.
- Ribbon: On the Edit in Place tab of the selected profile, click Profile panel Add Vertex .
 Then, specify the location of the new vertex on screen.
 - Context menu: Click Add Vertex, and specify the location of the new vertex on screen.
remove a vertex - Grips: Select the vertex grip you want to remove. Then, press Ctrl once and click to remove the vertex.
- Ribbon: On the Edit in Place tab of the selected profile, click Profile panel Remove Vertex .
 Then, select the vertex to remove on screen.
 - Context menu: Click Remove Vertex, and select the vertex to remove.
offset a vertex with its edges - Grips: Select the vertex grip which you want to offset with its associated edges. Then, press Ctrl twice and drag the vertex to the desired location.
offset a profile edge - Grips: Select the grip of the edge you want to offset and drag it to the desired location.
convert an edge to an arc - Grips: Select the grip of the edge you want to convert, and press Ctrl twice. Then, drag the grip until the desired arc shape is in place.
offset all edges of the profile - Grips: Select any edge grip on the profile, and press Ctrl three times. Then, drag the grip until the overall profile shape is correct.
add a ring to a profile - Ribbon: On the Edit in Place tab of the selected profile, click Profile panel Add Ring .
 Then, select a closed polyline, spline, ellipse or circle to convert.
 - Context menu: Select the profile, and click Add ring. Then, select a closed polyline, spline, ellipse to convert.
remove a ring from a profile - Ribbon: On the Edit in Place tab of the selected profile, click Profile panel Remove Ring .
 Then, select the ring you want to remove from the profile, and press Enter.
 - Context menu: Select the profile, and click Remove Ring. Then, select the ring you want to remove from the profile, and press Enter.
replacing a ring with another - Ribbon: On the Edit in Place tab of the selected profile, click Profile panel Replace Ring .
 Then, select the ring you want to replace and the ring that should be used instead.
 - Context menu: Select the profile, and click Replace Ring. Then, select the ring you want to replace, and after that the ring that should be used instead.
- When you have made all changes to the profile, you can end the edit in place mode in one of the following ways:
If you want to… Then… discard the changes and revert the profile to its original shape - Ribbon: On the Edit in Place tab of the selected profile, click Edits panel Cancel .

- Context menu: Click Discard All Changes.
save the changes to the current profile - Ribbon: On the Edit in Place tab of the selected profile, click Edits panel Finish .

- Context menu: Click Save Changes.
save the changes to a new profile definition - Ribbon: On the Edit in Place tab of the selected profile, click Edits panel Save As .
 Enter a name for the new profile definition, and click OK.
 - Context menu: Click Save as New Profile.
- Ribbon: On the Edit in Place tab of the selected profile, click Edits panel