In this exercise, you will manually enter survey data to perform a mapcheck analysis.
This method of performing a mapcheck analysis is useful when you must check survey data that does not exist as labels in the drawing. For example, you can use this method to enter survey data from a paper drawing.
This exercise continues from Exercise 2: Performing a Mapcheck Analysis with Parcel Labels.
Set up the mapcheck analysis dialog box
- Click
tab
 panel drop-down Find.
- If a message that states the command line mode cannot be used while a command is active is displayed, click OK.
- In the
Mapcheck Analysis dialog box, make sure that the
 Use Command Line Interface option is toggled off.
- Click
 Input View.
The input view provides an interface in which you can add data to the mapcheck analysis.
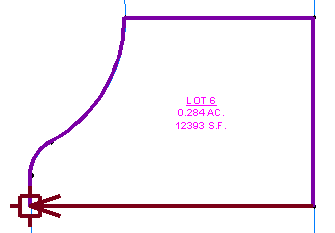
This exercise uses Survey-5B.dwg with the modifications you made in the previous exercise.
The parcel segments on the right side of the site are not labeled. Because the data is not available in parcel labels, you must enter the mapcheck information manually.
Enter parcel data
- Click
 New Mapcheck.
- In the Mapcheck Analysis dialog box, for the name of the mapcheck, enter Parcel Manual Input.
- To specify the point of beginning, enter the following values:
- Easting: 5576.199
- Northing: 5291.0640
The
 icon indicates the point of beginning.
- Click
 New Side.
- Expand the
Side 1 collection. Specify the following parameters:
Note:
Notice that the
 icon is displayed next to the side collection, and also next to the top-level mapcheck collection. This indicates that the mapcheck is incomplete, because it requires more data about the side.
- Side Type: Line
- Angle Type: Direction
- Angle: N00 00 10E
- Distance: 16.330
- Click
New Side.
- Expand the
Side 2 collection. Specify the following parameters:
- Side Type: Curve
- Curve Direction: Clockwise
- Radius: 20.00
- Arc Length: 21.550
- Click
New Side.
- Expand the
Side 3 collection. Specify the following parameters:
- Side Type: Curve
- Curve Direction: Counter-clockwise
- Radius: 75.00
- Arc Length: 80.800
- Click
New Side.
- Expand the
Side 4 collection. Specify the following parameters:
- Side Type: Line
- Angle: N90 00 00E
- Distance: 99.990
- Click
New Side.
- Expand the
Side 5 collection. Specify the following parameters:
- Side Type: Line
- Angle: S0 00 00E
- Distance: 100
- Click
New Side.
- Expand the
Side 6 collection. Specify the following parameters:
- Side Type: Line
- Angle: N89 59 54W
- Distance: 149.990
The direction arrow meets the point of beginning.
- Click
 Output View.
The Output View displays the results of the mapcheck analysis. You will learn how to work with the output data in Exercise 4: Working with Mapcheck Data.
To continue this tutorial, go to Exercise 4: Working with Mapcheck Data.