You can calculate physical properties for one or more selected solid bodies to verify your design intent.
Update the Physical Properties of a Solid Body
- Locate a center of gravity (to place a handle that is critical for balance, for example).
- Export data to another application for further analysis.
- In the browser or the graphics window, select one or more solid bodies.
- Right-click and choose Properties.
In the Body Properties dialog box, the Name field displays the name or names of the selected bodies.
- Click Update.
Update calculates mass, surface area, and volume after any changes to physical properties of a feature on a body, or after you add or delete a body.
Note: Update is available only when the values do not correspond to the specified Requested Accuracy level. The command is not available when physical properties are up-to-date.- Mass. Displays the mass of selected bodies in default units.
- Area. Displays the surface area of the selected bodies.
- Volume. Displays the volume of the selected bodies.
- Center of Gravity. Displays the X, Y, and Z coordinates of the body’s center of gravity. Note: Mass is not automatically updated with model changes. If model changes affect physical properties, the last known values become out-of-date and display as N/A.
- Click OK.
Change the Appearance of a Solid or Surface Body
- In the browser or the graphics window, select one or more solid bodies or one or more surface bodies.
- Right-click and choose Properties.
- Under Body Appearance, choose an option.
- Select Clear All Overrides to remove appearance overrides from individual faces contained in the selection. Clear the check box to leave individual appearance overrides intact.
- Click OK. Tip: You can also change the body appearance using the Appearance menu on the Quick Access toolbar.
Change the Appearance of a Face
If the part is included in an assembly, first activate the part whose face appearance you want to change.
- In the graphics window, click one or more faces.
- Right-click and choose Properties.
- In the Face Properties dialog box, Appearance drop-down list, select an appearance.
- Click OK.
In general, face appearance changes follow these rules:
If a cosmetic thread texture is applied to the feature, a face color change affects only the base color used in the thread texture.
In the following image, face appearance is changed to Blue (Sky-Bright) but threads remain black.

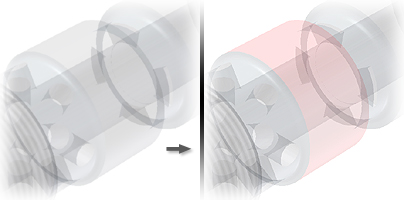
If the part is transparent, the face appearance changes but is transparent.
In this image, face appearance is changed to Red (Bright) but is transparent to match part appearance.
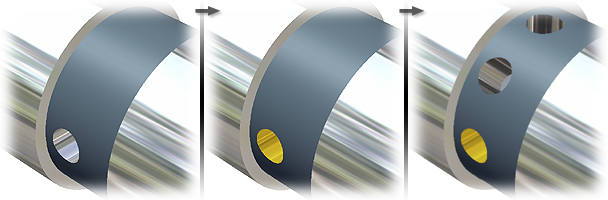
A face appearance overrides the feature appearance (which overrides the part appearance).
In this image, the appearance of this feature is set to Metal-Steel (Polished). Some faces are changed to Zinc, which overrides feature appearance.

If you change a face appearance, and then include the feature in a pattern, the patterned features do not have the face appearance.
In this image, the feature appearance is changed to Gold Metallic. The feature is patterned, and appearance for pattern instances remains set to As Part.
If an assembly contains multiple instances of the part, all instances update with the new face appearance. In this image, the face appearance is changed to Gold Metallic. Each instance of that part updates with new face appearance.
