Learn how to use the different modes for using Revit data with your Inventor designs.
Import Modes
There are two modes for using Revit models with Inventor: Reference and Convert. Both involve the import of Revit 3D views. Choose the mode that meets your requirements.
About 3D ViewsTo learn about Revit 3D views and how to prepare them for the best import experience, see Best Practices for AnyCAD Revit.
- The Revit Z-axis in aligned with Inventor's Z-axis. The new Inventor assembly is created with its Z-axis displayed in the up direction.
- During initial opening, the Revit model internal origin is located at the Inventor origin.
- Revit colors being given a corresponding Inventor appearance color. Color overrides done in Inventor survive updates. Texture maps are not used.
The Revit files are imported with:
-
Reference
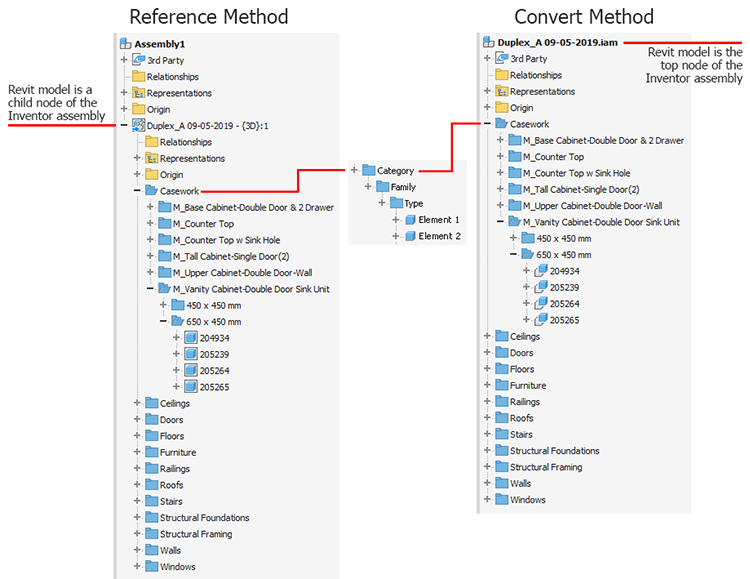
- Retains associativity with the source Revit model. When the Revit model changes, the Inventor model receives a notification. At that time you can choose to update the model. The Reference Revit model is imported as a subassembly into an Inventor assembly.
- Read-only. Changes to the source Revit model must be done in Revit.
- With respect to the referenced model, you can:
- Change which 3D view is referenced in Inventor. The browser node displays the Revit filename with the view name appended so the referenced view is easily identified.
- Constrain Inventor components to source model geometry.
- Project source model geometry into an Inventor model.
- Hide source model components.
- Suppress or break the link between the host and referenced files.
- Contained within the assembly, no separate files. The Revit elements are internal documents contained within the top-level Inventor document. The internal documents cannot be accessed separately.
- Convert
- Creates ordinary Inventor files corresponding to the Revit elements. The files can be modified in any way or deleted.
- Does not retain associativity to the source model. Changes to the source Revit model are ignored.
Import Revit files as associative Reference Models
- Get Started tab
 Launch panel New Import CAD Files
- File tab Open Import CAD Files
- QAT (Quick Access Toolbar) Open
- In an Assembly document, in the Assemble tab Components panel Place Imported CAD Files
The points of access for importing the CAD files are:
- In the Get Started tab Launch panel New
Import CAD Files
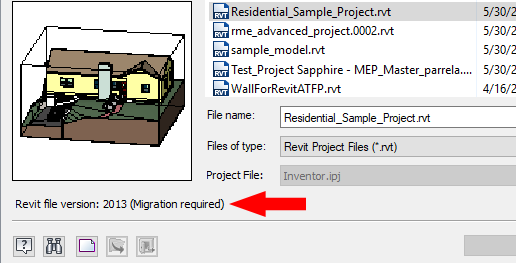
- In the Open dialog, navigate to and select the shared Revit
(*.rvt) model you want to import.
The open dialog displays a thumbnail view and the Revit version used to most recently modify the data.
- Click
Open. During the open process feedback displays in the lower section of the Import dialog.
Depending on the Revit file size, opening the file may take several minutes.
- In the Import dialog box:
- In the Options Import Type section select Reference Model (default).
- In the
Select section
3D View list, select the 3D view you want to import. The number of Revit elements to be imported is listed above the preview.
- For the selected view, an alphabetically sorted Category list displays below the view dropdown. Category list contents are based on the selected 3D view and includes only categories with visible elements. Visibility must be set in the 3D view in Revit. If elements are made visible in a category, that category is included when editing the view.
Note: More about Categories
- Category selection is remembered.
- Excluded categories are not imported regardless of element visibility.
- If there are no visible elements in an excluded category, the category is dropped from the list of excluded categories. If, later, elements are made visible in that category, the category will appear in the list when editing the view.
- If the Revit view is edited and element visibility is changed, when Inventor updates the view, elements no longer visible are removed and newly visible elements are imported.
- Some categories and their elements are not imported because Inventor does make use of them. For example Levels, Cameras, and so on.
- The category
Revit Links is a single category entry representing all linked RVT models. When checked, visible elements in the selected categories of the linked files populate the Inventor model. Unchecked, nothing in the linked RVT model is imported.
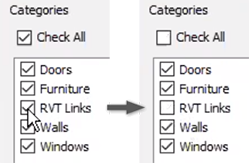
- Use the Check All option to quickly clear the list so you can check just a few categories to include.
- Changing the 3D view resets the categories list. The previous view and selections are not remembered.
- Click OK. The model is imported with the Z axis as the up direction and as a subassembly. You can place one or more instances of the Revit model in the Inventor assembly.
Changing 3D Views in Reference Models
- In the browser, right-click the Revit model node and click Edit Import.
- In the Import dialog, in the 3D view list, select the desired view.
- Click OK.
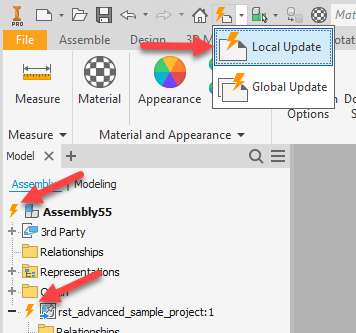
Updating Reference Models
- the source Revit model is modified
- Inventor components used in the assembly are modified
Use the Convert option to import Revit files as Inventor components
- Get Started tab Launch panel New Import CAD Files
- File tab Open Import CAD Files
- QAT (Quick Access Toolbar) Open
- In an Assembly document, in the Assemble tab Components panel Place Imported CAD Files
The points of access for importing the CAD files are:
- In the Get Started tab Launch panel New
Import CAD Files
- In the Open dialog, navigate to and select the shared Revit (*.rvt) model you want to import.
- Click Open. During the open process feedback displays in the lower section of the Import dialog.
- In the Import dialog box:

- In the Options Import Type section select Convert Model.
- Select the
Assembly Options for how the converted Revit is structured. Choose between:
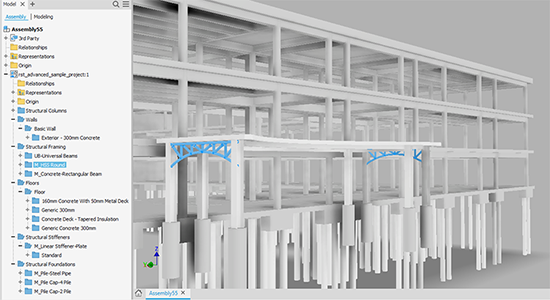
- Assembly - The Revit elements are imported as subassembly and part occurrences under a main assembly. Each Revit element, in general, is an occurrence. In this format, the individual Revit elements are grouped into folders using their Revit "category", "family" and "type".
- Multi-body part - The Revit elements are imported as bodies under a single Inventor part.
- Composite part - The Revit elements are imported as surfaces under a single Inventor part.
- Optionally, in the File Names section, specify a prefix or suffix for the Inventor models that are created.
- Specify or Browse to the File Location. The default file path is the same location as the Revit file.
- In the
Select section
3D View list, select the 3D view you want to import. The number of Revit elements to be imported is listed above the preview.
- Click OK. The converted model is imported with the Z axis as the up direction and as the top level node in the assembly. You can place one or more instances of the Revit model in the Inventor assembly.
The Revit model is imported into an Inventor assembly with the same name as the Revit file.
Compare import results in the Model browser
Revit File Migration
Additionally, certain RVT models may get warnings or errors during migration. Warning messages are shown in the translation report (at the top of the Inventor browser), but the import will finish. Error messages are shown as popup windows, and the import will fail.