This release contains a multitude of enhancements to help you solve your everyday design challenges.

Inventor 2024 delivers:
- Design Intent - Capture manufacturing processes with the new Finish Feature by combining appearance data with properties to describe / document real-world processes. Examples include material coatings, heat treatment, surface texture and paint that can layered atop one another or suppressed and un-suppressed with model states.
- Professional Grade Functionality - Faster hole & punch feature patterning, create custom or cut back elbows (not limited to 45 or 90 degrees) within Tube & Pipe environment, and support for user defined Image Based Light (IBL) environments for emulating realistic renderings.
- Compliance to 2D and 3D Drafting Practices - Annotate weld symbols within the 3D part and assembly environments (without converting to a weldment), apply sheet or view based revision clouds on drawings, or leverage the new ISO 13715 Edge Symbol annotation.
- Customer Driven Improvements: Rotate section view planes, obtain the oriented minimum bounding box of a part (via derive), or assembly (via derive or simplify), iLogic, and Read-Only support with Vault Professional. Autodesk Inventor 2024 continues to deliver enhancements requested by you and the Inventor user community. Improvements labeled with
 An Inventor® Ideas submission in the What's New indicate new functionality delivered as a direct result of your requests. Share your ideas at
Inventor Ideas forum.
Design Intent
- Finish
The new Finish feature enables you to not only specify the appearance of your parts, components and assemblies, but also the manufacturing process such as material coating or surface finish.
All applied finishes are listed in a new Finishes folder in the browser. You can re-order the finishes in the browser node, suppress, rename or delete them.
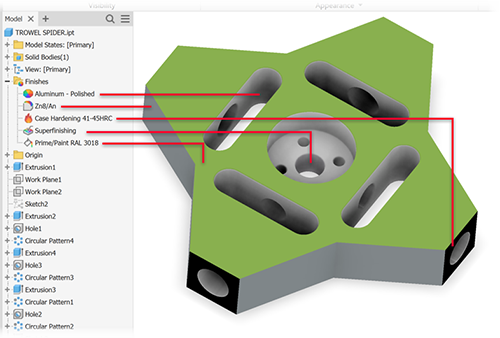
In Drawings, a new "Parameters - Finish" type category is added to the Leader Text and the Format Text dialogs to enable Finish information to be used in drawing notes. These parameters will automatically be updated if changed in the modelling environment. This enhances your drawing by adding additional manufacturing process information to the documentation.
Each Finish feature setting has a parameter with corresponding unique name in the "Finish Parameters" category in the Parameters dialog. All Finish parameters can be exported. Exported parameters are displayed in iProperties. Note that change in iProperties doesn't affect the model finish feature parameters.
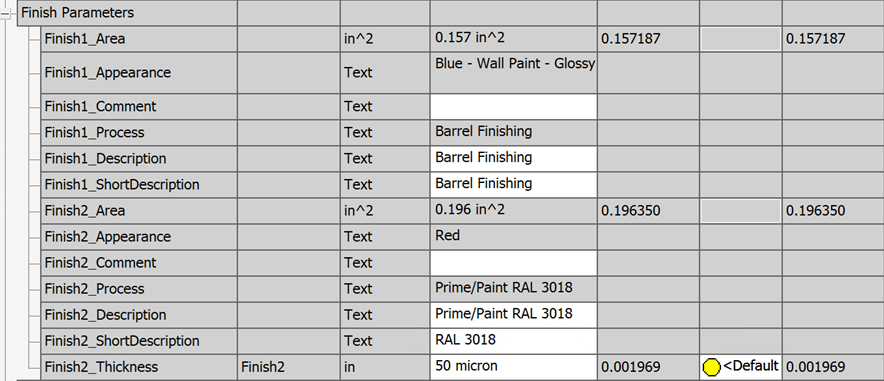
For more information see To Assign a Finish to a Component.
- Mark
- Use non-coplanar sketches to define the mark sketch geometry.
- Wrap or project the sketch to a non-planar face.
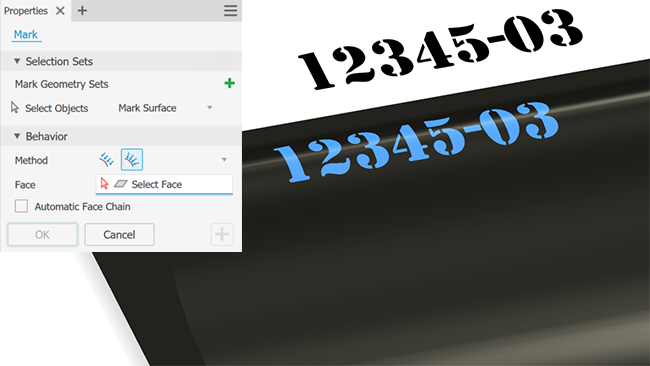
Use the Project option for complex faces and the wrap option for simple curved faces.
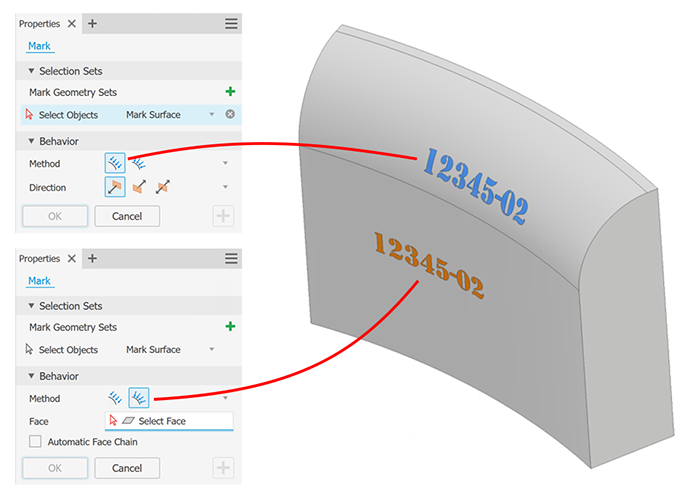
For more information see To Mark Faces.
- Inventor Fusion Interoperability
From within Inventor you can send a part (.ipt) file to Fusion 360 and create Manual Inspection tasks.

For more information see To Connect to Fusion 360 Workspaces.
- Fusion Exports Workflow
If a change has occurred in the Inventor model state or design view used for a Fusion 360 export, and you click Open in Fusion 360 in the export context menu, you are notified that the Inventor model and Fusion 360 model are out of sync and are given the option to update the Fusion 360 model before opening it.
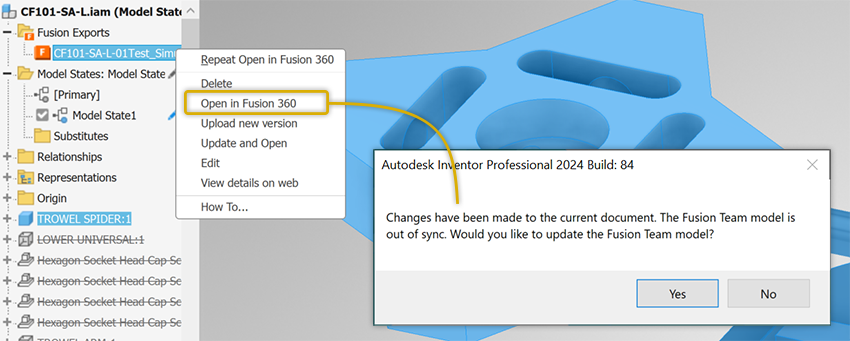
For more information see To Connect to Fusion 360 Workspaces.
- Translators
- UCS Support
Both JT and STEP support the option to include UCS on import.
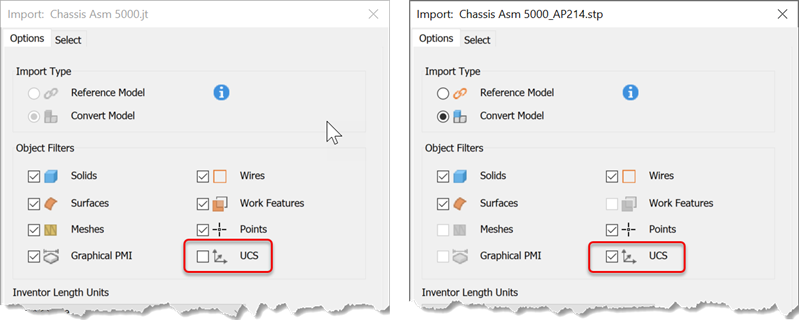 Note: UCS import is available for STEP files exported without PMI.
For more information see To Import Files as an AnyCAD Reference or Convert Model
- OBJ Import
Performance when opening OBJ files has been improved.
- SolidEdge
Support for reading SolidEdge 2023 is added.
- Parasolid
Support for importing and exporting Parasolid version 35 is added.
- UCS Support
Professional Grade Functionality
- Rectangular Pattern
You can now select a revolved face, cylindrical or conical, to define the direction for a component pattern. The Pattern Component command uses the face axis to define the pattern direction. Use the standard controls to flip the direction.
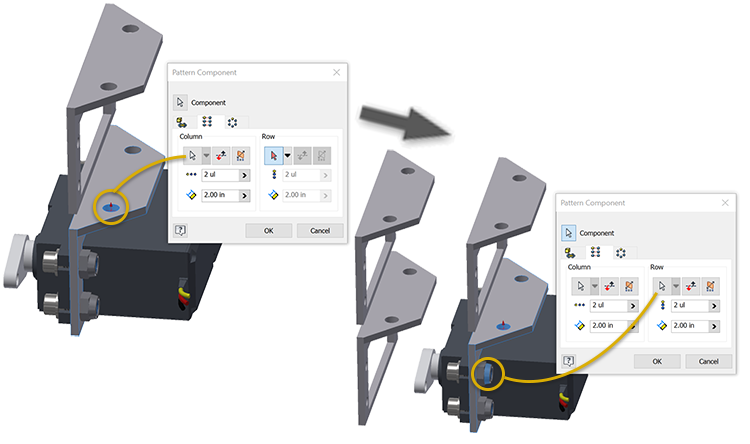
It is not necessary to activate the selector when using an origin axis, clicking the flyout activates the selector and chooses the selected axis. The direction selection does not change with the activation of the selector, you must also select a new direction.
For more information see Create rectangular patterns of components
- Circular Pattern
Circular pattern for components is enhanced to provide incremental and fitted positioning methods.
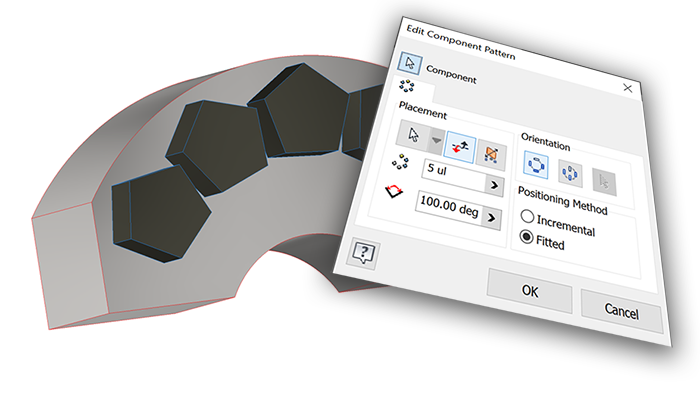
For more information see Create circular patterns of components
- Custom Elbows
In previous versions of Inventor, it was only possible to add a 45 or 90 degree elbow to a rigid pipe run. Starting from this release , it is now possible to apply custom angled elbows.
When a style with Custom Elbows is activated, select the Custom Elbows option in the Route dialog and either use the curved arrow manipulators, or type a value to angle the elbow relative to the current position.
- When dragged by 45 or 90 degrees, the route is populated with a rigid elbow. Rigid elbow is placed as a Standard part.
- When dragged to other than 45 or 90 degrees, the route is populated with a custom elbow. Custom elbow is placed as a Custom part.
- New Custom Elbow Styles
New styles which support the use of custom elbows (Custom Elbow 45, Custom Angle 90) are available in the Tube and Pipe Styles dialog.
For more information see To create New Tube and Pipe Styles.
For more information see To Author Tube and Pipe Parts.
- Custom Environment Image Support
The workflow for using custom hdr and exr images with IBL lighting styles is much improved and is supported for both CPU and GPU ray tracing.
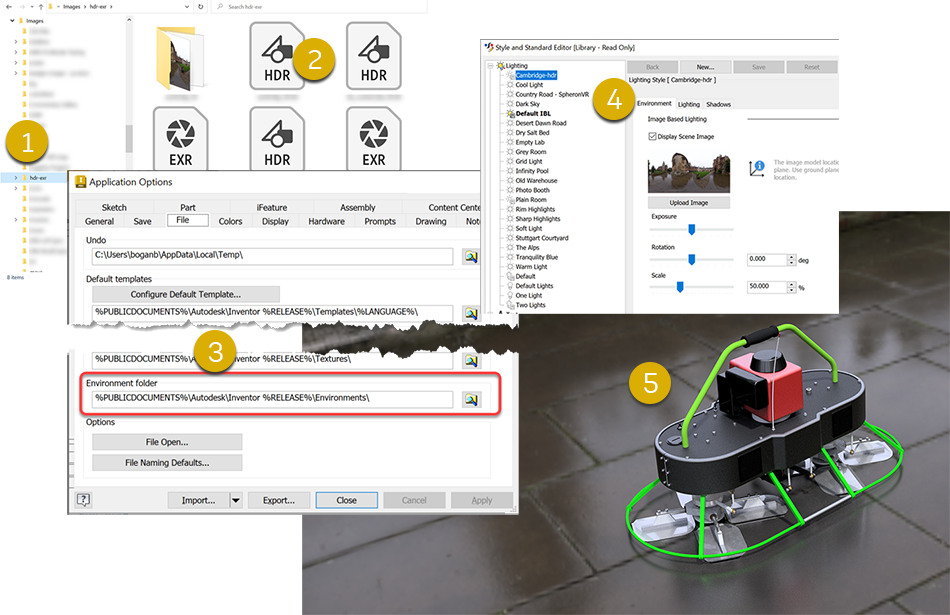
- Store environment images in a local or network folder.
- Supports both HDR or EXR images.
- Optionally, in Application Options
 Files, set the environment folder path if you plan on sharing the environment folder.
- Create a new lighting style and use your custom environment image.
- Activate the lighting style to use it to render the scene with or without the image.
For more information see About Lighting Styles, To Work with Lighting Styles, Lighting Style Dialog Reference, and File Tab Reference.
- Guided Tutorial Update
Guided Tutorials have been updated to use the new interaction components delivered with the Home experience.

For more information see Get Started Tutorials and Authoring a Guided Tutorial
- Shared Views
For added consistency across the product, the Shared View experience is updated to use a panel.
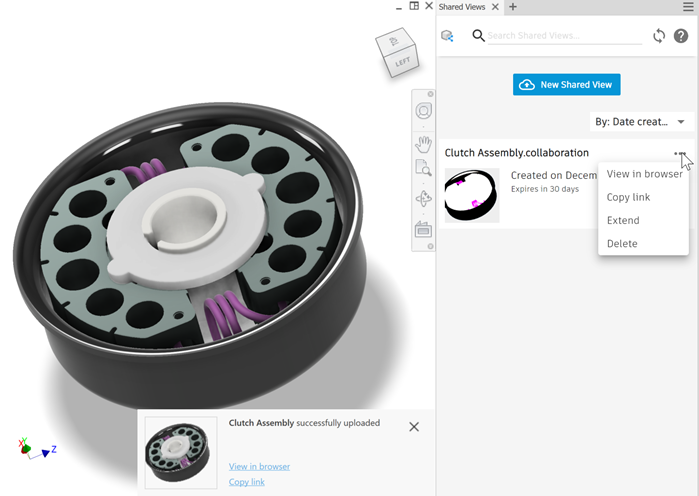
For more information see About Shared Views.
Compliance to 2D and 3D Drafting Practices
- Model Based Definition (MBD)
- Annotation Folder
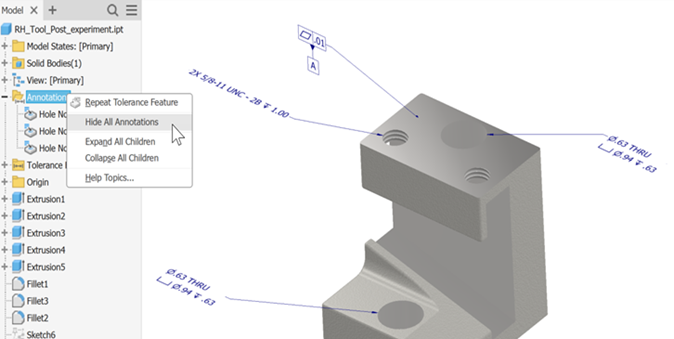
All 3D annotations are placed in a folder in the model browser. All 3D annotations can be hidden by Hide All Annotationsin the folder context menu.
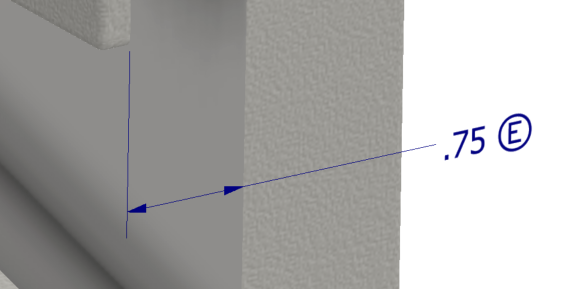
- 3DA Envelope Requirement Modifier
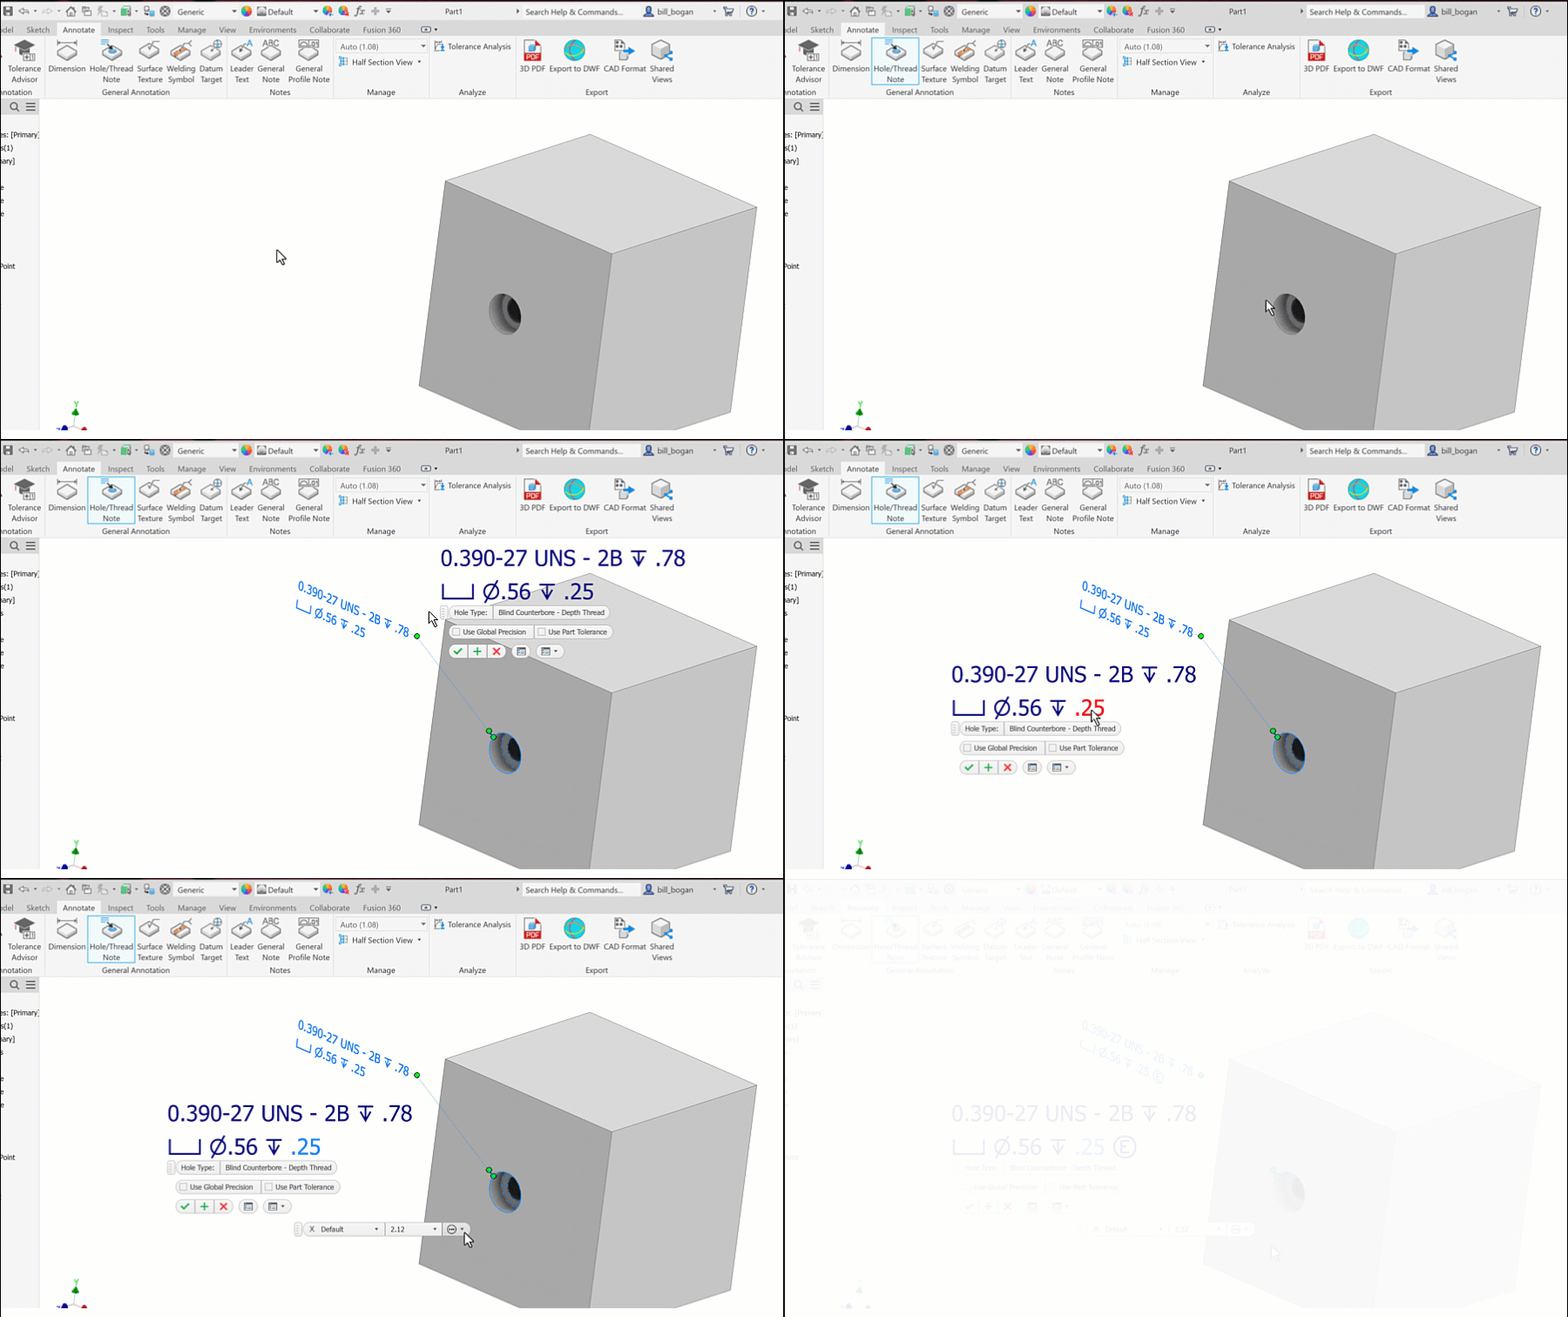
The Envelope Requirement modifier is now available for hole notes and dimensions. In the annotation preview, click on a dimension and in the toolbar select the envelope modifier.
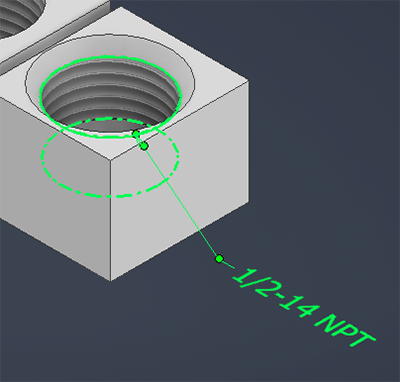
- 3DA Thread Notes
3DA thread notes now highlight all faces related to the thread feature.
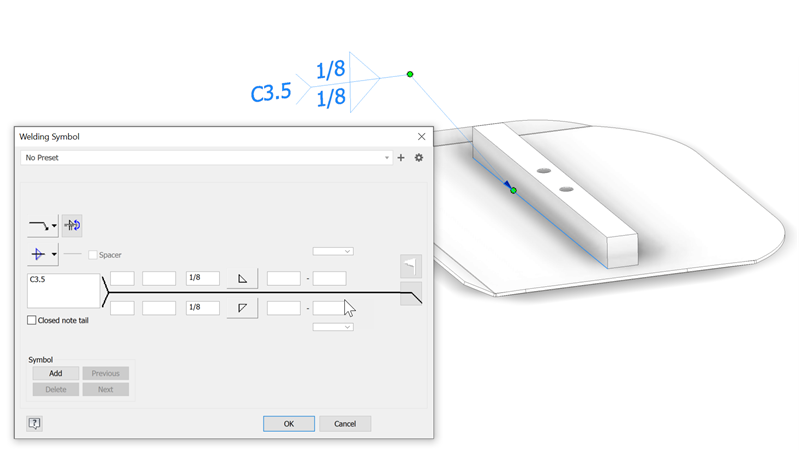
- 3D Weld Symbols
3D weld symbols are now available as one of the 3D annotation types. Create and edit weld and subweld symbols in a part or assembly model. Then, retrieve the associative symbols in drawings. 3D weld symbols are included in exports to 3D PDF, DWF, and Shared Views.
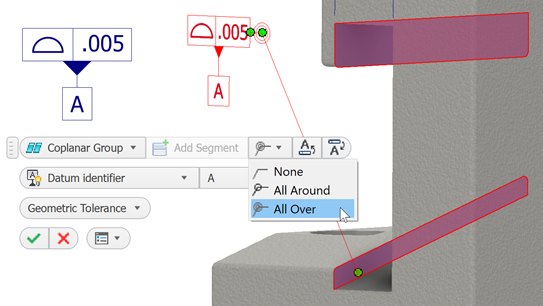
- All Over Modifier
The All Over modifier is now available for feature control annotations.
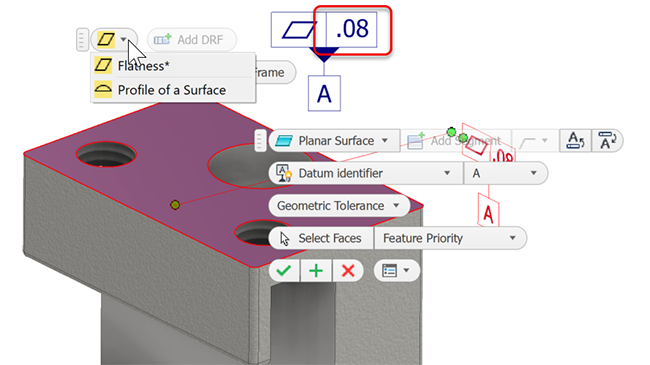
- Flatness and Profile of a Surface
These tolerance options now have default values when applied to the model.
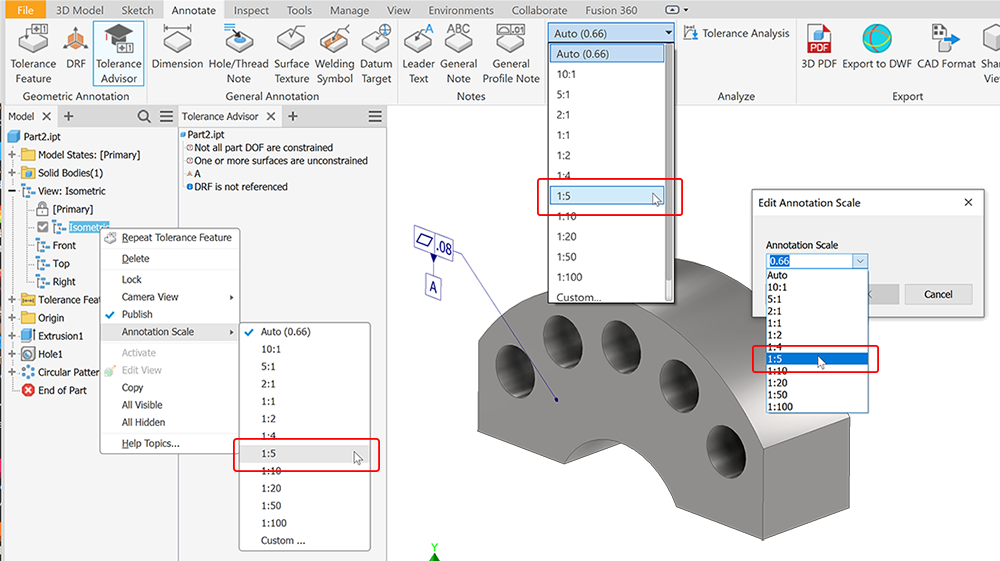
- Annotation Scale
In this release, 1:5 scale is added to the annotation scale drop down per DIN EN ISO 55455
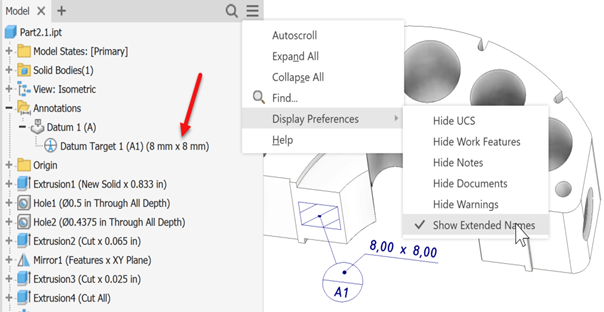
- Datum Target Browser Node
The Datum Target browser node now displays the target size when using the extended name option.
For more information about 3DA and MBD see:
- Annotation Folder
- Revision Clouds
Revision clouds move from the SDK to the drawing environment.
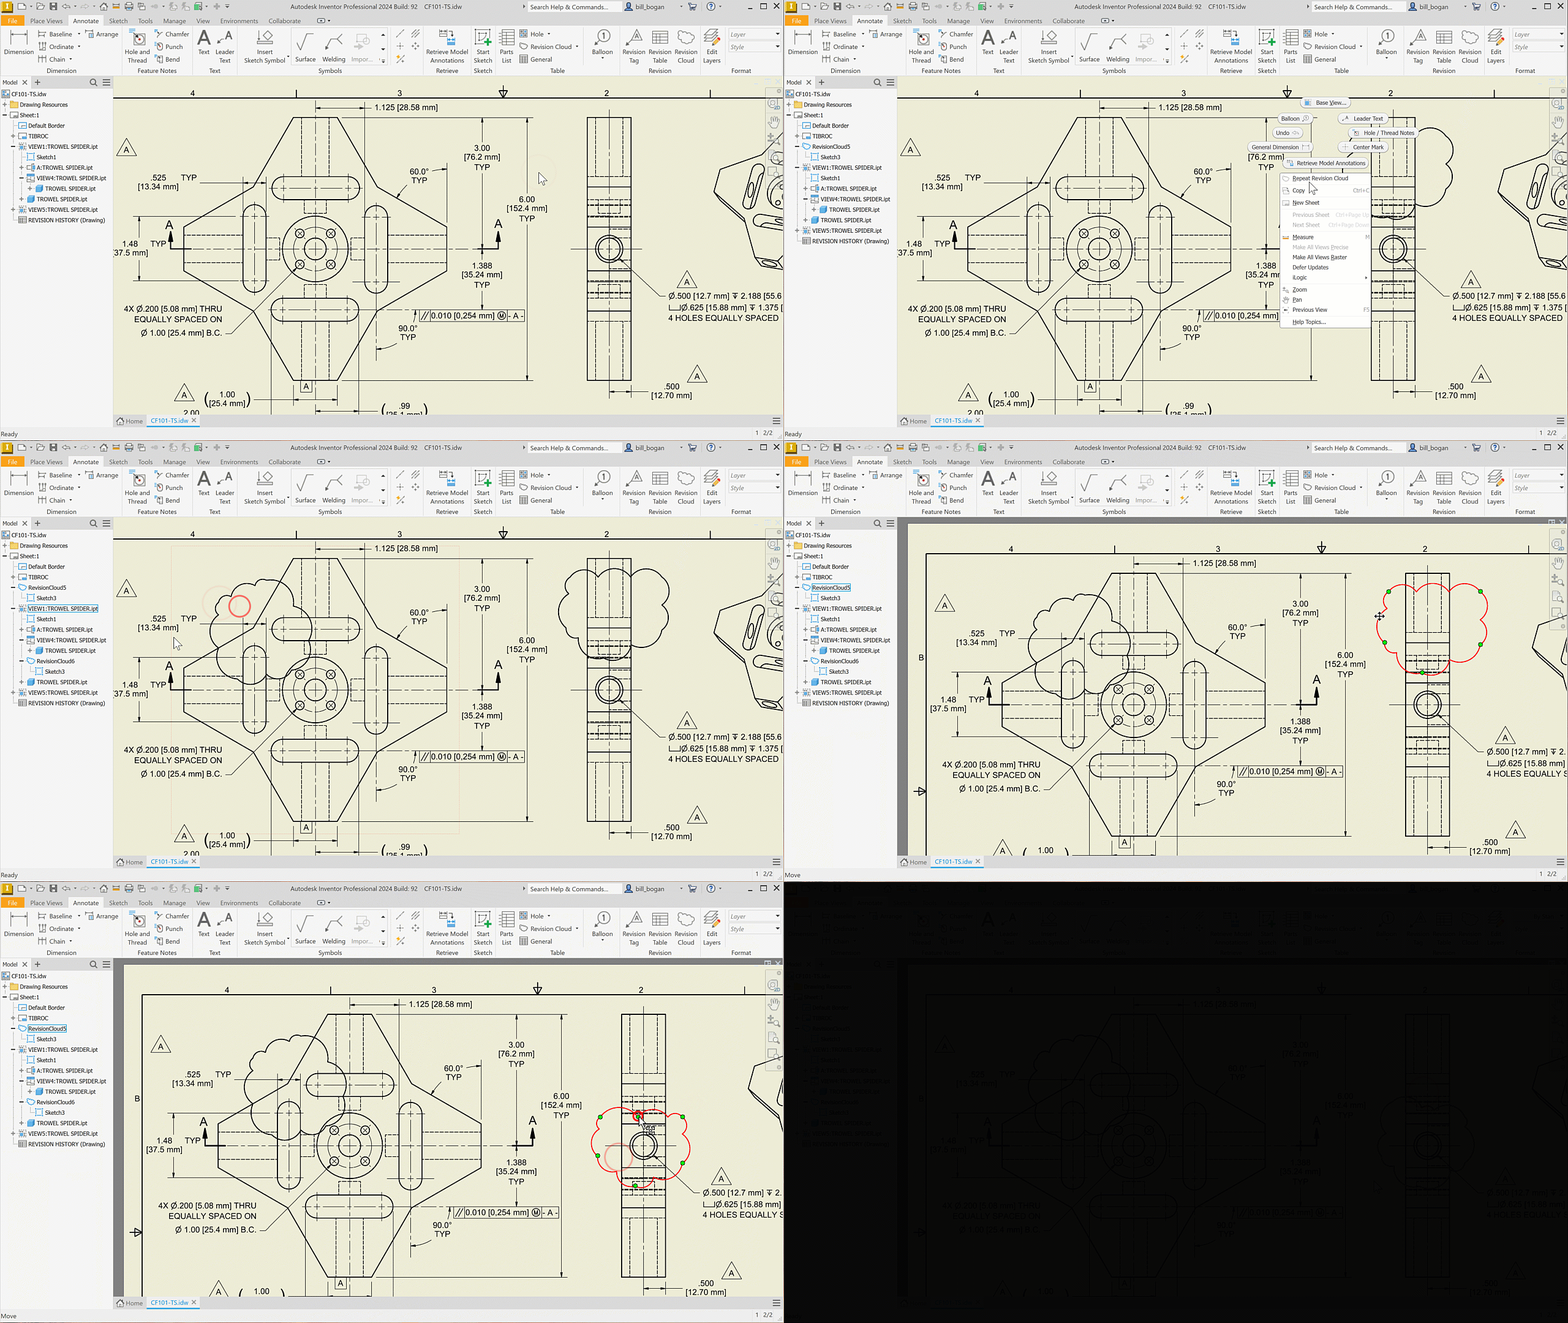
Revision clouds are full-fledged Inventor objects and no longer in the SDK. Add them to drawing sheets or views, move them around, add or delete vertices, and like other annotation styles the formatting is managed using the Styles Editor. Being sketch-based they can be edited either in their cloud state or from the sketch.
For more information see To Work with Revision Clouds
- Edge Symbol
Starting from this release of Inventor, you can define an Edge Symbol based on ISO 13715:2019 standard. The new Edge Symbol command is added to the Symbols panel of the Annotate tab.
The Edge symbol style is added to the drawing Style and Standard Editor.
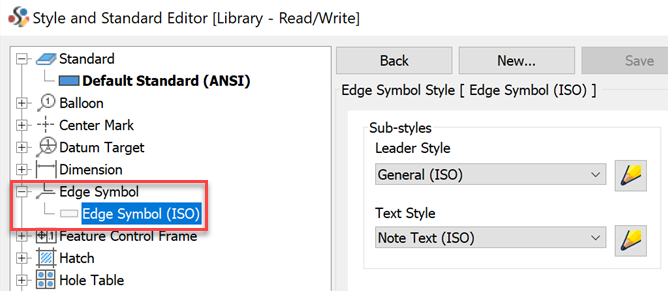
For more information see Add an edge symbol.
- Standards Updates
Many 2D weld symbols in drawings were updated per ISO/BSI/DIN/GB standards. For 3D weld symbol in assemblies, it applies to ISO/DIN standards. The changes include updating the names of the fields and adding new fields depending on selected weld type. The changes were made to Square Butt Welds, Fillet Welds, or Plug Welds for example.
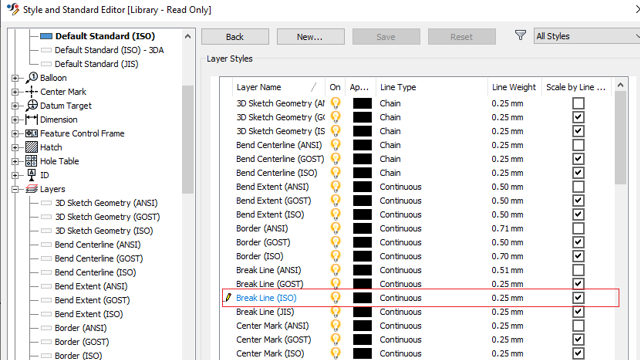
Also, a change was made to the "Break Out Line" object type for ISO standards. Until now, the "Visible" layer on "Thickness" was set to 0.5 mm. Now, as per updated standard, the "Break Out Line" object type is set on the "Break Line" layer with thickness of 0.25 mm. This also applies to DIN/GB/JIS standards.
- Sheet Name Property
Sheet Name is added as a Sheet Property and can be used in text.
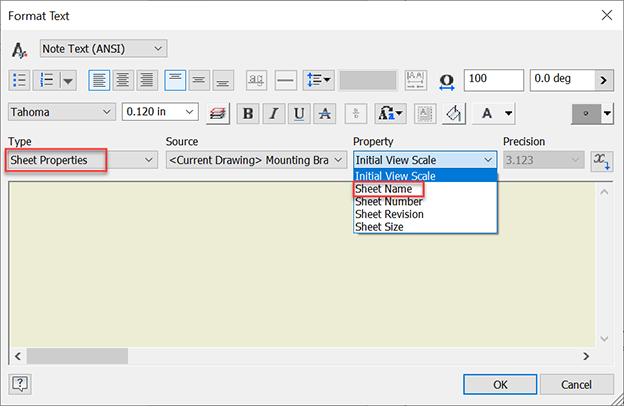
For more information see Format Text Reference
- Oriented Minimum Bounding Box
-
You can derive a solid body as an oriented minimum bounding box. A new "Oriented minimum bounding box" option is added to the Options tab of the Derived Part, Derive Assembly and Make Part dialogs. By default, the option is checked. Uncheck the box to derive a body as the orthogonal bounding box.
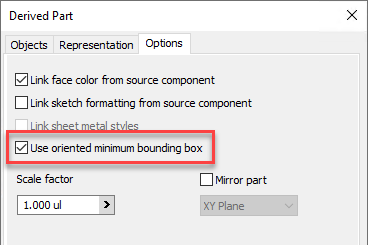
Also, representing the selected component in the derived part as the orthogonal bounding box is now available for parts. The option is added to the Derived Part and Make Part dialogs and you can set only one body or the whole Solid Bodies folder.
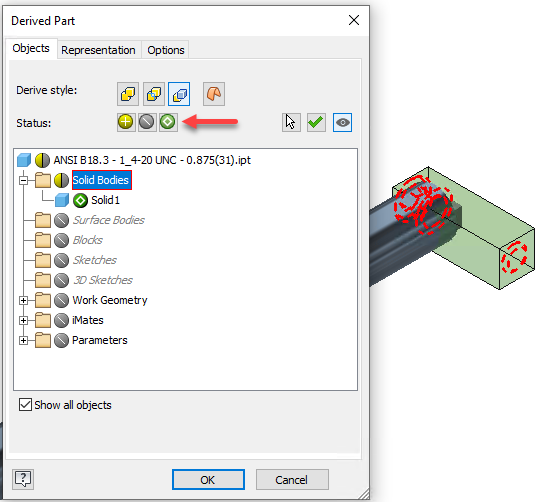
For more information see To Create a Derived Part or Assembly.
-
You can cancel the preview of the oriented minimum bounding box when deriving a part, assembly, and when simplifying an assembly.
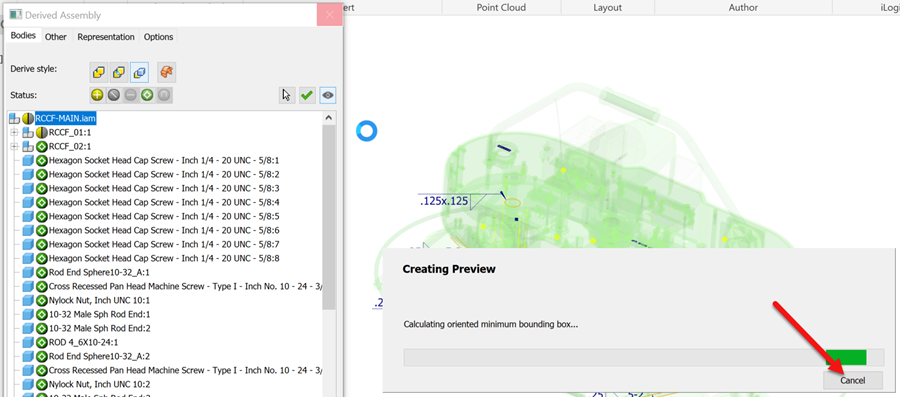
For more information see About Derived Parts and Assemblies.
- Bounding Box Parameters
When simplifying an assembly and replacing components with envelopes, you can choose the oriented minimum bounding box option. When "Replace with Envelopes" is set to "All in One Envelope", the "Edge A", "Edge B", and "Edge C" values can be set in the property panel and the graphics window.
A new "Create model parameters" option is added to Advanced Properties of the property panel. When selected, three read only parameters for the "Edge A", "Edge B", and "Edge C" are created in the simplified file.
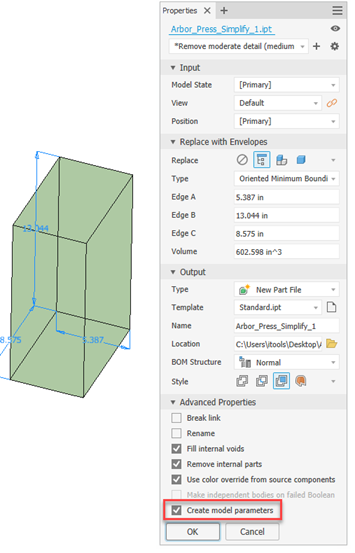
For more information see Create a Simplified Part from an Assembly.
-
Customer Driven Improvements
-
Section view definition persists in the design view representation. With this release you can easily edit the section view definition or suppress the section view by right-clicking the view representation node and clicking Section View
 Edit
Edit
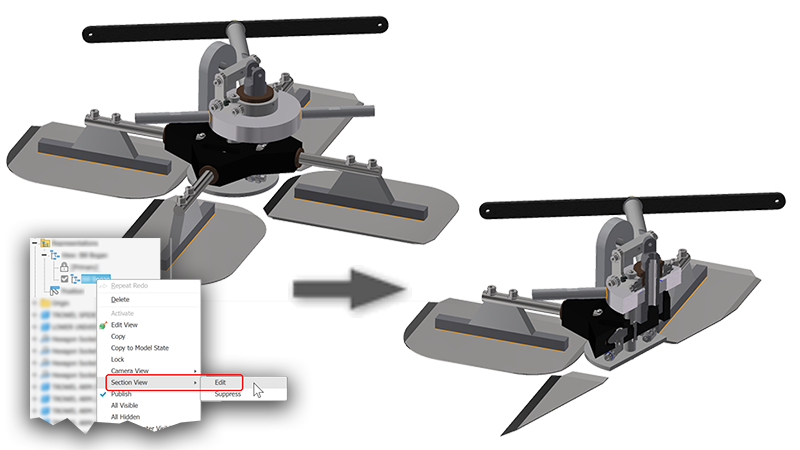
For more information see To Work with Section Views
-
Large Assembly Performance
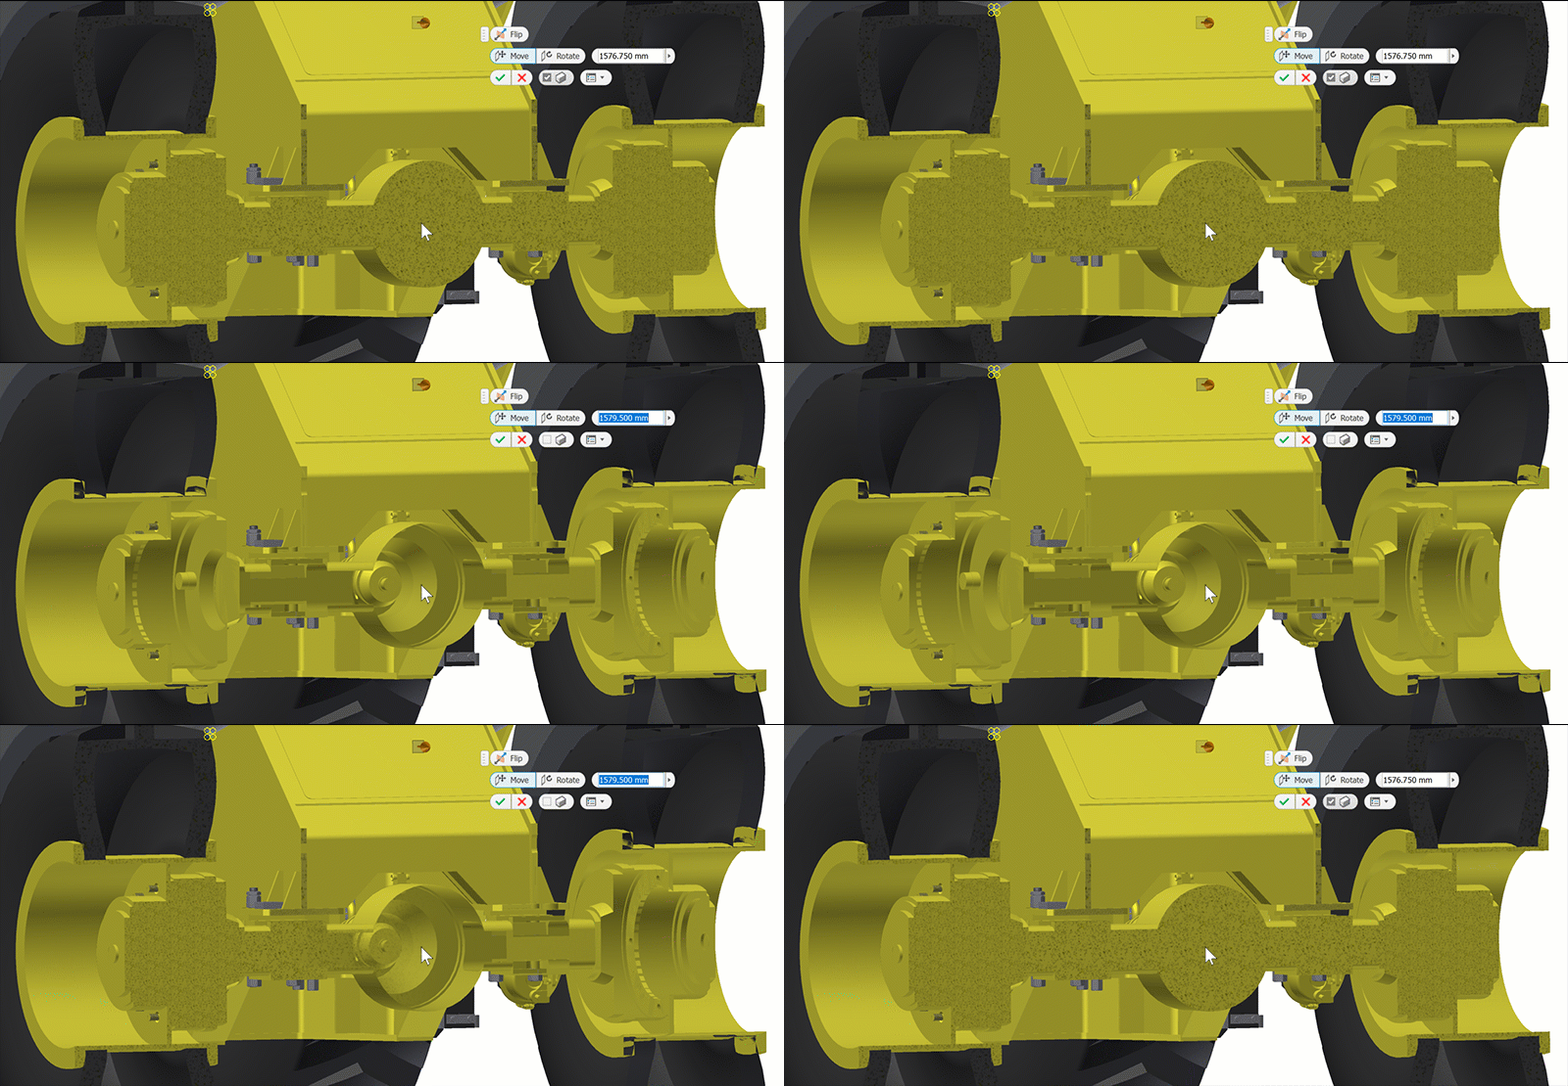
Control Section View end cap preview during section view plane dragging.
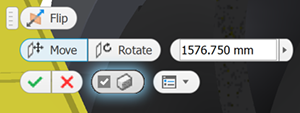
End cap visibility is set by default to display end caps for sectioned geometry when the part count is less than or equal to 500. If the part count is greater than 500 the end caps will not display. You can override the setting by selecting or deselecting the option in the mini-toolbar.
For more information see To Work with Section Views.
- Part Section Views
Section view definition persists in the design view representation. With this release you can easily edit the section view definition or suppress the section view by right-clicking the view representation node and clicking Section View
 Edit or Suppress.
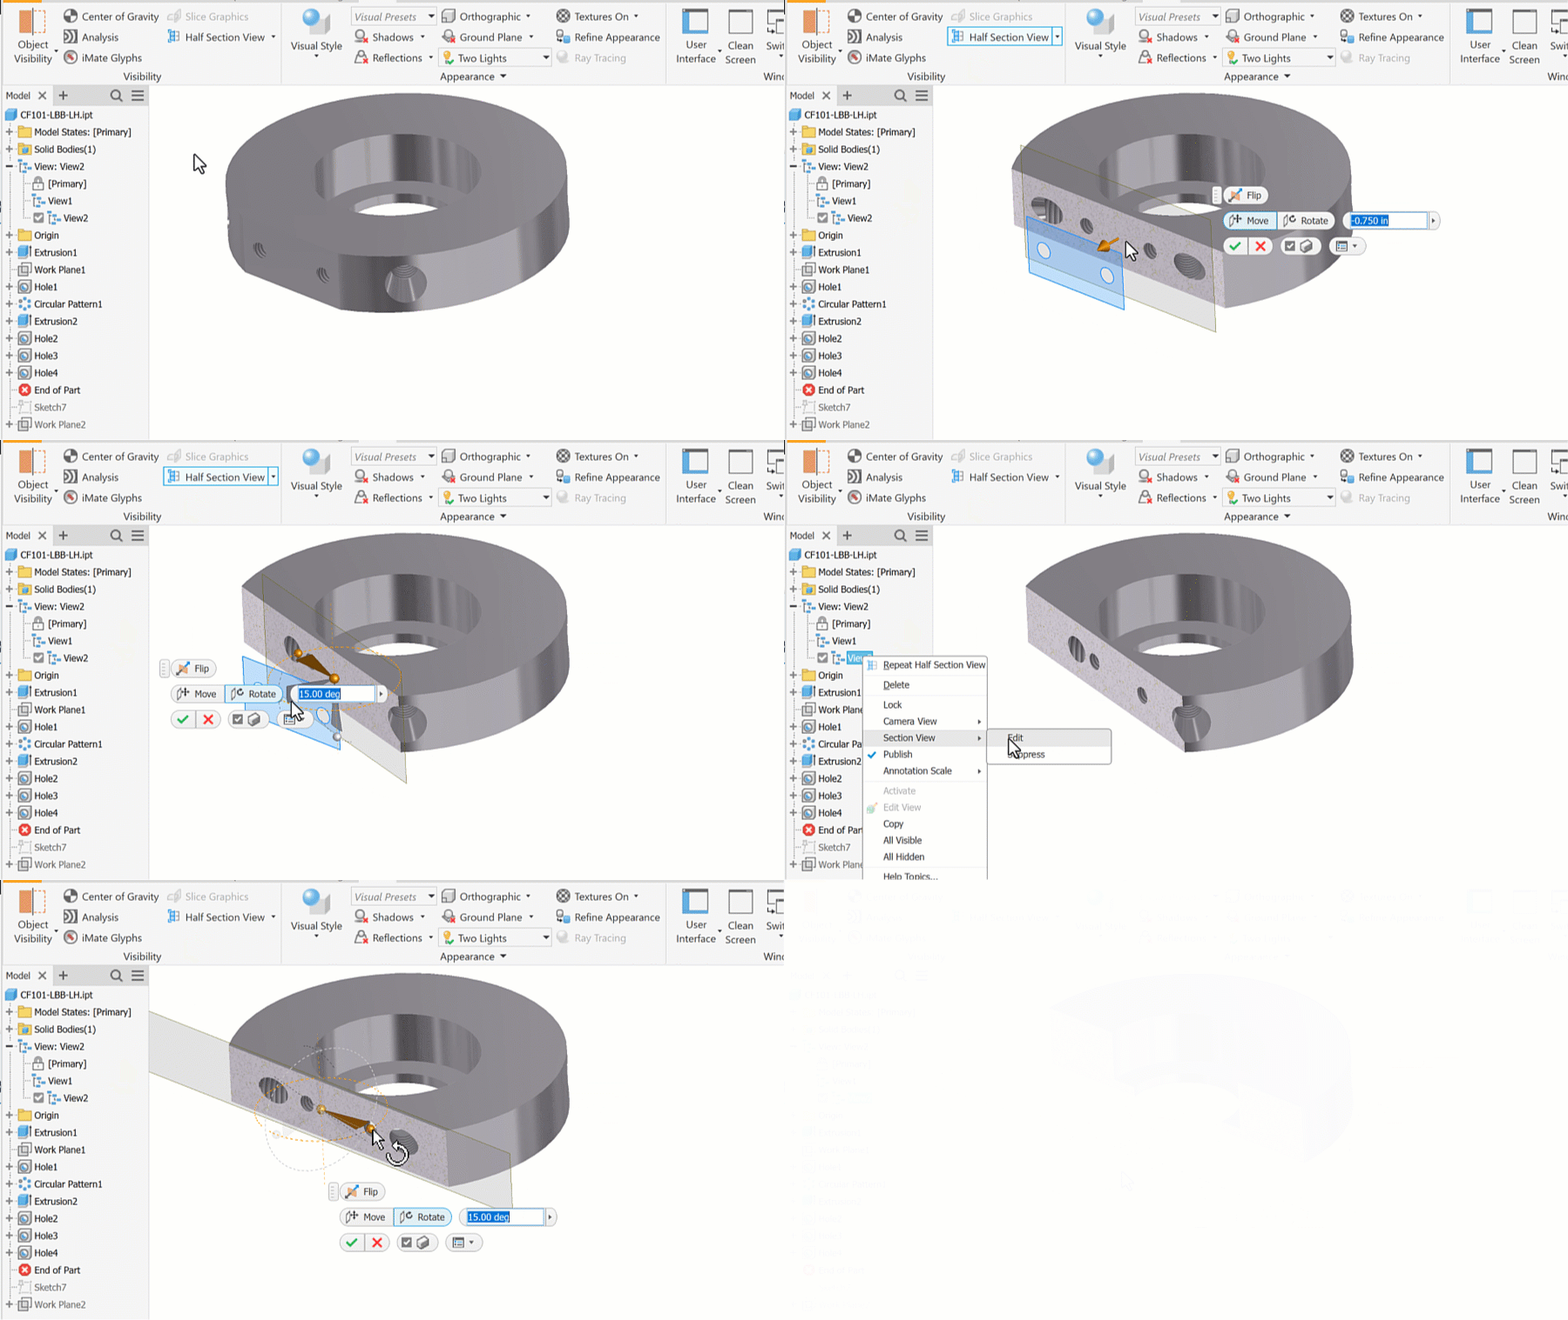
Previously, you could only access section views using the context menu commands which required unnecessary clicks. Now, the section view commands and options are added directly to the mini-toolbar in the graphics window.

For more information see To Work with Section Views.
- Content Center - Thread Direction
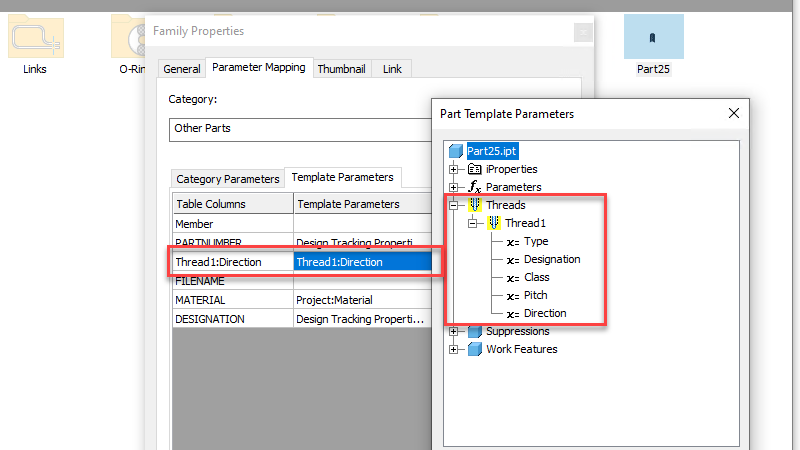
You can now map the thread direction (left or right) to the part template parameters.
Using the Content Center Editor add a new column into Content Center family table. Fill in the desired thread properties defining the thread direction and map this column to the family template Thread Direction available in Family Properties
 Template Parameters
  Part Template Parameters.
- Sheet Metal
- Improved Profile Detection
When specifying face in Sheet Metal, closed loop detection is now improved to make it easier to select geometry from a sketch, especially in situations where multiple profiles are overlapping.
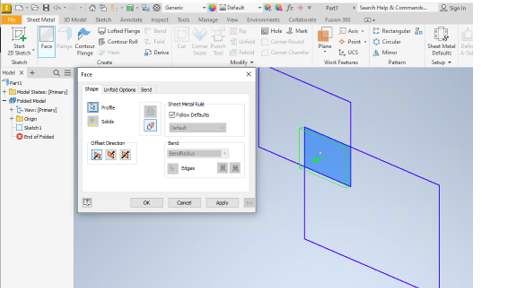
- Sketch Pattern Performance
This is a general improvement for sketch driven pattern, not only for compute, but also for highlighting a sketch driven pattern occurrence when moving the mouse on the browser view.
- Improved Profile Detection
- iLogic Enhancements
-
Vault Workflow Enhancements
With Inventor 2024, working with Vault has never been easier. New functions added to iLogic allow Inventor to check out, get files, search Vault, and much more as part of your automations. Vault code snippets added to the editor make it easy to quickly get started.
Note: iLogic Vault code requires Vault Professional and will not interface with Vault Basic.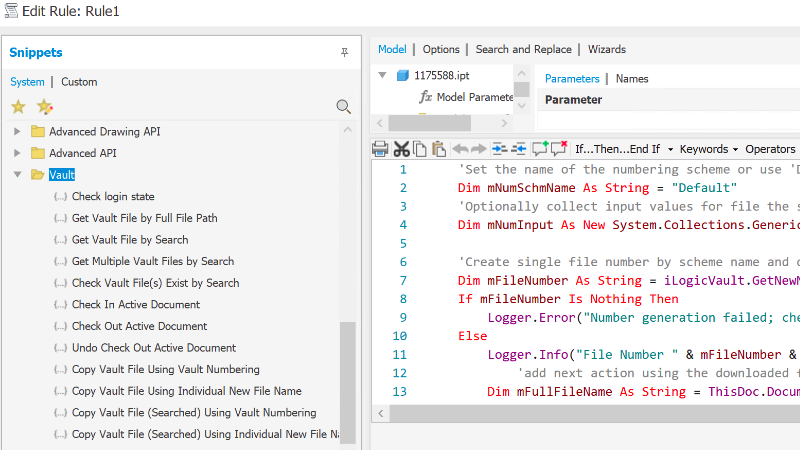
Add a Custom Content Center Part
You now have the ability to place and define a custom part in iLogic. Create a custom part in Content Center, or insert a standard Content Center part as a custom part, and create a rule to capture the current state. The "AddCustomConterCenterPart" function is created. When you edit the part and repeat the capture operation, iLogic rule updates accordingly. Also, when you edit the rule, the part updates as well.
Close an Open Form
A new function to close an open form is added in this release of Inventor. Note that this is only available for non-modal forms.

-
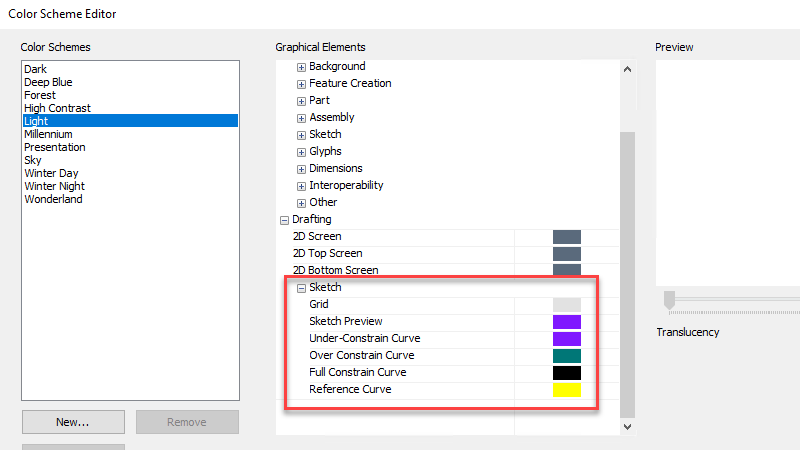
- Sketch Color Scheme
With this release, color scheme settings can be set for drawing sketch elements. Until now, it was difficult to work with elements if their color conflicted with the sheet color setting. The new Sketch options under the Drafting heading allow the color of sketch elements to be set for the drawing environment.
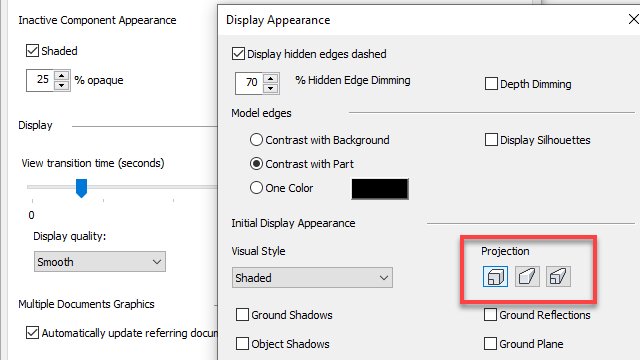
- Perspective with Ortho Faces
It is now possible to set Perspective With Ortho Faces as the default view setting in both Document Settings and Application options.
To access it, go to:
- Application Options
 Display tab
  Appearance
  Settings
  Display Appearance dialog
  Initial Display Appearance
  Projection
- Open a modeling document: Document Settings
 Standard tab
  Display Appearance
  Settings
  Initial Display Appearance
  Projection
- Application Options
- Component Substitute Status
Easily identify parts or assemblies that are substitute components.
Whenever a part or assembly is created as a substitute, using derive or simplify, the resulting component is given the read-only substitute status. The substitute status displays in the component context menu.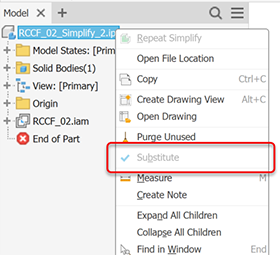
This change affects part documents. Thus, even in a new part document, the context menu displays the read-only Substitute status. It is unchecked.
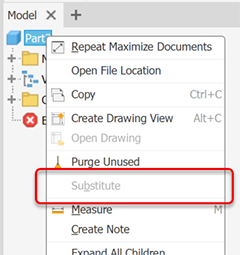
For more information about simplified substitutes see Create a Simplified Part
- Model Parameter Enhancements
- Hardness
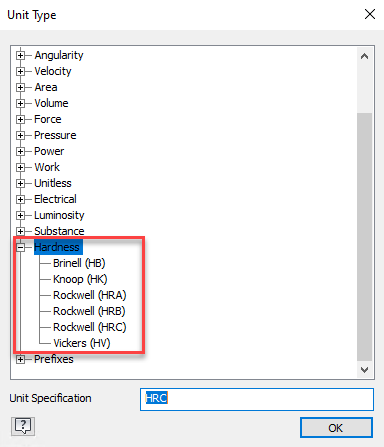
Hardness is a brand new unit type added for this Inventor release. This allows hardness to be specified in the Finish command, but can also be used on it's own. The following types are available in the Parameters dialog:
- Brinell (HB)
- Knoop (HK)
- Rockwell (HRA)
- Rockwell (HRB)
- Rockwell (HRC)
- Vickers (HV)
- Export Boolean Parameter to a Custom iProperty
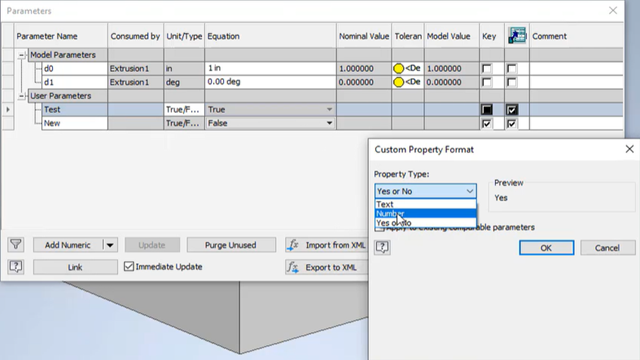
It is now possible to export both text and Boolean (true/false) values from the Parameters dialog to custom iProperties. These can then be retrieved for example in the drawing environment or 3D annotations. Text and Boolean parameters can also be exported when using the Derive function.
- Hardness
- Part List Filter Indicator
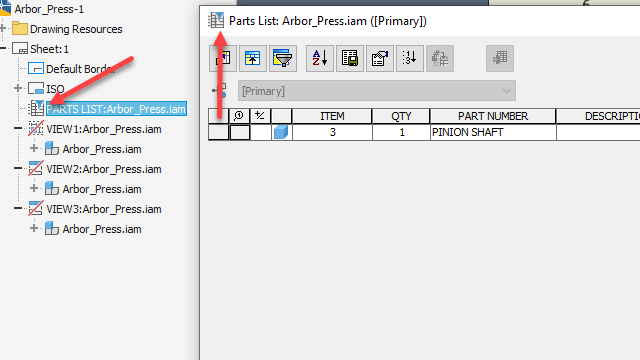
It is now easier to recognize if a filter is applied to the parts list. An icon in the browser and the Parts List dialog displays a filter symbol when one is applied.
- Inventor Studio Rendering Output
Inventor Studio has had, until now, an imposed 4096p x 4096p rendering output. The limitation has been removed and Inventor Studio now renders images up to 16K x 16K resolution, depending on what your graphics card supports.
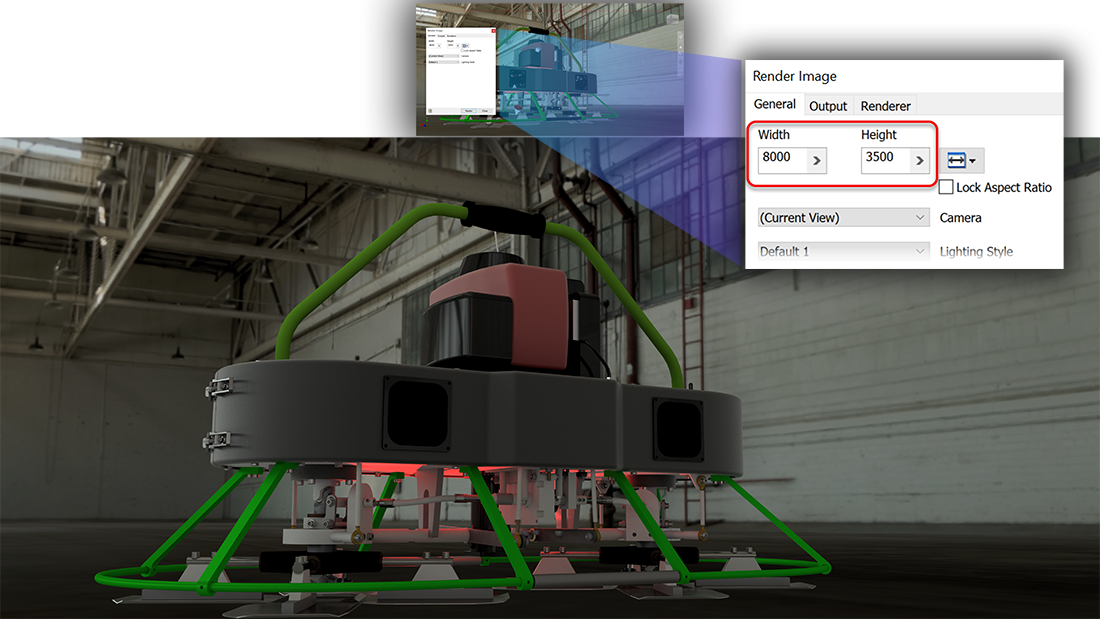
For more information see To Create Rendered Images.
- GPU Ray Tracing (Pre-release)
- Support for IBL backgrounds
GPU ray tracing now supports rendering with IBL backgrounds.
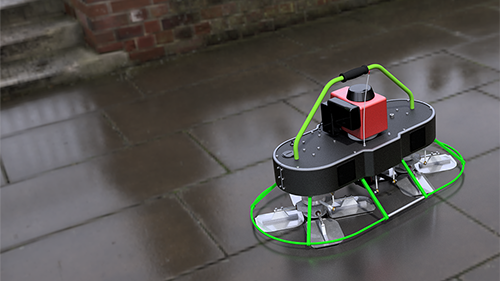
For more information see Environment Image Enhancements.
- Ray Tracing Dialog
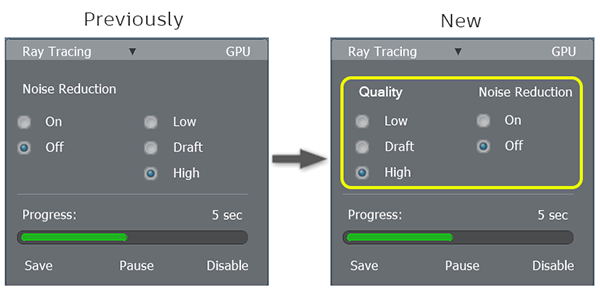
The Ray Tracing dialog has been improved to clarify the purpose for the options that are presented.
- GPU Thread Rendering
GPU Ray Tracing now renders thread appearances.
 Note: For AMD GPUs, decal and thread rendering are disabled while awaiting an updated driver.
For more information see GPU Ray Tracing (Pre-release) Details
- Support for IBL backgrounds
- Shortcut Improvement
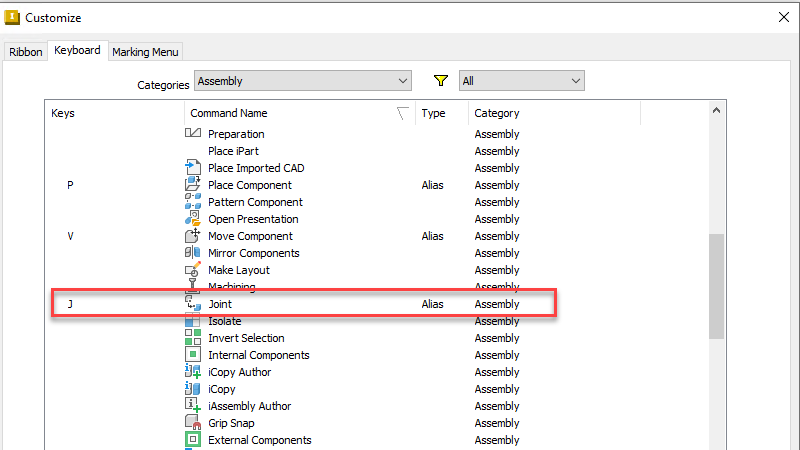
The "J" key is now assigned as the shortcut key to start the Place Joint command in assemblies, weldments, and dynamic simulation.
Assembly Section Views
