Jobs are available for Oracle-based enterprise industry models only. Jobs provide a long transaction and versioning framework. Jobs make it possible to have multiple states for an object in the database.
Jobs
You can change data only within a job. Data outside a job is read-only, and is equivalent to the Live data within a job.
Open — Once data modification is initiated, the job is set to open. Data changes are isolated within that job and are not visible in other jobs or outside jobs. Feature locking is either Pessimistic or Optimistic.
Pending — When changes are ready for review and approval, the job (including all altered data) is set to Pending. Data changes are visible in all open and pending jobs. The changes can be still be reverted.
Live — When the work is approved and the job is ready for production, the job is set to Live. Data changes are visible to all and cannot be reverted any more.
Deleted — Pseudo state. Deleted jobs are not stored in the database.
You can also add your own job states. They are stored in the system tables TB_JOB_STATE and TB_JOB_STATE_TRANSITION.
A job may contain one or more topics and each topic has its own job state. The topic's job states are stored in TB_JOB_TOPIC_STATE.
You can use the industry model options to specify whether to perform a job topology check when the job state is changed.
Job-enable an industry model
To work with jobs, you must first job-enable the industry model, which locks features so that they can be modified within a job only.
Job-enabling starts certain routines. For example, it adds a JOB_VERSION attribute to each feature class and writes Jobs metadata (TB_JOB* system tables).
"Lock" Jobs
Once it is checked, do not allow more than one Map session to work on the same job at same time. For example, User A starts Map, opens an enterprise project and works on job1. User B starts Map, opens the same project and selects job1 as the current job. An error message is displayed, informing User B that job1 cannot be worked on.
- Start Infrastructure Administrator and open the project.
- Go to Data Model --> Form Designer, under system tables, show form of TB_JOB table, find the ID (the ID is the job that the user had selected before the unexpected closure) of the dead locked Job.
- Show Form of TB_JOB_LOCKING table and delete the record which has the same job id.
Clear history of the current job when status is to Live
Once it is checked, changing the state from pending to live, current job history will be cleared automatically. This function is used to clear the live job historical data which are stored in TB_JOB_VERSION table so that the table won't grow too large and impact the performance.
Pessimistic Feature Locking
When you job enable an industry model, you lock the features. A feature can be modified in only one job. You can use optimistic or pessimistic job locking. The main difference between the two types of feature locking is the handling of job conflicts. A job conflict occurs if the same feature is modified in different jobs.
Use pessimistic feature locking to detect and solve job conflicts as early as possible.
For example, in Job A you add a transformer on a pole, and in Job B another user B selects the same pole to delete it from the database. With pessimistic feature locking, user B is immediately warned that the feature is locked. User B cannot modify the feature.
To solve the job conflict, user B would contact you, and you can jointly decide how to proceed. For example, you can use the Partial Posting command to extract the respective features from your Job A, so that it can be modified in Job B.
You use Partial Posting to extract a subset of features from the current job to change its state to Live immediately. Then the modified features can be modified again in other jobs.
For more information about Partial Posting, see "Changing the Job State" in the User's Guide.
Optimistic Feature Locking
A feature can be modified in different jobs. Use optimistic feature locking to allow modifications, even if conflicts occur. Job conflicts are not detected immediately, but only when you change the job state. After the first job has been merged forward, and when the second job is being merged forward, the Job Conflict Manager appears.
Job Templates
To work with job-enabled feature classes, you must create a job that contains those feature classes. Use job templates to do this.
A job template contains pre-defined feature classes that can be processed in the jobs that are created from this template. You cannot modify or delete job-enabled feature classes that are not in this job.
You can combine feature classes from different topics into one job template. When you create a job from this template, you can change the state of each topic separately.
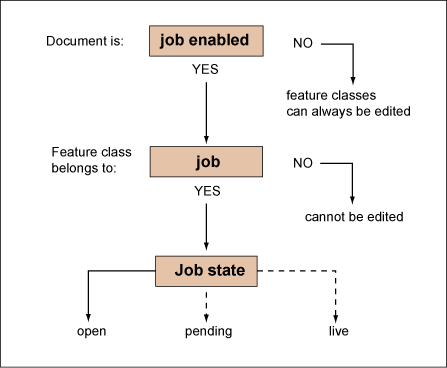
Job-enabled feature classes can be edited only if they belong to the current job. A job can be processed only if its state is open.

Job enabled feature classes can be edited only if they belong to the current job. A job can only be processed only if its state is open.
You can define an arbitrary number of job templates with any combination of job enabled feature classes.
You can assign job templates to one or more user groups. For example, to improve security, a user group is allowed to use only a limited set of job templates. In AutoCAD Map 3D toolset, members of this user group can work with only the assigned jobs templates and the jobs that were created with those templates.
In the Job Administrator, use the Assign Templates To User Groups command to assign unassigned job templates to user groups.
Steps in this workflow: