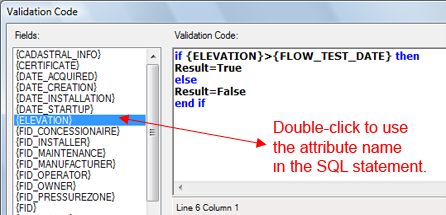
You can define validation code (check rules) using the same rules as those for defining formulas (using VB .NET). The code defines the value “result”, which can be either True or False. If True, the value is accepted. If False, the modification is blocked and the user has to correct the input until it fits the rules. The application stays in Edit mode until the input is correct.
The following example from the Water utility application assumes that a hydrant has two elevation attributes: ELEVATION is the height of the point where the hydrant is connected to the water network, GROUND_ELEVATION is the height of the hydrant above sea level. This rule ensures that the GROUND_ELEVATION is always higher than the ELEVATION
- In the Infrastructure Administrator, do one of the following:
- Click Enterprise and connect to the enterprise industry model. Open a project.
- Click File and open an industry model drawing or template.
- Expand the Industry Model node and click Form Designer.
The form designer is displayed in the right pane. The topics and feature classes are displayed in the form explorer.
- In the form explorer, select the feature class Hydrant, select the Form Type, and click Edit.
- In the Form Designer dialog box, in the right pane, click the General tab and select the GROUND_ELEVATION text control.
- In the left pane, click the Properties tab.
- Select the ValidationCode property and click the browse button.
-
In the Validation Code dialog box, enter the validation code. You can double-click the attribute names in the list to insert them into your code.
if {ELEVATION} < {GROUND_ELEVATION} then Result=True Else Result=False End if -
In the Validation Code dialog box, enter the text that is displayed if the validation code returns False:
Elevation must not be higher than ground elevation!
-
Click OK to close the Validation Code window.
To see the validation, open the Hydrant feature class form and enter values for ELEVATION and GROUND_ELEVATION. The error message is displayed if you enter an ELEVATION value that is higher than the GROUND_ELEVATION value.

Control input with a validation code. If the user enters a value that does not match, the specified error message is displayed.