
Right-click anywhere on the Time Slider to display a menu for animation control operations.
- Cut, Copy, and Delete
- Cut,
Copy, and
Delete affect the keys at the current time or in the selected ranges.
Cut and
Copy place the selected keys on an internal clipboard for pasting, and
Delete removes the selected keys from the timeline.
Copy,
Cut, and
Delete also operate on integer time ranges. For example, if your current time is 5, these items act on the range of 5 up to 6, but not including any keys at time 6.
Tip: You can easily Shift + select and drag keys on the Time Slider to cut and paste them elsewhere on the timeline, and Shift + Ctrl + drag selected keys to copy them elsewhere on the timeline. See Cut Keys and Copy and Paste Keys for more details.
- Paste
- Paste puts any copied or cut keys from the clipboard at the current time. Paste > Paste Connect pastes copied keys the same as if you select with the Connect option turned on.
- There are two ways to paste keys into the
Time Slider:
- Click the time where you want the pasted keys to start. Existing keys beyond that time will be shifted by the time range of the pasted keys.
- To fit the keys into a particular time range, Shift-click the Time Slider to select a time range. The keys will be scaled to fit that range. Existing keys in the selected area are removed.
Tip: You can easily Shift + select and drag keys on the Time Slider to cut and paste them elsewhere on the timeline, and Shift + Ctrl + drag selected keys to copy them elsewhere on the timeline. See Cut Keys and Copy and Paste Keys for more details. - Snap
-
Use Snap to force selected keys to snap in time to the nearest whole time units.
- Keys
-
- Convert to Key converts selected Breakdowns to normal keys.
- Convert to Breakdown converts normal keys to Breakdowns.
- Add Inbetween adds a single Inbetween.
- Remove Inbetween removes a single Inbetween.
-
Remove Key expands a submenu where you select options for removing multiple keyframes at once:
Setting Description Unsnapped Deletes any keys that are not snapped to whole frames. You can set a time range for this action if you click Unsnapped >  for options. See
Remove key options for more.
for options. See
Remove key options for more.
Before Current Frame Deletes all keys before the current frame.
Click Before Current Frame >
to see options. See
Remove key options for more.
After Current Frame Deletes all keys that follow the selected frame. Click After Current Frame > to see options. See
Remove key options for more.
to see options. See
Remove key options for more.
Outside Current Range Deletes all keys that are outside the range set in the Outside Current Range > options. See
Remove key options for more.
options. See
Remove key options for more.
Ripple Delete Removes keys between the range set in the Ripple Delete > options, and closes the gap created by the deletion. See
Remove key options for more.
options, and closes the gap created by the deletion. See
Remove key options for more.
Redundant Keys Removes keys with similar values to streamline animation. Click Redundant Keys > to see options. See
Remove key options for more.
- Tangents
-
The Tangents item will set the tangent of the keys at the current time, or all the keys in a selected time range.
-
- Spline creates an animation curve that is smooth between the key before and the key after the selected key.
- Linear creates an animation curve as a straight line joining two keys.
- Clamped creates an animation curve that has the characteristics of linear and spline curves.
- Stepped creates an animation curve whose out tangent is a flat curve.
- Flat sets the in and out tangents of the key to be horizontal (with a slope of 0 degrees).
- Plateau eases animation curves in and out of their keyframes like spline tangents, but also flatten curve segments that occur between equal-valued keyframes like clamped tangents.
- Auto clamps curve values between frames to a maximum or minimum point based on the adjacent keyframe values.
- For more description of each of these tangent types, see Graph Editor Tangents menu.
- Blue Pencil
- Click Blue Pencil to view a list of operations for Blue Pencil frames. See Work with Blue Pencil frames.
-
- Insert Frame(s) adds a blank frame at the current time.
- Duplicate Previous Frame creates an identical version of the previous frame at the current time. See the section Difference between Copy and Duplicate Previous Frame in the Work with Blue Pencil frames topic to learn when to use this option instead of Copy Frame(s).
- Delete Frame(s) removes the frame at the current time.
- Cut Frame(s) removes the frame at the current time and copies it to the clipboard.
- Paste Frame(s) pastes the contents of the clipboard at the current time.
- Copy Frame(s) copies the current frame to the clipboard. However, it does not remove the frame. See the section Difference between Copy Frame(s) and Duplicate Previous Frame in the Work with Blue Pencil frames topic to learn when to use this option instead of Duplicate Previous Frame.
- Clear Frame(s) empties the drawings from current frame.
- Display Frames lets you choose how frames appear on the
Time Slider:
-
Always shows Blue Pencil frames on the Time Slider.
-
Selection/Context Active only shows Blue Pencil frames on the Time Slider when using Blue Pencil.
-
Off Hide Blue Pencil frames on the Time Slider.
-
- Time Slider Bookmarks
-
Time Slider Bookmarks are colored tags along the top of the Time Slider that flag events in your scene. Bookmarks let you draw attention to specific moments in time, which is useful when you want to focus or highlight specific areas or moments in your scene.
-
Add a Bookmark to a selected frame or time range by clicking or by clicking the Bookmark icon
 in the
Range Slider or pressing
Alt (Option) +
T.
in the
Range Slider or pressing
Alt (Option) +
T.
-
Create
Opens the Create Bookmark dialog so you can add a bookmark to the selected frames. If no frames are selected, enter the bookmark range in the Start and End frame fields.
-
Edit
Opens the Create Bookmark dialog for the bookmark at the current time. (If multiple bookmarks overlap, the bookmark on top (the newest-created) is selected.)
-
Frame Bookmark
Centers the playback range on the bookmarks at the current time, so that the bookmark area takes up the entire range. (If multiple bookmarks overlap, the bookmark on top (the newest-created) is selected.)
Hotkey: | (vertical bar)
-
Frame Previous Bookmark
Centers the Range Slider on the bookmark before the bookmark at the current time.
Hotkey: : (colon)
-
Frame Next Bookmark
Centers the Range Slider on the bookmark after the bookmark at the current time.
Hotkey: , (comma)
-
Unframe
Returns the Time Slider view to the play range.
Hotkey: Alt (Option) + \ (backslash)
-
Delete
Deletes the top-most bookmark at the current time.
-
Show Bookmarks
Toggles Bookmark visibility.
-
Delete All Bookmarks
Removes all bookmarks from the scene.
-
BookmarkManager
Opens the Bookmark Manager window.
See Create a Bookmark for more.
-
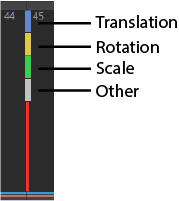
- Color Coded Keys
-
Turn on this option to show key ticks with colored "beads" to indicate which animation curve affected by the key.
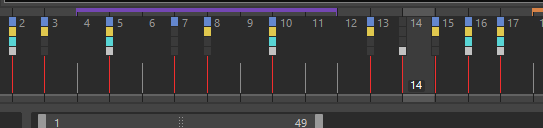
Colors indicate on which curve the key is set
A Time Slider color coded key tick showing what each color indicates
- Set custom colors for Translation, Rotation, Scaling, and Other keyed attributes in the Color Settings.
- Cached Playback
- Lets you activate and configure Cached Playback to improve animation playback performance.
-
- Cached Playback
- Turn on this option to cache animation to memory to improve playback speed. See Use Cached Playback to improve playback speed.
- Caching modes
- Choose from Evaluation cache, Viewport software cache, or Viewport hardware cache to optimize Cached Playback for your computer's hardware. See Choose a mode for Cached Playback for descriptions of these modes.
- Flush Cache
- Empties the playback cache, and discards the contents so that everything must be rebuilt. Because the data is immediately deleted, it may be slower than cache invalidation. Use Flush Cache when you want to wipe the cache clean. See the
Invalidation section of the
Cached Playback status line states topic. (You can also flush the cache from the right-click menu of the Cached Playback icon
 in the
Playback Options.)
in the
Playback Options.)
- Cached Playback Preferences
- Opens the Cached Playback Preferences window so you can configure Cached Playback.
- Color preferences
- Opens the Color Settings window directly to the Cached Playback color settings, where you can change the default coloring of every part of Cached Playback that appears on the Time Slider. You can pick a color for cached, uncached and invalidated frames and subframes. You can even set transparency for the Cached Playback Status line with the opacity settings.
- Playback Speed
-
Lets you set the playback speed or frame rate of your current scene.
-
- Real-time
-
Sets the playback speed of your current scene to 24 frames per second.
- Play Every Frame, Free
-
Sets the playback speed of your current scene to play every frame and not be clamped to a specific maximum frame rate.
- Play Every Frame, Max Real-time
-
Sets the playback speed of your current scene to play every frame and be clamped to a maximum frame rate of 24 frames per second.
- Display Key Ticks
- Lets you set the source of the key ticks shown on the Time Slider. Choose:
- Active: keys set on the active object. This is the default.
- From Channel Box: keys set in the Channel Box. See Set keys in the Channel Box.
- None: does not show key ticks on the Time Slider.
- Show Layer Weight: shows the weight animation for a selected layer.
- From Layer Editor Show Options: uses whatever setting is active in the Animation Layer Editor menu bar Show menu.
- All Affecting: shows keys for all affected animation layers. (All layers that contain attributes of objects selected in the scene.).
- Active: shows only keys from active layers.
- Selected: shows only keys from selected animation layers.
- Active and Selected: shows keys from both active and selected animation layers.
See View layered animation for more information.
- Playback Looping
-
To select playback looping options, right-click the Time Slider and select Playback Looping > Once, Oscillate, or Continuous (For a demonstration of this behavior, see Loop in Playback Options.) These are the same options as using the Loop icon
 in the
Playback Options and the
Preferences window.
in the
Playback Options and the
Preferences window.
- Set Range To
-
- Start/End sets the playback range to the Start and End values set in the Playback Range numeric input fields.
- Min/Max sets the playback range to the first and last keys of the scene.
- Selected sets the playback range to the range defined by the current selection on the Time Slider.
- Enabled clips sets the playback range to include the range of all enabled clips.
- Sound Length sets the playback range to the duration of a sound currently loaded into the Time Slider.
- Preferences sets the playback range to the values in the Preferences window.
- Time Display
-
Select what format Time information appears on the Time Marker:
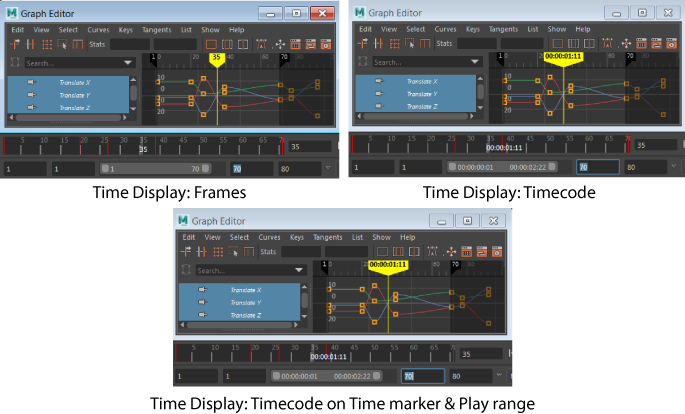
- Frames: Displays frames on all time rulers, current time markers, and input fields which display or accept time.
- Timecode: Displays video standard timecode on all time rulers, current time markers, and input fields which display or accept time.
- Timecode and frames on Time Marker: Displays video standard timecode on timemarkers while time rulers shown frames. This is the legacy display when Timecode is set in the in the Time Slider options in the Time Slider Preferences
- Enable Stepped Preview
-
Lets you toggle Stepped Preview mode on and off, easily switching curves from Spline to Stepped tangents and back. When on, keys temporarily display with Stepped tangents, so playing back your animation gives a quick view of object positions as they hit each keyframe. When off, the animation plays as usual with the original tangents. See also Stepped tangents.
- Auto snap keys
-
When on, keys snap to the nearest whole frame when they are moved or scaled. When scaling, if two keys snap to the same frame, they merge together into one key. This preference is off by default.Tip: You can also select Windows > Settings/Preferences > Preferences > Time Slider > Auto snap keys.
- Audio
-
This menu lets you select an imported sound to be displayed on the Time Slider.
Select Sound > <filename> >
 .
.
- Playblast
-
Selecting this opens the Playblast window. Selecting the option box (
) opens the
Playblast Options
window.