
You can quickly access many of your most commonly used tools with marking menus.
Marking menus are used throughout the Maya interface. When you right-click an object, a marking menu appears that lets you select a selection mode and other actions that are in context to the type of object. Some marking menus appear when you hold a key and press a mouse button.
Marking menus are very fast for experienced users because once you get used to showing them and the positions of their items, you can select the items using very quick gestures with the mouse or tablet pen, sometimes so fast the entire menu won’t even display.
To select an item from a marking menu
- Do one of the following:
- Right-click anywhere in your scene when an object is selected, and release the mouse button.
The marking menu remains on the screen, letting you move your cursor over the item you want to select.
- Right-click anywhere in your scene when an object is selected and continue holding your mouse button and drag in the direction of the item you want to select. It doesn't matter how far you drag or if you hit the item exactly. This allows you to make the drag very quickly. Dragging over an item with a submenu attached shows the submenu.
- Right-click anywhere in your scene when an object is selected, and release the mouse button.
Blue Pencil Marking menus
The Blue Pencil Marking menu gives you intuitive access to frequently used actions. Right-click when Blue Pencil is active to show a menu of Blue Pencil tools.
| Menu Item | Effect | |
|---|---|---|
| Transform | Activates Transform mode, which lets you select an area of a drawing and translate, rotate and scale it.See Modify drawings with the Blue Pencil Transform mode for steps on how to modify your Blue Pencil drawings. | |
| Draw | Expands to show a choice of Blue Pencil drawing tools. Click the option box next to the name of the tool you want to use: | |
| Pencil | Lets you draw freehand in the Viewer Window. | |
| Brush | Lets you draw freehand in the Viewer Window. | |
| Eraser | Erases brush strokes on the Blue Pencil sketch at the current frame. | |
| Text | Adds a text box to the scene where you can type. | |
| Line | Drag across the screen to create a straight line. | |
| Arrow | Drag across the screen to create a line capped with an arrowhead. | |
| Ellipse | Drag across the screen to create an oval shape. | |
| Rectangle | Drag across the screen to create a square shape | |
| Frame | Expands to show a choice of Blue Pencil Frame management tools: | |
| Insert | Adds a Blue Pencil frame to the scene at the current time. | |
| Duplicate | Creates a copy of the Blue Pencil frame at the current time. | |
| Step Forward | Moves to the following Blue Pencil Frame. | |
| Paste | Adds the clipboard contents at the current time. | |
| Delete | Removes the frame at the current time from the scene. | |
| Clear | Keeps the frame but removes the frame content at the current time. | |
| Copy | Creates a copy of the Blue Pencil frame at the current time. | |
| Step Backward | Moves to the previous Blue Pencil Frame. | |
| Cut | Removes the frame at the current time and adds it to the clipboard. | |
| Ghosting | Expands to show a choice of Blue Pencil ghosting options. Click the option box next to the name of the feature you want to use: | |
| Ghost Previous | Displays a transparent 'ghost' image of the earlier frame. | |
| Ghost Next | Displays a transparent 'ghost' image of the following frame. | |
| Cleanup | Expands to give you options about removing unwanted sketch artifacts from the current frame. See Clean up Blue Pencil sketches. | |
| Delete Active Layer | Deletes the active Blue Pencil layer from the scene. | |
| Delete Active Camera Layers | Deletes every Blue Pencil layer from the camera that the active layer is assigned to. | |
| Delete All | Removes all Blue Pencil data from the scene. | |
See Blue Pencil Toolbox for more information.
Graph Editor Marking menu
Shift + S +click in the Graph Editor Graph View to display a marking menu of options for keys (swipe left) and Tangents (swipe right). See Keyframe Tangent Marking menu for a description of the options.
Polygon / NURBS marking menus
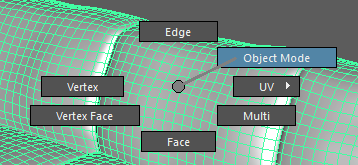
Right-clicking a polygon or NURBS object in the scene brings up a marking menu of many commonly used commands.
| Menu Item | Effect |
|---|---|
| Components | The upper radial section of each object type displays options to change the current component selection mode for that object.
Note: Objects remain selected even when switching between various object and component modes.
|
| Shape node | Allows you to display the appropriate object's shape node without changing the current selection. |
| Select | Selects the current object. |
| Select All | Selects all objects in the scene. |
| Deselect All | Clears the current selection. |
| Select Hierarchy | Selects the current object and anything under it in the DAG. |
| Invert Selection | Selects anything currently unselected in the DAG and vice versa. |
| Select Similar |
When in component mode, Select Similar selects polygonal components (vertices, edges, and faces) of a similar type to the current selection. When in object mode, this option selects other objects of the same node type in the scene. |
| Make Live |
Turns the current object into a Live surface that other objects will then automatically snap to. |
| DG Traversal |
Allows you to navigate up and down the DG into the current object's History (upstream) and Future (downstream) without having to open the Node Editor. |
| Inputs |
Allows you to select and edit any / all input (upstream) connections to the current object's shape node. |
| Outputs |
Allows you to select and edit any / all output (downstream) connections to the current object's shape node. |
| Paint | Provides quick access to multiple paint modes, including: Paint Select, 3D Paint, Sculpt Geometry, and Vertex Color painting (not available for NURBS curves). |
| Metadata | Allows you to visualize and modify metadata associated with the current object. |
| Actions | Provides quick access to Templating, (controlling the object's selectability), Unparenting (down to the root level), and Bounding Box display actions. |
| UV Sets | Provides quick access to options related to an object's (possibly) multiple UV sets (polygons only). |
| Color Sets | Provides quick access to options related to an object's (possibly) multiple color sets (polygons only). |
| Scene Assembly | Provides quick access to various options related to Scene Assembly for creating large complex scenes. |
| Material Attributes | Opens the current object's shader node in the Attribute Editor. |
| Assign New Material | Opens the Assign New Material window. |
| Assign Favorite Material | Allows you to assign commonly used shaders based on your Favorite list in the Hypershade. to the current object. |
| Assign Existing Material | Allows you to assign the current object any shader that already exists in the scene. |
| Remove Material Override | Removes any material overrides created on a render layer, reverting back to the master layer's material shader. |
Convert Selection marking menus
Ctrl + right-clicking an object provides a menu of selection conversion commands that mirror those found in the Select > Convert Selection menu as well as Contiguous Edges. The available options differ depending on the current object type. See Change one type of selection to another.
Create Polygon marking menus
Shift + right-clicking the scene without a selection provides a menu of polygon primitives and creation tools.
Polygon Tools marking menus
Shift + right-clicking with a polygon object selected brings up a marking menu of many commonly used polygon tools.
| Menu Item | Effect |
|---|---|
| Target Weld Tool | Activates the Target Weld Tool, which allows you to merge vertices or edges interactively. |
| Sculpt Tool | Activates the Sculpt Tool, which moves vertices in a direction determined by the average of all normals within the boundary of the tool cursor. |
| Fill Holes | Fills all holes in the geometry with new faces. |
| Multi-Cut | Activates the Multi-Cut Tool, which allows you to divide edges and faces by inserting new vertices / edges. |
| Insert Edge Loop | Activates the Insert Edge Loop, which allows you to create new edge loop perpendicular to the existing edges. |
| Append to Polygon Tool | Activates the Append to Polygon Tool, which allows you to add polygons to an existing mesh. |
| Soften/Harden Edge | Manipulates vertex normals to make all edges appear soft or hard. |
| Extrude | Extrudes the selected components. |
| Offset Edge Loop Tool | Activates the Offset Edge Loop Tool, which allows you to insert new edge loops on either side of selected edges. |
| Smooth | Smooths the current mesh by adding new polygons. |
| Subdiv Proxy |
Smooths the current mesh by adding polygons and placing it inside the original, non smoothed mesh, which becomes the proxy. |
| Crease Tool | Activates the Crease Tool, which allows you to create transitions between hard and soft edges. |
| Project Curve on mesh | Creates a new curve that is the projection of a selected curve on the selected mesh surface. |
| Split mesh with projected curve | Splits or splits and detaches edges on a polygon surface using a projection from the selected curve. |
| Mirror | Provides the options found in the Mesh > Mirror menu, to mirror the selected mesh across an axis. |
| Mapping | Provides options to apply a default UV map to the selected faces. |
| Triangulate Faces | Converts the selected faces to triangles to ensure proper rendering. |
| Quadrangulate Faces | Converts the selected faces to quads to ensure proper rendering. |
| Separate | Separates the selected polygon into the individual polygon shells (if any exist) that make it up. |
| Combine | Combines the selected polygon shells into a single object. |
| Booleans | Provides the options found in the Mesh > Booleans menu, to model based on the intersection points of two meshes. |
| Reduce | Retopologizes the selected object in an attempt to reduce the overall number of polygons. |
| Cleanup | Opens the Cleanup Options , which allow you to remove unwanted geometry or tesselate faces that may be valid in Maya but not elsewhere. |
| Connect Tool | Activates the Connect Tool allowing you to connect components by inserting edges between them. |
| Quad Draw Tool | Activates the Quad Draw Tool, which allows you to draw new polygons by placing dots in the scene. |
| Polygon Display | Allows you to toggle various display settings based on the component type currently selected. |
UV marking menus
Shift + right-clicking a polygon object while in UV selection mode brings up a marking menu of many commonly used UV tools.
| Menu Item | Effect |
|---|---|
| Mapping | Allows you to project new UVs onto the mesh. |
| 3D Cut and Sew UV Tool | Allows you to create or merge UV shell seams directly in the viewport. |
| 3D Grab UV Tool | Allows you to drag UVs directly in the viewport. |
| Cut UVs | Separates the selected UV edges. |
| Sew UVs | Attaches the selected UV edges. |
| Delete UVs | Removes the selected UVs. |
| Create UV Shell | Creates a UV shell(s) out of each set of adjacent selected UVs. |
| Merge UVs | Merges the selected UVs (assuming they belong to the same UV shell). |
| Auto Seams | Automatically cuts seams into the shell pertaining to the selected UVs. |
| Texture Borders | Displays texture borders in the viewport. |
| UV Editor | Opens the 2D UV Editor. |
| UV Set Editor | Opens the UV Set Editor. |
UV Shell marking menus
Shift + right-clicking a polygon object while in UV Shell selection mode brings up a marking menu of many commonly used UV shell tools.
| Menu Item | Effect |
|---|---|
| Mapping | Allows you to project new UVs onto the mesh. |
| 3D Cut and Sew UV Tool | Allows you to create or merge UV shell seams directly in the viewport. |
| 3D Grab UV Tool | Allows you to drag UVs directly in the viewport. |
| Unfold | Unfolds the object's UV shell. |
| Optimize | Evens out the space between UVs. |
| Layout | Spreads out an object's UV shells to make the best use of 0-1 UV space. |
| Flip | Changes the orientation of the UV shell. Useful if a texture appears backwards. |
| Auto Seams | Automatically assigns / cuts seams into the UV shell. |
| Texture Borders | Displays texture borders in the viewport. |
| UV Editor | Opens the 2D UV Editor. |
| UV Set Editor | Opens the UV Set Editor. |
NURBS curves marking menus
Shift + right-clicking a NURBS curve brings up a marking menu of many commonly used NURBS commands.
| Menu Item | Effect |
|---|---|
| Add Points Tool | Activates the Add Points Tool, which allows you to extend certain types of curves (such as CV, EP, and Pencil)q. |
| Open / Close Curves | Separates or connects the first and last points of the selected curves. |
| Reverse Curve | Reverses the curve direction by renumbering the points. |
| Convert NURBS to Bezier | Converts the selected NURBS curve to a Bezier curve. See Bezier curves. |
| Bezier Curve Tool | Activates the Bezier Curve Tool, allowing you to modify or extend the selected Bezier curve. |
Transform marking menus
Ctrl + Shift + right-clicking your scene when different transformation tools are active, or holding the shortcut key for that tool and left-clicking the scene, opens a marking menu full of various settings related to that particular transformation tool.
Common Transform marking menus
The following marking menus are common to the Select Tool, Move Tool, Rotate Tool, and Scale Tool.
| Menu Item | Effect |
|---|---|
| Selection Constraints | Lets you select components based on a specific type of constraint (i.e. edge loops only or border edges only). |
| Transform Constraints | Lets you select a transform constraint. |
| Smart Duplicate | Lets you Shift + drag to create duplicates. |
| Smart Extrude | Lets you shift + drag to extrude components. |
| Preserve UVs | Maya automatically transforms UVs in the UV space relative to the transformations taking place in the scene view (not available for Select Tool). |
| Preserve Children | Maintains the position of child objects when you move a parent object (not available for Select Tool). |
| Tweak Mode | Turns Tweak Mode on and off (not available for Select Tool). |
Symmetry
| Menu Item | Effect |
|---|---|
| Symmetry |
Turns Object symmetry on. |
| Topology q/ World / Object |
Sets the symmetry space. |
| X Axis / Y Axis / Z Axis |
Lets you choose whether to reflect your selection along the X-axis, Y-axis or Z-axis. |
Select
| Menu Item | Effect |
|---|---|
| Marquee | Turns Marquee select on and off. |
| Preselection Highlight | Turns Preselection Highlight on and off. |
| Highlight Nearest Component | When enabled and Maya is in component mode, automatically highlights the component (according to the active component selection setting) closest to the mouse cursor for selection. |
| Highlight Backfaces | When enabled, backfacing components are highlighted for preselection and are selectable. When this option is disabled, backfacing components are still selectable, but they are not highlighted for preselection. |
| Asset Centric |
Turns Asset Centric selection on and off. |
| Soft Select | Opens the Soft Select marking menu. |
| Camera Based Selection | Turns on Camera Based Selection. |
| Clear Selection | Deselects all selected components. |
Soft Select
| Menu Item | Effect |
|---|---|
| Soft Select | Turns Soft Selection on and off. |
| Object / Global / Surface / Volume | Sets the Falloff Mode for Soft Selection. |
| Color Feedback | Turns color feedback for Soft Selection on and off. |
Select Tool marking menus
The following marking menus give you access to options associated with the Select Tool. You can also access these marking menus by holding Q + clicking in your scene.
| Menu Item | Effect |
|---|---|
| Paint Select | Changes the selection mode to Paint Select. |
| Lasso | Changes the selection mode to Lasso Select. |
Move Tool marking menus
Holding W + clicking in your scene opens a marking menu of options associated with the Move Tool. Most of the options can also be found in the Move Tool Settings.
| Menu Item | Effect |
|---|---|
| Axis / World / Object / Component | Sets the Move Axis (coordinate system) for the Move Tool. |
| Keep Spacing | Maintains relative spacing when snap settings are on. |
| Update Triad | Determines whether the manipulator is updated during manipulation or when the mouse button is released, when moving components along their normals. |
| Move Options | Opens the Tool Settings. |
Axis
| Menu Item | Effect |
|---|---|
| Live Object Axis / Normal / Parent / Along Rotation Axis | Sets the Axis Orientation for the Move Tool. |
| Custom |
Sets the Axis Orientation to a Custom axis orientation based on a specified point, edge, or face. |
Snap
| Menu Item | Effect |
|---|---|
| Discrete Move | Lets you move components by specified increments.
You can modify the increments in the Tool Settings editor. |
| Face Center / Vertex | Lets you move and snap to a live polygon’s components.
Both can be turned on simultaneously. |
| Relative Mode | Lets you move components relative to their initial orientation or scale. |
Rotate Tool marking menus
Holding E + clicking in your scene opens a marking menu of options associated with the Rotate Tool. Most of the options can also be found in the Rotate Tool Settings.
| Menu Item | Effect |
|---|---|
| Object / World /Component /Gimbal / Custom | Sets the Axis Orientation for the Rotate Tool. |
| Custom |
Sets the Axis Orientation to a Custom axis orientation based on a specified point, edge, or face. |
| Rotate Object Center | Lets you rotate object components around the object’s pivot point. |
| Free Rotate | When on, dragging the area inside the rotation manipulators (the center) rotates the object or component.
When off, you can only rotate the object or component by dragging the rotation manipulators. |
| Relative | Lets you rotate or scale components relative to their initial orientation or scale. |
| Rotate Options | Opens the Tool Settings. |
Scale Tool marking menus
Holding R + clicking in your scene opens a marking menu of options associated with the Scale Tool. Most of the options can also be found in the Scale Tool Settings.
| Menu Item | Effect |
|---|---|
| Axis / World /Object /Component | Sets the Axis Orientation for the Scale Tool. |
| Snap Scale | Lets you scale components by specified increments.
You can modify the increments in the Tool Settings editor. |
| Relative | Lets you rotate or scale components relative to their initial orientation or scale. |
| Scale Object Center | Lets you scale object components around the object’s pivot point. |
| Prevent Negative Scale | Stops all single axis scaling operations on components at 0. |
| Scale Tool Settings | Opens the Tool Settings. |
Axis
| Menu Item | Effect |
|---|---|
| Live Object Axis / Normal / Parent / Along Rotation Axis | Sets the Axis Orientation for the Scale Tool. |
| Custom |
Sets the Axis Orientation to a Custom axis orientation based on a specified point, edge, or face. |
Input / Output marking menus
Holding A + clicking in your scene opens a marking menu of options related to incoming and outgoing connections to the currently selected objects.
| Menu Item | Effect |
|---|---|
| Enable All Outputs / Disable All Outputs | Enables / Disables all outgoing values from the selected node. |
| Delete History / Delete Non-Deformer History | Clears the appropriate type of construction history. |
| Select All Inputs / Select All Outputs | Selects incoming / outgoing connections to the selected node. |
| Freeze Transformations | Resets the selected object's current transformations to zero. |
Component Marking Menus
Shift + right-clicking your scene when in component selection mode opens a marking menu specific to the type of component (vertices, edges, or faces) currently being selected.
Common Component marking menus
The following marking menus are common to the Vertex, Edge, and Face component modes.
| Menu Item | Effect |
|---|---|
| Merge | Provides options for merging multiple selections of the same component into one. |
| Paint Select | Activates Paint Selection mode for the current component type. |
| Multi Cut | Activates the Multi-Cut Tool, which allows you to divide edges and faces by inserting new vertices / edges. |
| Delete | Deletes the selected component (vertices and edges only). |
| Normals | Presents a number of options to modify the selected components normals (vertices and faces only). |
| Extrude | Extrudes the selected components. |
| Crease Tool | Activates the Crease Tool, which allows you to create transitions between hard and soft edges (vertices and edges only). |
| Connect Components | Connects the selected vertices, edges, or faces (in the form of their border edges) to the last selected vertex or edge. |
| Detach Components | Separates components into multiple overlapping components. |
| Transform Component | Activates a Manipulator Tool based on the last selected component. |
| Connect Tool | Activates the Connect Tool allowing you to connect components by inserting edges between them. |
| Polygon Display | Allows you to toggle various display settings based on the component type currently selected. |
Vertex marking menus
Shift + right-clicking the scene in Vertex component mode opens a marking menu of vertex tools and options.
| Menu Item | Effect |
|---|---|
| Average Vertices | Averages the distance between the selected vertices. |
| Chamfer Vertex | Chamfers the selected vertices. |
| Apply Color | Assigns color data to the selected vertices. |
Edge marking menus
Shift + right-clicking the scene in Edge component mode opens a marking menu of edge tools and options.
| Menu Item | Effect |
|---|---|
| Flip/Spin Edge | Flips or spins edges to opposite corners of a face. |
| Bevel Edge | Expands the selected edge into a new face based on the current Bevel Options. |
| Soften/Harden Edge | Manipulates vertex normals to make connected edges appear soft or hard. |
| Offset Edge Loop Tool | Activates the Offset Edge Loop Tool, which allows you to insert new edge loops on either side of selected edges. |
| Insert Edge Loop | Activates the Insert Edge Loop, which allows you to create new edge loop perpendicular to the existing edges. |
| Slide Edge Tool | Lets you reposition a selection of edges or entire edge loops on a polygon mesh. |
| Edit Edge Flow | Adjusts the position of the selected edges to fit the curvature of the surrounding mesh. |
| Add Divisions To Edge | Allows you to split an edge using multiple vertices. |
| Bridge | Creates faces connecting the selected border edges. |
| Fill Hole | Automatically creates a three or more sided face to fill an open area bordered by the selected edge. |
Face marking menus
Shift + right-clicking the scene in Face component mode opens a marking menu of face tools and options.
| Menu Item | Effect |
|---|---|
| Poke Face | Creates a vertex at the center of the selected face(s) and adds vertices to properly triangulate them. |
| Bevel Face | Expands the selected face's edges into a new faces based on the current Bevel Options. |
| Wedge Face | Extrudes an arc out of the selected face until it is within a certain Arc angle of the selected edge. |
| Smooth Faces | Adds new polygons to smooth out vertices and edges bordering the selected faces. |
| Assign Invisible Faces | Removes all shading from the selected faces (but does not remove the face itself). |
| Add Divisions To Faces | Subdivides selected faces into additional faces. |
| Triangulate Faces | Converts the selected faces to triangles to ensure proper rendering. |
| Quadrangulate Faces | Converts the selected faces to quads to ensure proper rendering. |
| Reduce Faces | Retopologizes the selected faces in an attempt to reduce the overall number of polygons. |
| Bridge Faces | Creates faces connected the selected faces' opposite border edges. |
| Extract Faces | Disconnects the selected faces from the mesh. |
| Duplicate Face | Creates a copy of the selected faces. |
| Target Weld | Activates the Target Weld Tool, which allows you to merge vertices or edges interactively. |
| Mapping | Provides options to apply a default UV map to the selected faces. |
Sculpting marking menus
Shift + right-clicking an object when using a sculpting tool gives you access to the other sculpting tools.
Hypershade Marking Menus
For a list of marking menus found in the Hypershade Window, see Hypershade Marking Menus
Node Editor Marking Menus
For a list of marking menus found in the Node Editor Window, see Node Editor Marking Menus
Script Editor Marking Menus
For a list of marking menus found in the Script Editor Window, see Script Editor Marking Menus
UV Editor Marking Menus
For a list of marking menus found in the UV Editor Window, see UV Editor Marking Menus