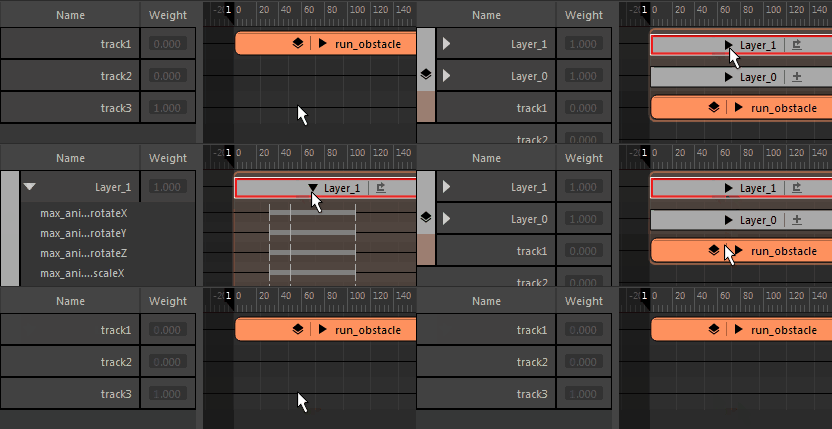
You can use Clip Layers to modify an existing animation clip.
- Activate the Organize by Clip option in the Graph Editor Outliner to view animation Clip Layers of selected objects grouped by animation clips.
- To add Clip Layers to a looped clip, first create a Group clip from it, and then add layers to the Group. See Combine clips into Group clips.
To create a Clip Layer:
Right-click a (or Shift-select multiple) clip in the Time Editor, and select
Create Additive
 or
Create Override
 from the
Time Editor toolbar or from the Layers area of the
Time Editor Clip contextual menu.
 next to the name. Click this to expand the Layer view. See
Key on Clip Layers. The active clip is outlined in red to let you know which Clip Layer is ready to receive keys.

To set a key on a Clip Layer
Click the expanded Clip Layer, ensure that it appears in the
Time Editor toolbar Active Layer field to select it for keying (the active layer highlights in red), and select Set Key
 , or press
S.

To move a key on a Clip Layer
Select the key and drag.

To delete a key on a Clip Layer

Time Editor Clip Layer modes
- Additive

-
When in Additive mode, an animation layer ‘adds’ its animation to layers that precede it in the stack and affect the same attributes.
-
For example, if AnimLayer1 and AnimLayer2 both contain the translateX attribute for a sphere, the resulting translateX value for the sphere is the sum of the translateX values from both layers.
-
You can use the Track Weight in this mode as a multiplier. For example, while a Track Weight value of 1 keeps the layer value as-is, a Weight value of 2 adds twice the effect, a Weight value of 0.25, adds a quarter of the value, and so on. This is useful feature if you want to exaggerate the effects of a layer.
-
Note:
Boolean attributes (such as Visibility) and Enum type attributes are always calculated in Override mode, even if they are added to animation layers in Additive mode.
- Result = Layer Value + Layer Weight
- See Key Time Editor clip weights.
- Additive Override
- Discards any preceding layers on the clip and adds the value to the raw clip value, as if all the layers below were muted, overriding them. The multiplier effect of the weight (see Additive, above) is still in effect.
- Result = Original Value + Layer Value * Layer Weight
- See Key Time Editor clip weights.
- Override

-
When in Override mode, an animation layer overrides the animation of any layer that shares the same attributes and precedes it in the stack.
Override discards any preceding layers on the clip and blends the layer value with the raw clip value, as if all the layers below were muted. The Track Weight settings have a multiplier effect, where if the Weight value is at 1, it represents 100% of the layer value, a Weight value of 0.5 represents 50% layer value and 50% of clip value, and so on.. -
You can modify the opacity of Override layers by turning on the Passthrough option and animating the Weight value. The following section describes Override-Passthrough mode.
Note: Be careful to use only the attributes you want an Override layer to drive, otherwise objects on your rig may be unintentionally pinned. Whenever you select a part of a character rig to create an Override layer, you create new animation based on the current pose; any inadvertently-selected nodes included with the layer will appear pinned at the current frame. See Animate HumanIK characters in the Time Editor for more on Override and Additive layers on HIK rigs. - Result = Layer Value * awfoundation::Clamp(Layer Weight, 0.0, 1.0)
- See Key Time Editor clip weights.
- Override Passthrough

- Override-Passthrough mode blends the layer value with the value of all layers combined below (weight 1 = 100% layer value, weight 0.5 = 50% of layer value and 50% of the value of all layers below).
When an animation layer is in Override mode, you can also turn on the Passthrough option. Passthrough lets you turn the opacity of Override layers on and off.
-
When Passthrough is off, the layer is always completely opaque, blocking all animation from preceding layers with shared attributes. When Passthrough is on, you can modify the layer’s opacity to control how much animation from preceding layers is allowed to play in the result.
-
If you think of Override layers like a gate in the animation layer stack, the Passthrough option controls whether the gate is locked or unlocked. When Passthrough is off, the gate is locked shut and no animation from preceding layers can get through. When Passthrough is on, the gate can open, and it is possible for other animation to get through.
-
With Passthrough on, you control the opacity of the layer by animating its Weight value. The gate is unlocked, and the Weight value determines how far it will swing open.
-
The following image illustrates the opacity of an Override animation layer as the Weight value changes with Passthrough mode on and off.
-

-
When Passthrough is on and the Weight value is set to 1, the layer is completely opaque and its full animation plays in the result. When the Weight is set to 0.5, half the layer’s animation plays in the result, mixed with half the animation from preceding layers. If the Weight is 0, the layer is completely transparent. None of its animation plays in the result, and the full animation from the preceding layers plays.
-
When Passthrough is off the layer is completely opaque, blocking all animation from preceding layers. Animating the Weight value still controls how much of the layer’s animation plays in the result.
- Normalized Weight = (awFoundation::Clamp(Layer Weight, 0.0, 1.0); value = value * (1.0 Normalized Weight) + Normalized Weight * Layer Value
- See Key Time Editor clip weights.