To open the Clip Layer contextual menu
- Click the Layer icon
 on a Clip Layer in the
Time Editor to expand its layers, then right-click the layer.
on a Clip Layer in the
Time Editor to expand its layers, then right-click the layer.
Note: The
Time Editor does not support
Animation Layers. Instead, use Time Editor Clip Layers to alter animation on existing clips.
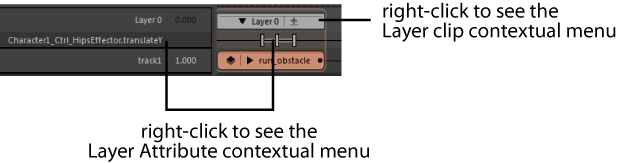
Note: Layer clips have two different contextual menus, depending on whether you right-click the Layer attribute or the Clip Layer. See
Layer attribute contextual menu
- Set Key
- Sets a key on the active layer.
Depending on the selection in the viewport and the Channel Box different attributes are keyed.
- Nothing selected: Keys all attributes in the Layer
- Objects selected: Keys all of the selected objects attributes
- Channel Box attributes select: Keys only the active layer Attributes that match the selection in the Channel Box
- Rename...
- Opens a window where you can enter a different name for the selected Clip Layer.
- Set as Keyable Layer
- Lets you make the selected Clip Layer able to accept keying.
- Select all Nodes
- Lets you select the associated Roster nodes in the Node Editor, which lets you drive clip layer attribute inputs using a custom Dependency Graph (DG) network.
- To do this, select this option, open the
Node Editor, click the input and output connections button and press
F to locate the Roster node.
Note: Be careful not to accidentally click in empty areas of the Node editor or Time Editor before pressing the input and output connections button or the node is deselected.
-
If you select this option while right-clicking on a clip layer
- All the attributes of the associated clip layer roster node are selected. This chooses every attribute associated node with the Clip Layer.
-
If you select this option while right-clicking on a clip layer attribute in the Time Editor Roster
- The associated Roster node for this attribute is selected. This chooses only the selected attribute node.
- Edit
-
- Create Override
- Adds an Override Layer of the selected object(s) to the Time Editor. See Add Clip Layers to the Time Editor.
- Create Additive
- Adds an Additive Layer of the selected object(s) to the Time Editor. See Add Clip Layers to the Time Editor
- Delete Layer
- Deletes the selected clip layer(s) and all associated animation curves. See Delete or empty Clip Layers.
- Flatten Layers
-

- Merges all Clip Layers of the selected clip into a single layer. See
Key on Layer clips.
Note: You must have more than one clip layer to flatten layers.
- Selection
-
- Add Selection
- Adds attributes of the selected object(s) to the selected clip layer(s).
- Remove Selection
- Removes all attributes of the selected object(s) from the selected clip layer(s). This helps you clean up clip layers that are cluttered with attributes you are not keying.
- Mode
- Sets the main clip layer mode. (See
Animation layer modes for more information.) Choose from the following options:
- Additive
- Sets the layer to Additive mode.
- Additive Override
- Sets the clip layer to Additive Override mode.
- Override
- Sets the result layer to Override mode.
- Override Passthrough
- Sets the clip layer to Override-Passthrough mode.
- Mute/Solo
- You can set a clip layer so that its effects are visible or hidden when the clip is played back.
-
- Mute/Unmute Layer
- Lets you temporarily disable/activate a clip layer to prevent it from playing back when the clip is played back.
- Solo Layer/Undo Layer Soloing
- Lets you isolate a clip layer so you can play back its effects.