Updates to the Retopologize, Make Live, Quad Draw, Boolean, and Unsmooth workflows include interface and usability improvements that let modelers produce better results.
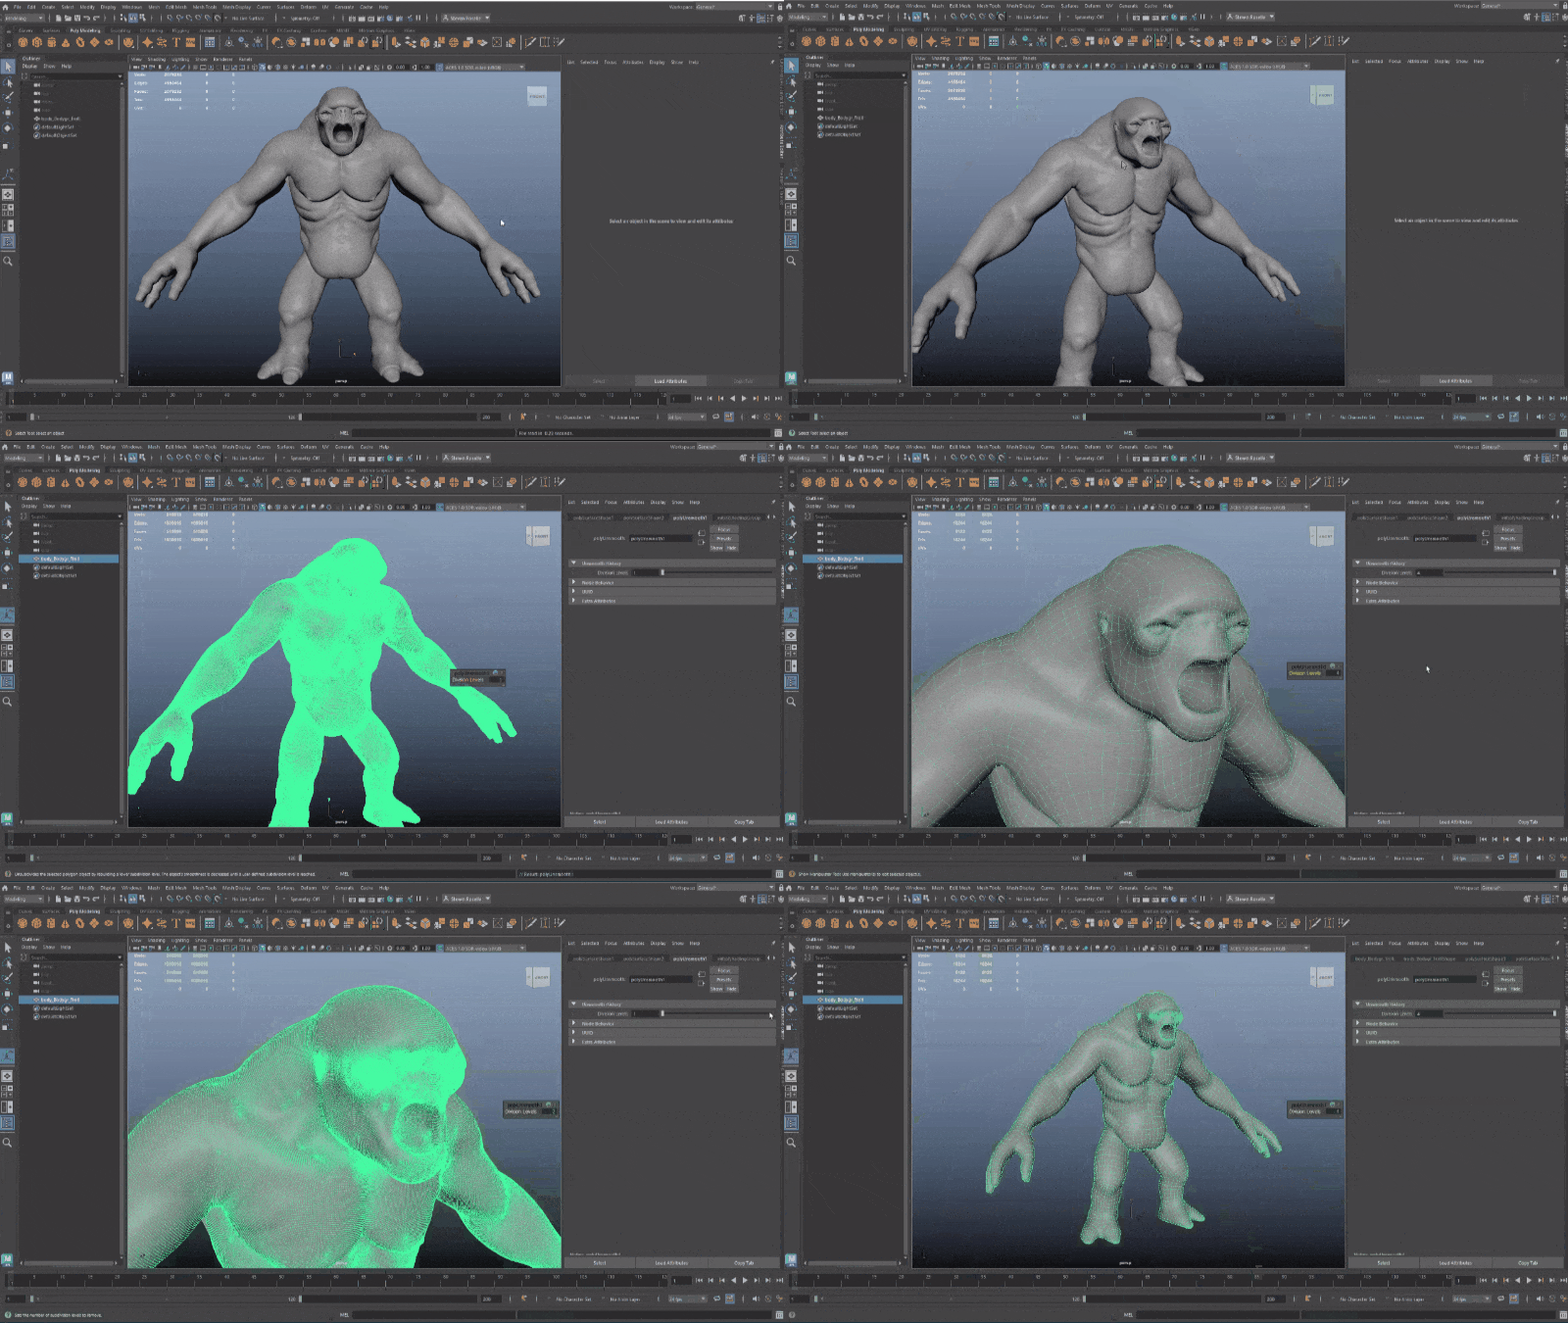
Model provided by: Christoph Schädl
Retopologize updates
Feature Preservation during Retopologize
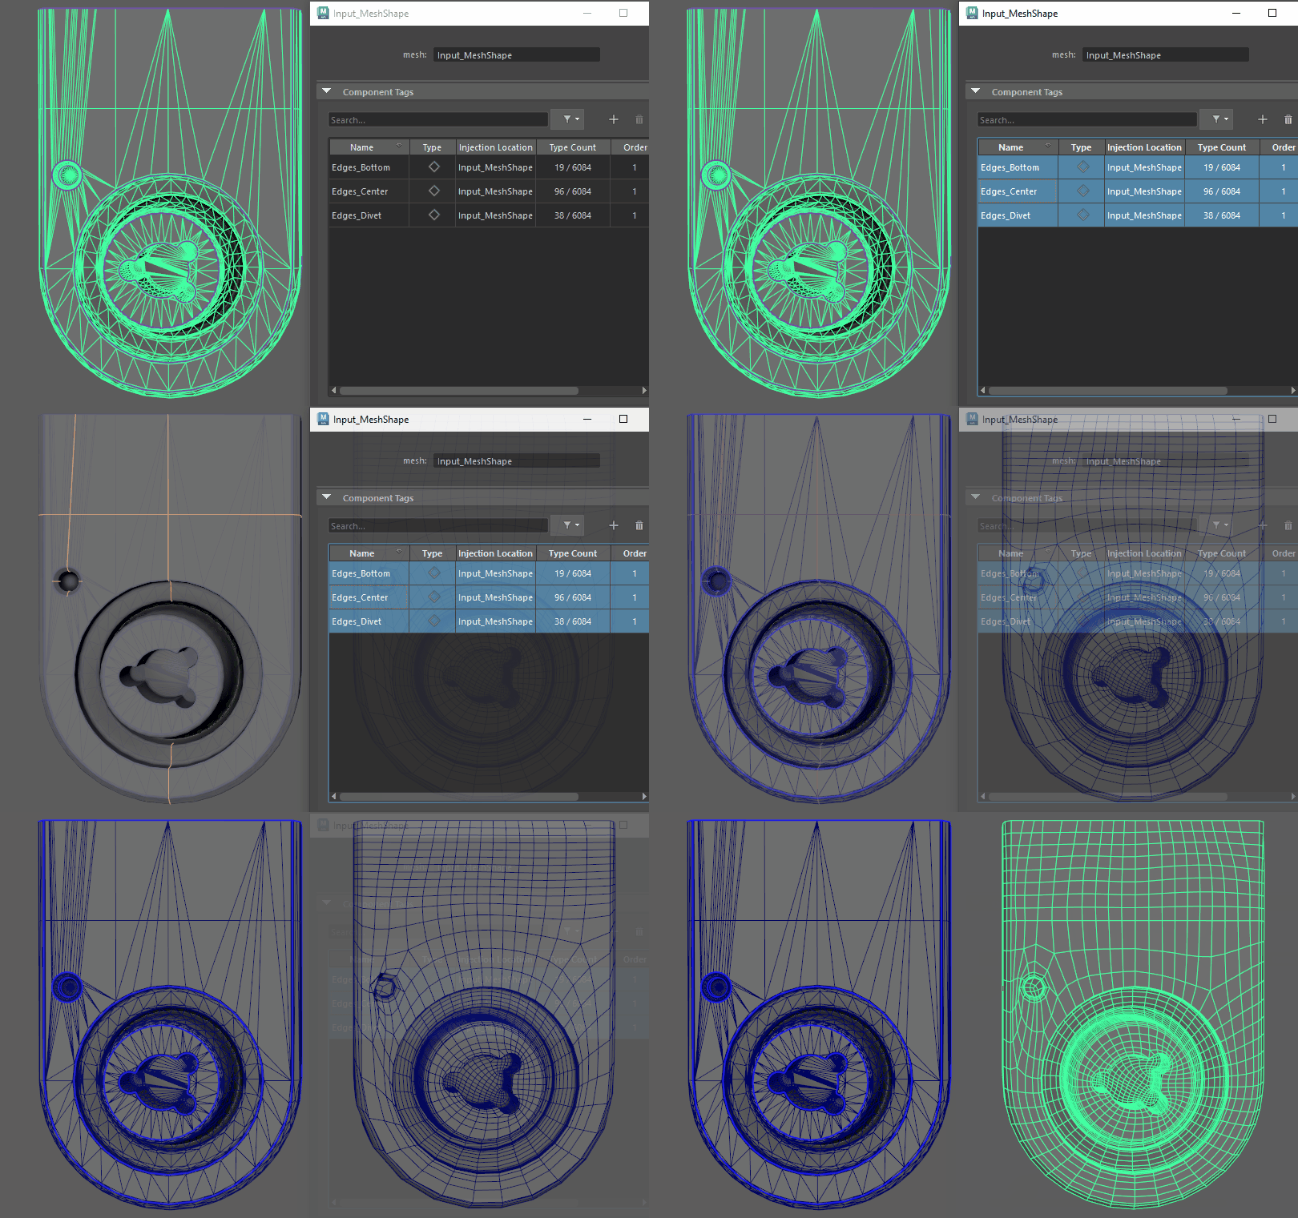
- Edges by Angle: Edges are preserved based on a specified angle tolerance. See Preserve areas of a retopologized mesh.
- Edge component tags: Edge Component Tags that are defined on the input mesh are used as an influence on the retopologized mesh. See Preserve areas of a retopologized mesh using Component Tags. To try the feature for yourself, you can also download and open the Interactive Tutorial from the AREA.
Retopologize with symmetry
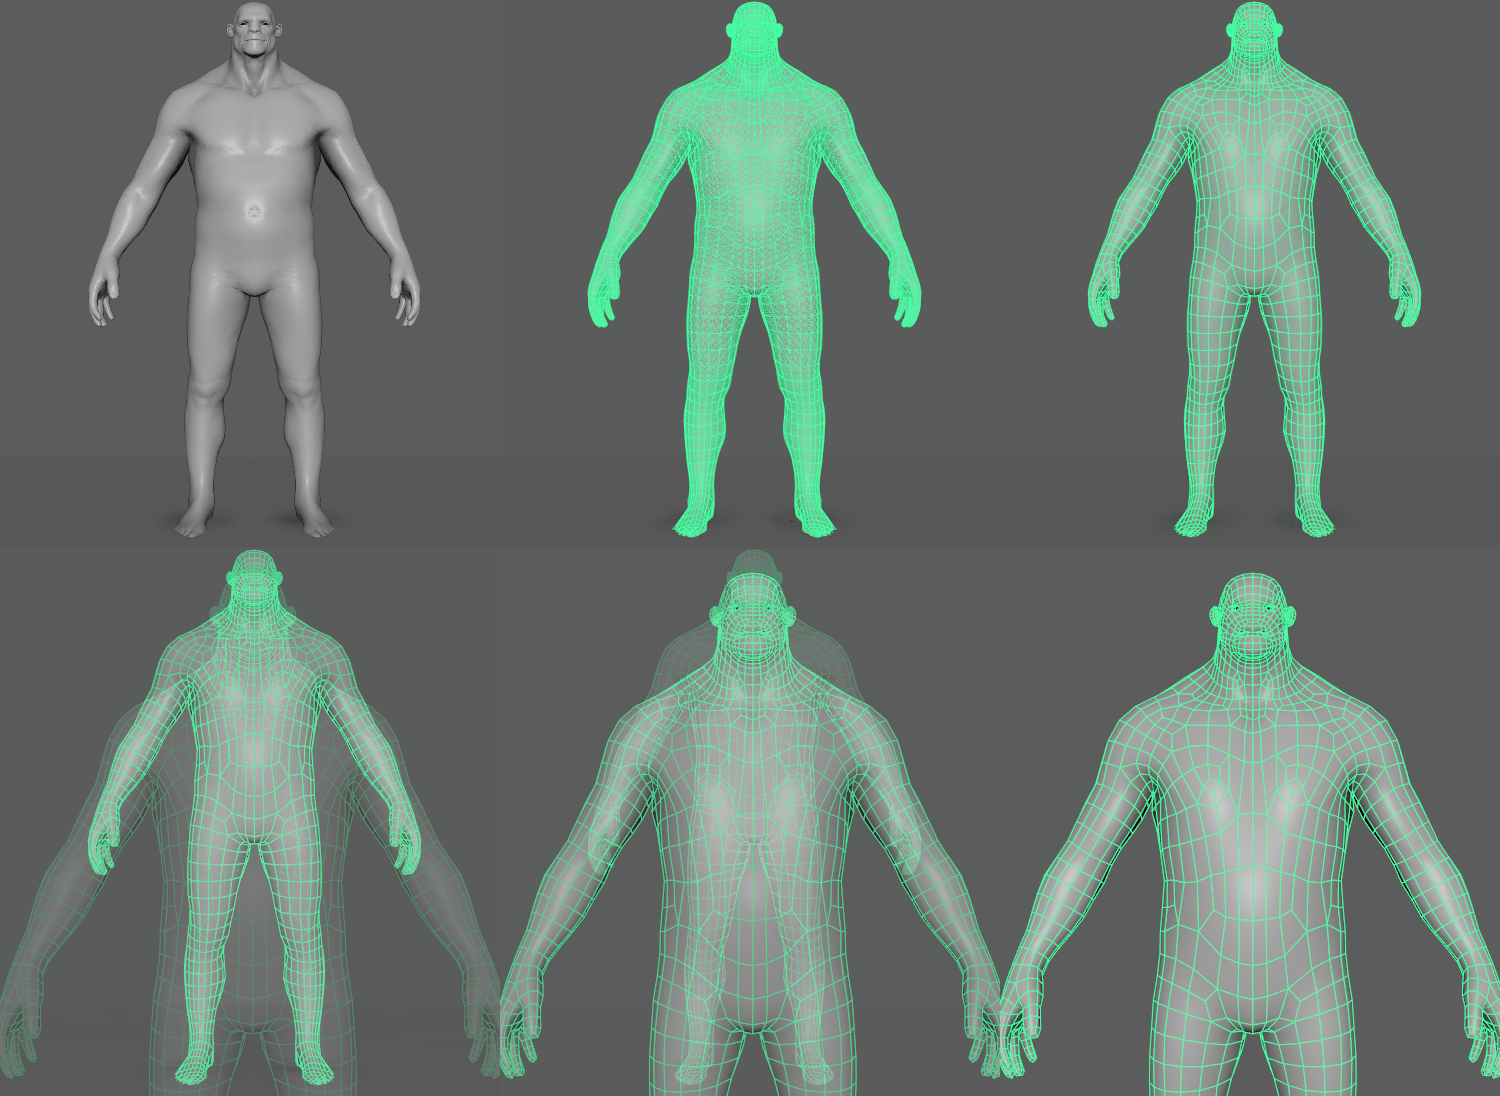
Create even edge flow on both sides of your mesh during
Retopologize using new symmetry options (Mesh > Retopologize >
 ). When symmetry is enabled,
Retopologize precuts your geometry along the selected axis before running. Symmetry is useful when retopologizing characters or hard surface objects that require mirrored topology on both sides of the model, like a chair or a gear. See
Retopologize a mesh with symmetry. To try the feature for yourself, you can also download and open the
Interactive Tutorial from the AREA.
Mesh pre-check during Retopologize
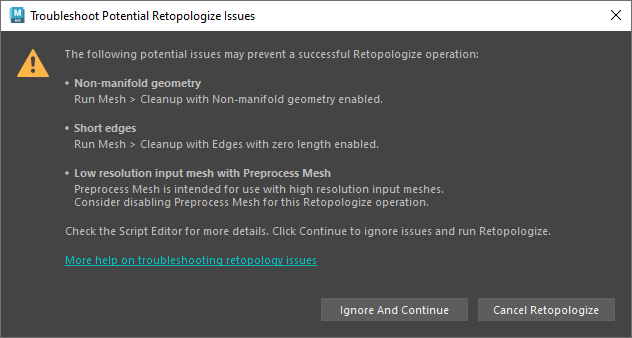
When the new
Scan mesh for issues option is turned on (Mesh > Retopologize >
 ), your input mesh is checked for potential issues that could either prevent
Retopologize from running successfully or have adverse effects on the results. If issues are detected, a dialog box appears with warnings and recommended troubleshooting steps, allowing you to quickly identify and fix problem areas before running a potentially time consuming
Retopologize process. For more troubleshooting tips, see
Troubleshoot Retopologize issues and
Retopologize limitations.
Keep input mesh after Retopologize
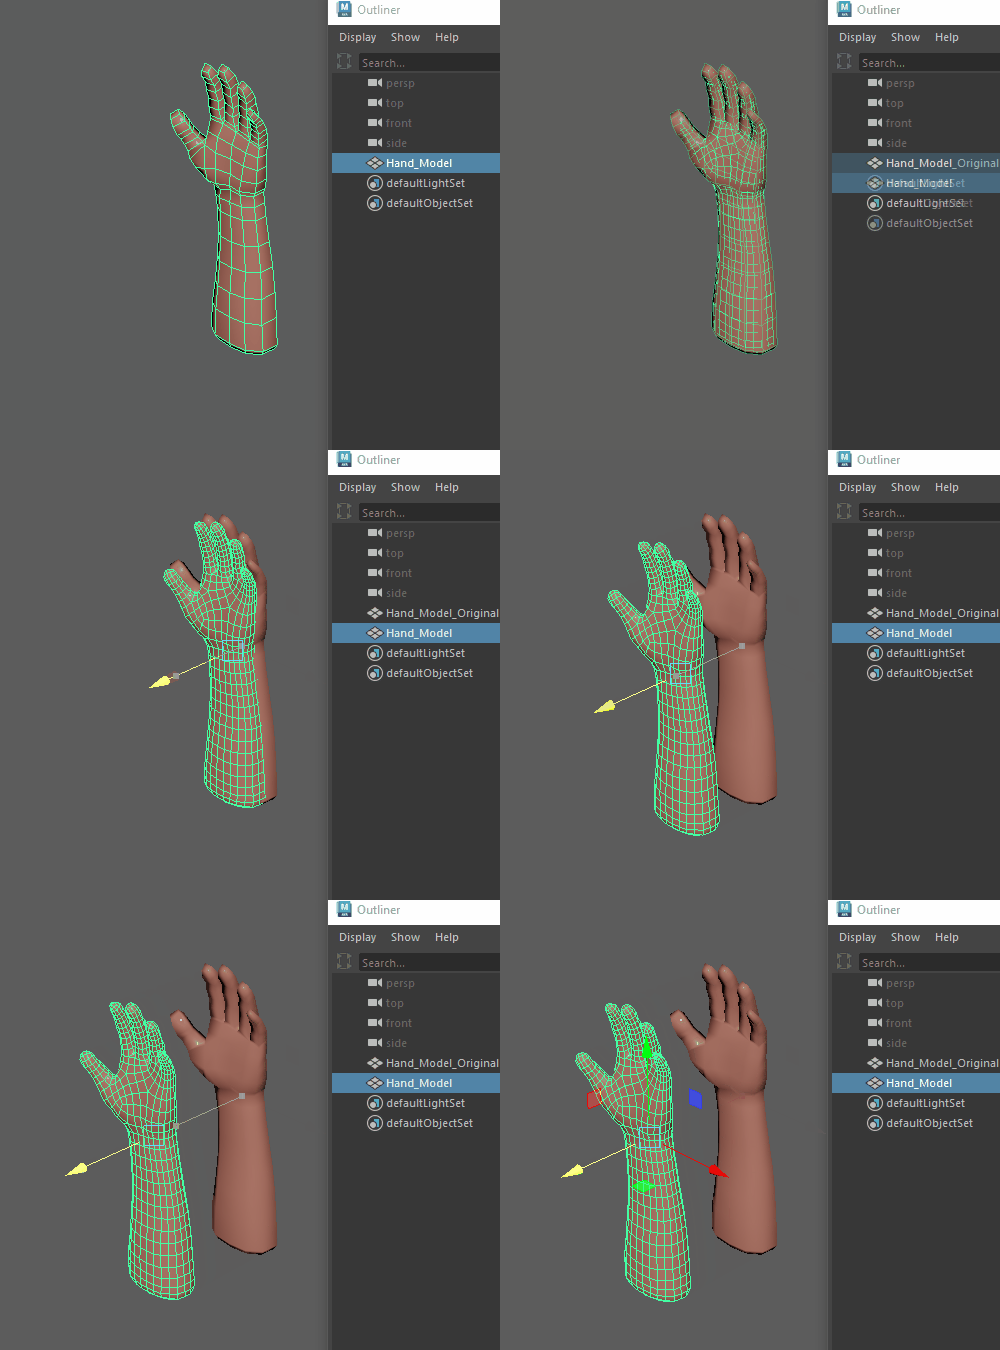
You can now display your input mesh and retopologized mesh in your scene simultaneously when Keep Original is turned on in the Retopologize Options. Previously, the input mesh was hidden after retopologizing a mesh. Now both meshes are placed at the same location in your scene, making it easier to make edits to your input mesh. For example, you can define areas for feature preservation such as component tags and see updates on your result mesh dynamically.
Make Live updates
Make multiple objects live

Make Live now supports multiple objects, letting you snap to any of the surfaces that are live. Simply select all your objects and click the Make Live icon
 . The name of the first selected object is displayed in the field next to the icon in the following format:
<FirstSelectedObject...>, indicating that you have more than one object in your live selection. Hovering over the field displays a list of all the live surfaces, and right-clicking it displays a pop-up menu that lets you add or remove live surfaces from the list.
When an object is live, it is automatically assigned a dark green wireframe color. This color is now also applied to the names of the live surfaces in the Outliner, making it easier to find them in a long list of objects. See Set multiple live surfaces and Add or remove surfaces from a make live list. To try the feature for yourself, you can also download and open the Interactive Tutorial from the AREA.
Make Live Quad Draw support
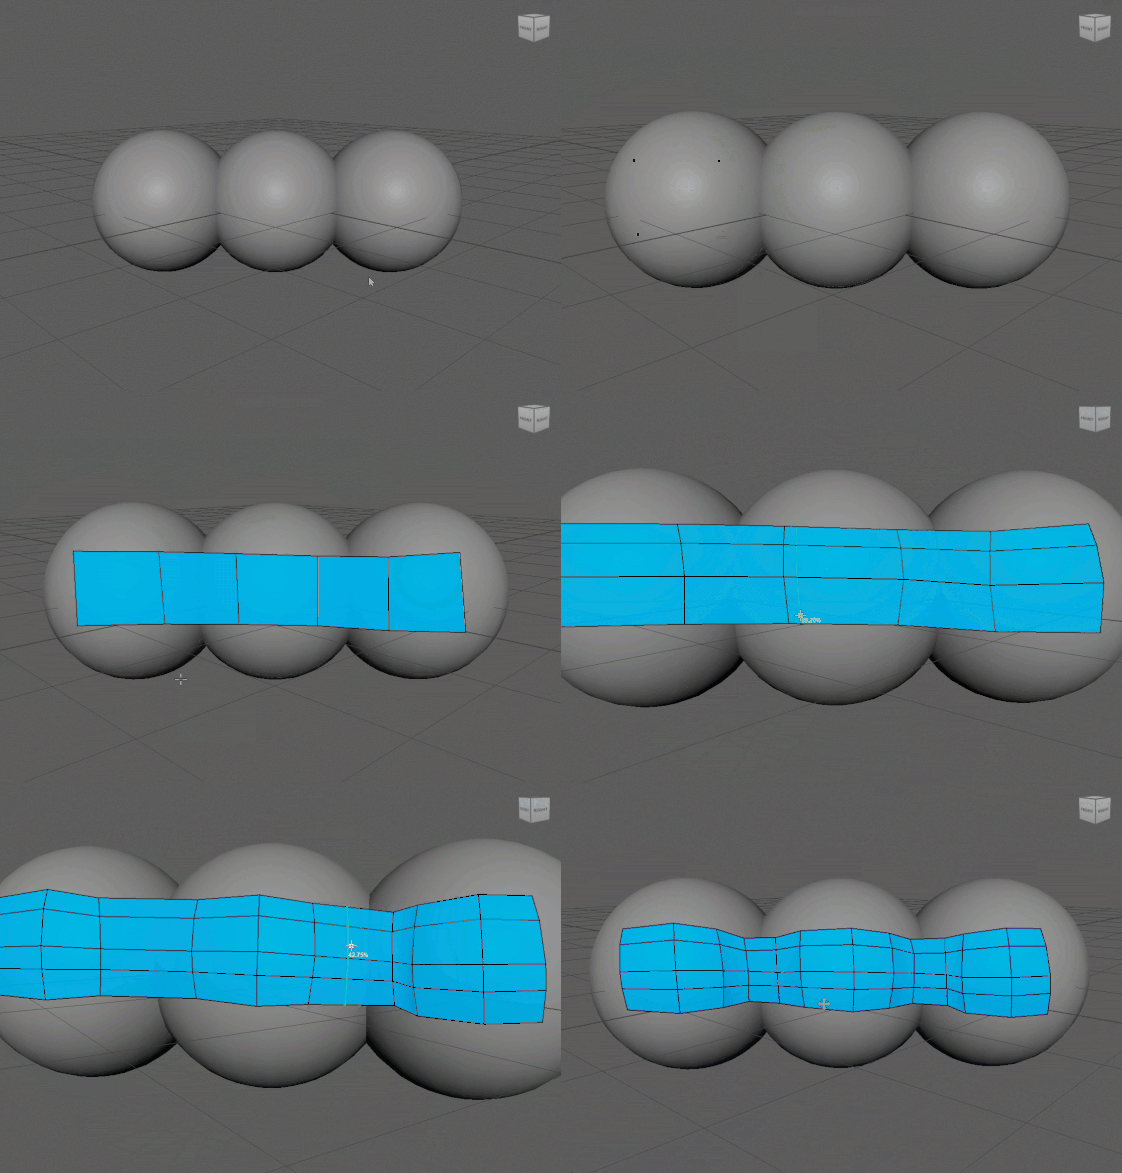
You can now use Quad Draw with multiple live objects and smooth mesh preview meshes, letting you create new, simplified geometry on top of complex collections of target meshes. For example, Quad Draw can now be used on full characters that are made up of many individual pieces like clothing or armor. See Set a reference mesh for Quad Draw and Snap to a live surface. To try the feature for yourself, you can also download and open the Interactive Tutorial from the AREA.
Unsmooth a mesh
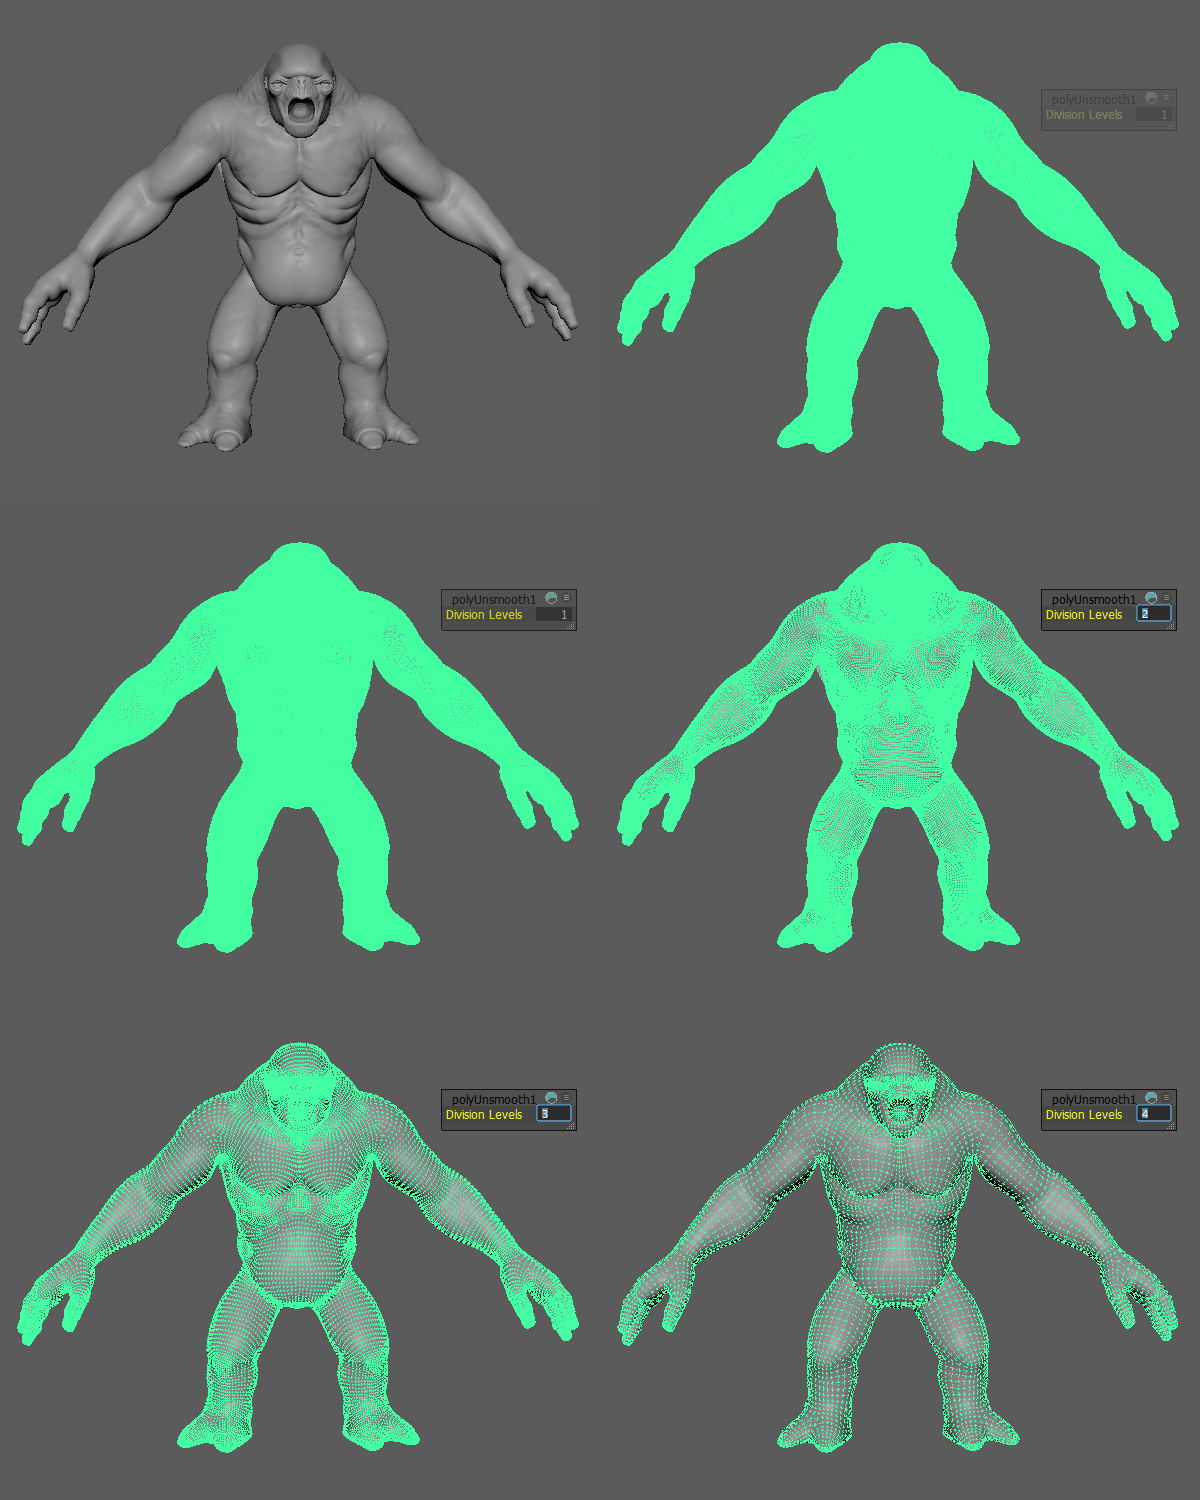
Model provided by: Christoph Schädl
The new
Mesh > Unsmooth option lets you unsubdivide any Catmull-Clark smoothed, high resolution mesh. You can set the number of subdivision levels to recreate in the
Unsmooth Options (Mesh > Unsmooth >
 ) or
polyUnsmooth node. Unsmoothing can be useful for creating low resolution versions of meshes that have been smoothed and subdivided during the sculpting process. See
Unsmooth a mesh.
Boolean improvements
Updates introduced in Maya 2023.1 give modelers more control when adding and editing new input objects in the Boolean Stack. Additionally, a new Interactive Update option provides a quick way to mitigate slow boolean performance while working with dense scenes.
Duplicate boolean input objects
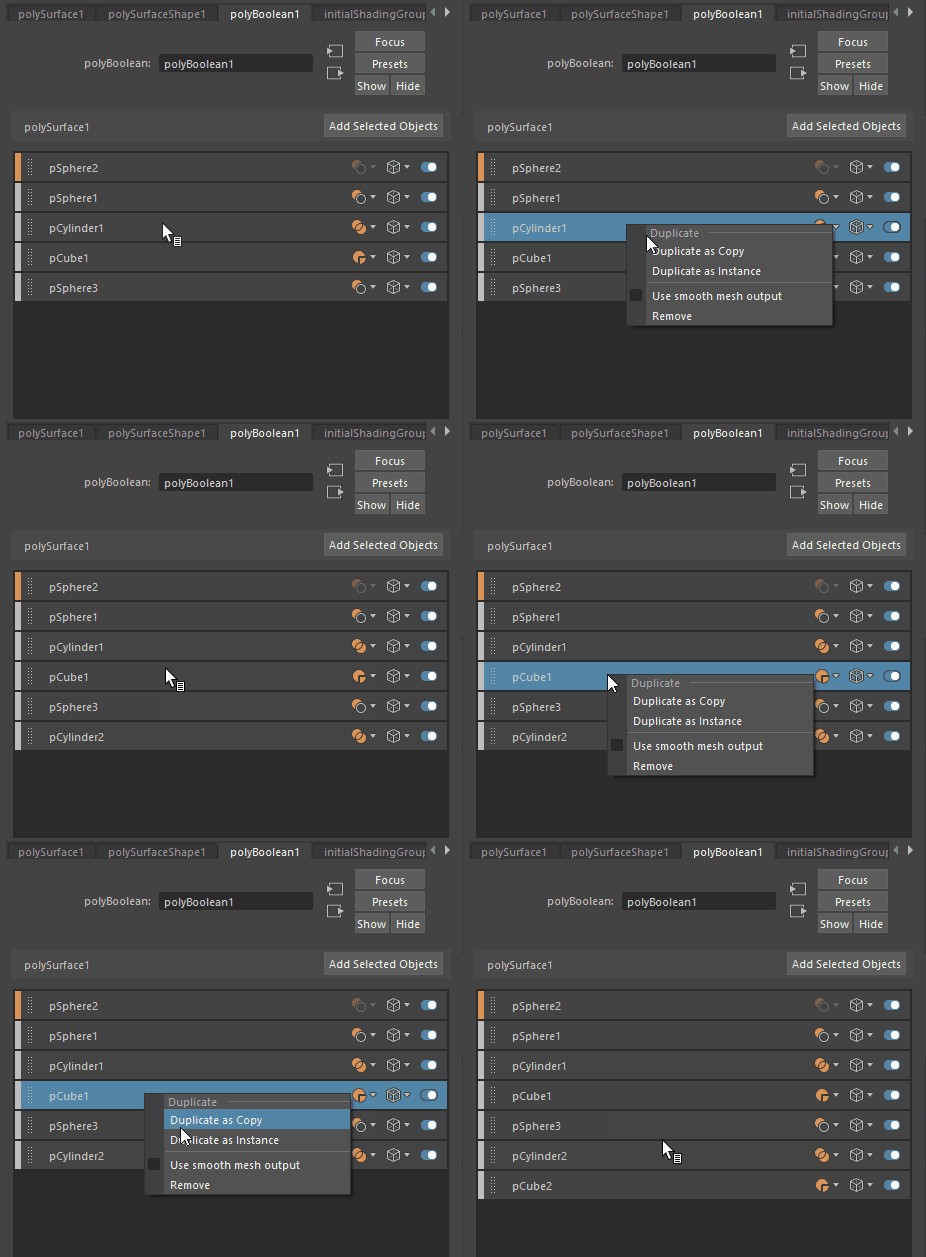
Quickly duplicate boolean input objects using the new options in the Boolean stack. Right-click a layer and select Duplicate as Copy or Duplicate as Instance. See Duplicate boolean input objects.
Set defaults for new boolean input objects
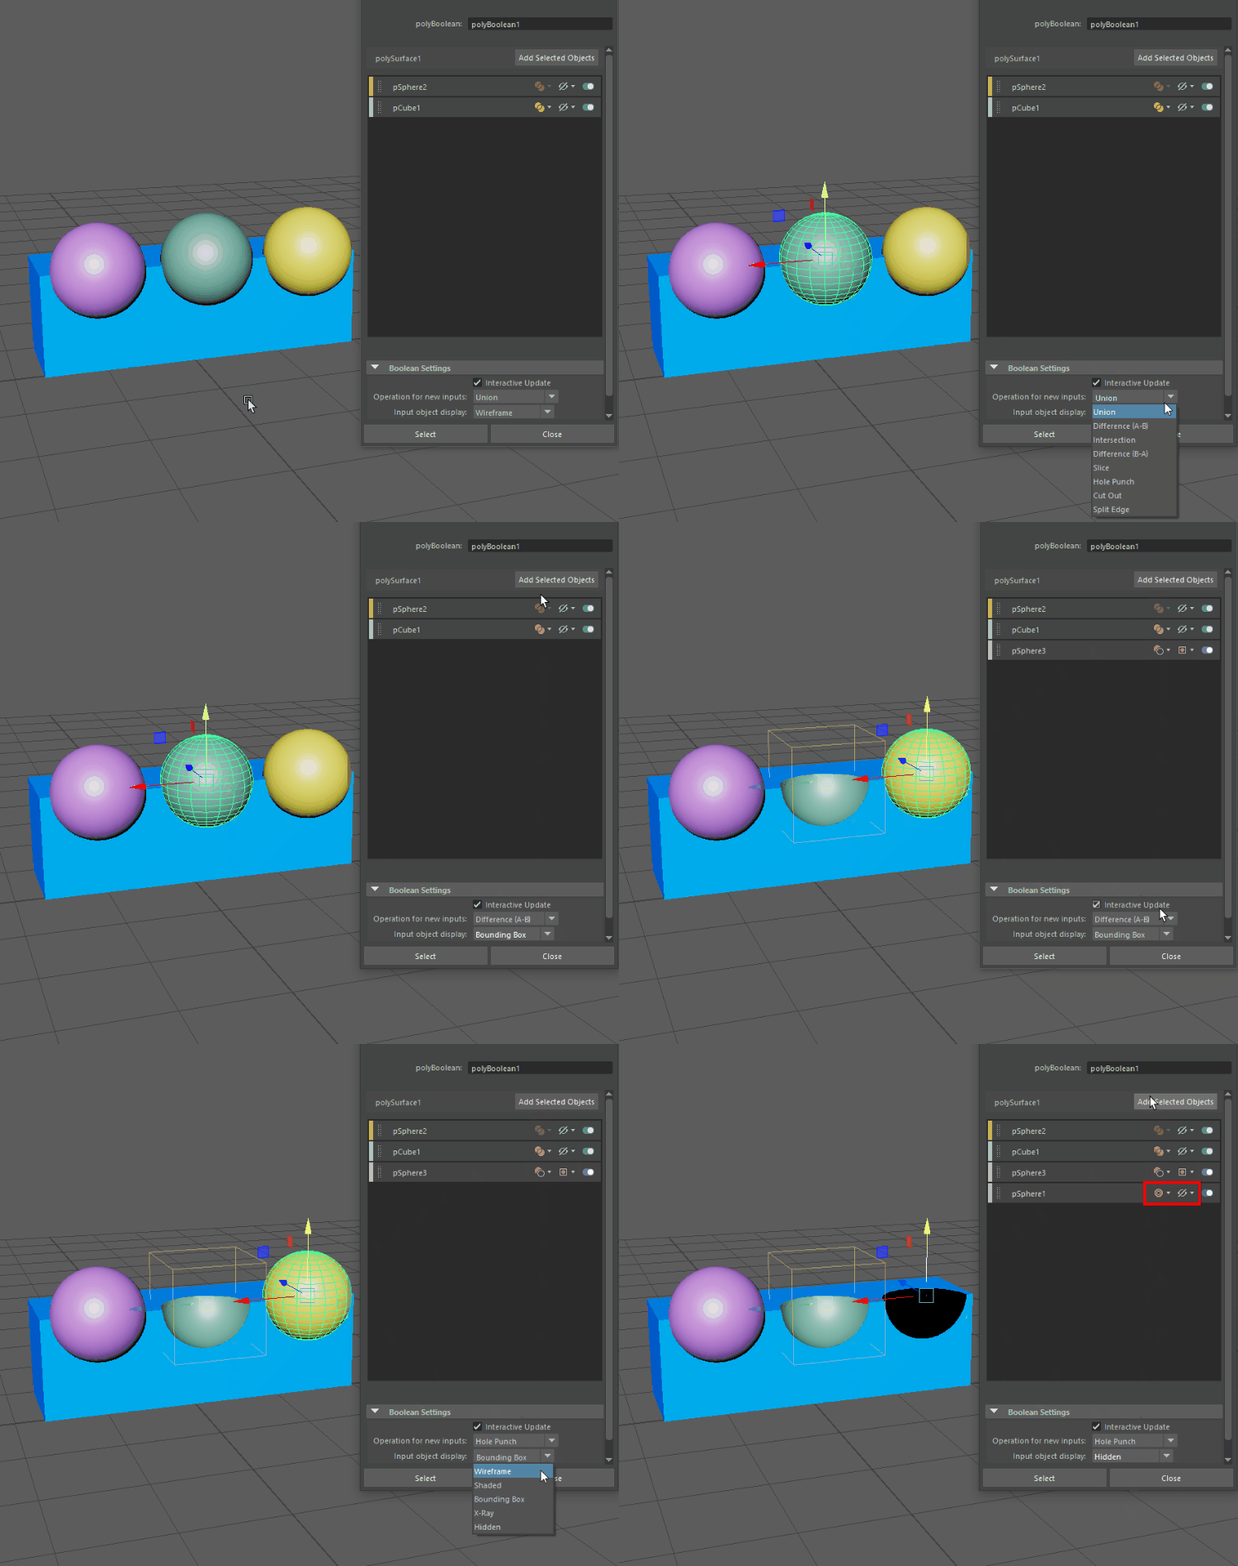
Previously, new input objects were added to existing boolean nodes as Union operations in wireframe display mode. Now you can set your own defaults using options (Operation for new input and Input object display) in the Boolean stack and Boolean Operation options. See Set defaults for new boolean input objects.
Improved interactive performance
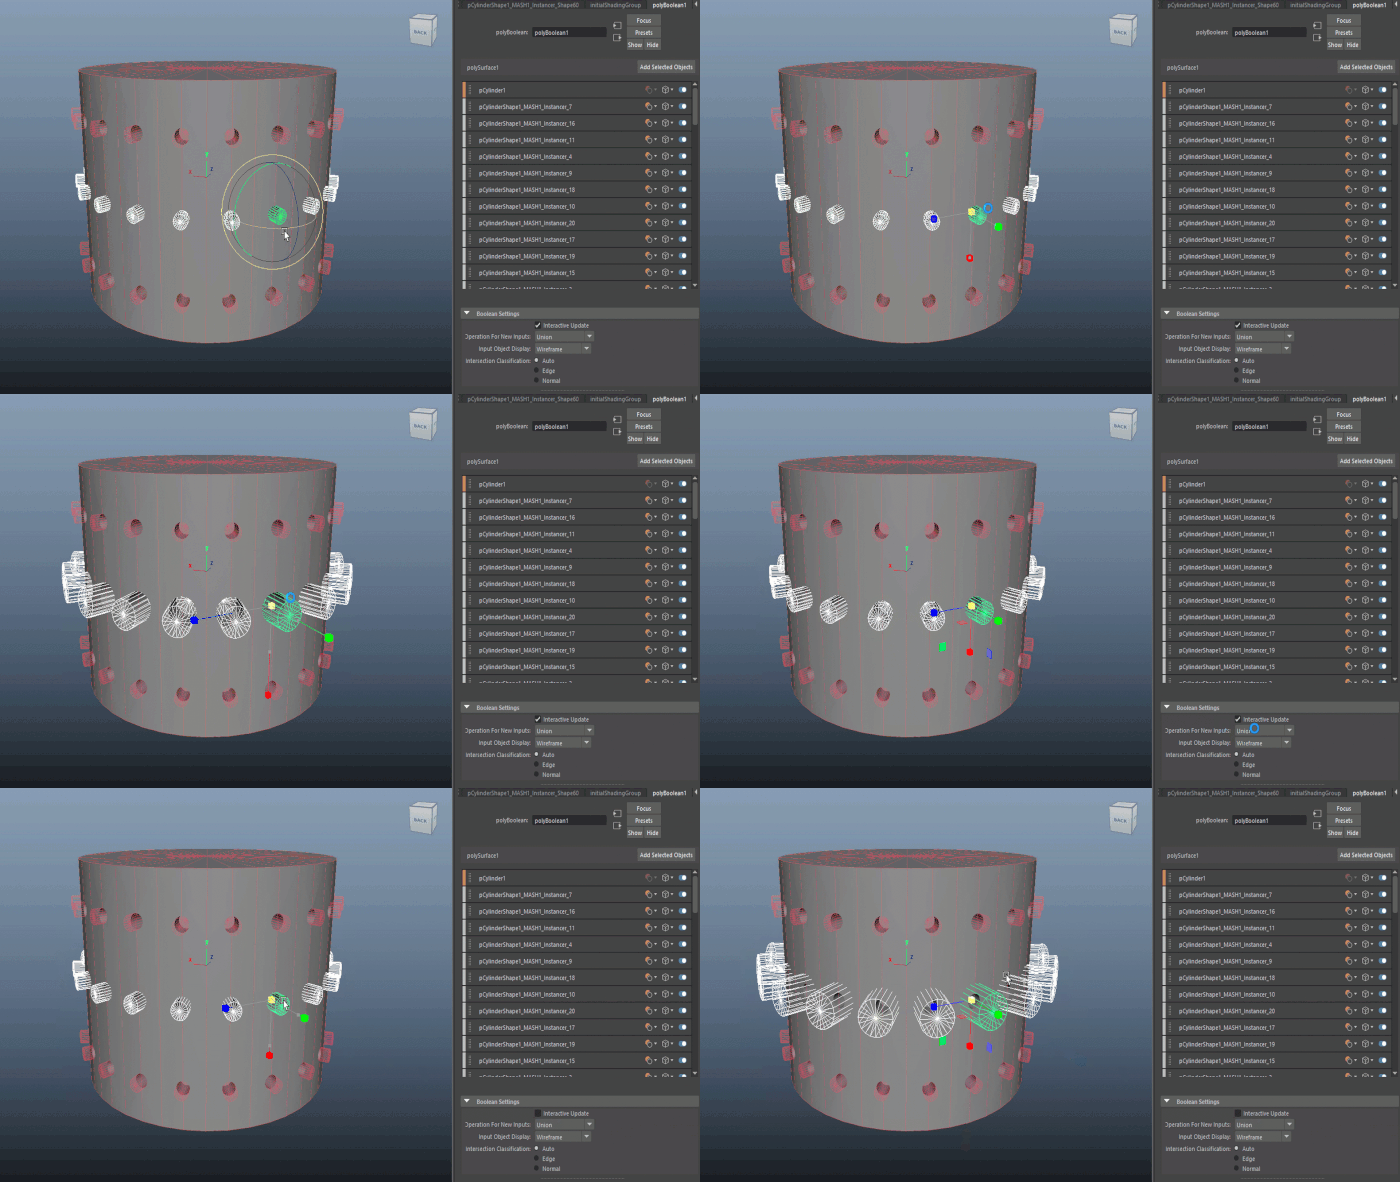
Disable the new Interactive Update option in the Boolean stack or Boolean Operations options to mitigate slow interactive performance. When on, the boolean continuously refreshes whenever the mouse button is pressed and dragged. When off, the boolean only refreshes when the mouse button is released.
Boolean intersection classification
A new Intersection Classification is now available in the Boolean stack and Boolean Operation options. When your boolean includes an open mesh(es) (planes or meshes with holes), this option gives you greater control over the result of your boolean operation. Select from Edge, Normal, or Auto. For more information, see Boolean Intersection Classification.
Add viewport objects to a boolean node
 to pin the Boolean stack or click
Copy Tab to open the boolean node in a separate window.
Bidirectional boolean selection
The Boolean stack now updates to reflect your selection in the Viewport or Outliner. When you select an object that is part of a boolean node in the Viewport or Outliner, it is also selected in the Boolean stack.
Modeling shelves
Several new shelves make modeling tools and commands more discoverable and easily accessible: UV Editing, Curves, and Surfaces.
The following commands and tools were previously located on the Poly Modeling shelf and have now been moved to the UV Editing shelf: Planar Mapping, Cylindrical Mapping, Spherical Mapping, Automatic Mapping, Contour Stretch, Auto Seams, Cut UV Edges, Delete UVs, 3D UV Grab Tool, 3D Cut and Sew UV Tool, UV Editor, UV Set Editor.
Previously, the commands and tools that are located on the Curves and Surfaces shelves were grouped on one shelf. Now they are divided between two separate shelves.

Paint Vertex Color Tool updates
- Restrict painting to individual RGB channels to prevent the accidental painting of other channels.
- Display specific color channels as a grayscale using the new Display RGB color set as greyscale option.
Display RGB channels individually on polygon objects
New options in the
Polygon Preferences and
Polygons Options (Display > Polygons > Custom Polygon Display
>
 ) let you display RGB channels individually, providing better visual feedback about specific channel color values. Other new options let you display channels as a greyscale on the polygon object surface.
UV editing performance improvements
Modelers can enjoy improved UV Editor performance when transforming UVs on objects that have Smooth Mesh Preview enabled or when selecting and moving UV shells associated with complex meshes. This update improves interactivity when working with UVs for character meshes.
Collapse UV Toolkit Selection options
You can now collapse the Selection options in the UV Toolkit, making the sections in the toolkit more accessible.
MikkTSpace tangent support
MikkTSpace tangents are now supported in Maya. To enable MiikTSpace tangents, go to Windows > Settings/Preferences > Preferences > Modeling > Polygon Tangent Space > Use MikkTSpace tangents. This preference impacts display in the viewport and the creation of normal maps through tools like Transfer Maps. It is turned off by default. See Transfer Maps options for more information on tangent space and normal maps.
Snap support when using Move Tool plane handles
Snap mode (v) is now supported when using any of the Move Tool's plane handles, which constrain movement to two axes.