3D mesh
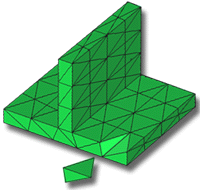
A 3D mesh represents the CAD model by filling the volume of the model with four-node, tetrahedral elements (tetras).
 Download the files for this tutorial from Autodesk Knowledge Network - Meshing folder.
In this task, you will:
- Import a 3D meshed model
- Investigate how the mesh is structured
- Ensure the Mesh tutorial project you used in the previous task is active. Alternatively click
 (Start & Learn tab > Launch panel > Open Project) and select Mesh tutorial.
 - Click
 (Home tab > Import panel > Import).
 - From the Files of type drop-down list, select Study files (*.sdy).
- Navigate to the where you saved the tutorial files.
- Select dustpan_3d.sdy then click Open.
- Click
 (View tab > Navigate panel > Select).
 - Click on an element (tetra) in the model and press Delete on your keyboard.
- Rotate and zoom in on the model to investigate the way the model has been represented.
- Note that the 3D Mesh type and number of elements in the model are displayed in the Study Tasks pane.
- When you have finished comparing the three model types generated in the last tasks, close the studies.
Parent topic: Mesh
Previous topic: Dual Domain mesh
Next topic: Mesh a CAD model