This section describes the options found in the Story window’s context menu that are available when you right-click a track. See Story context menu and Story clip context menu for information on additional menu options.
You can also access some of these options from the Story Controls. See Story window controls.
Depending on where you right-click and what is selected, the options in the context menu may change. For example, right-clicking in the Edit Track list shows different options than right-clicking in the Action Track list. The options that appear also change depending on which tracks or clips are selected and apply to the selection.
Insert Subtrack
Inserts a subtrack onto the track.
You can also create subtracks by dragging a track onto another track. Character tracks can only be dragged onto other Character tracks. Animation tracks can only be dragged onto Camera Animation tracks, Character tracks, and other Animation tracks.
To unparent subtracks, drag them to an empty space in the track list.
| Option | Behavior |
|---|---|
| Animation Override | Inserts an Animation subtrack which is set to Override by default. |
| Animation Additive | Inserts an Animation subtrack which is set to Additive by default. |
| Character Override | Inserts a Character subtrack which is set to Override by default. This subtrack can only be the child of a Character track. The same character is automatically selected in the subtrack’s Character field. |
| Character Additive | Inserts a Character subtrack which is set to Additive by default. This subtrack can only be the child of a Character track. The same character is automatically selected in the subtrack’s Character field. |
Insert Animation/Audio/Video File
Load files as clips using the Insert <x> File option, where <x> is either Animation, Audio, or Video.
| Insert Animation File | Displays an Open File dialog box, which lets you load .fbx files as clips for Animation, Character, and Camera Animation tracks. |
| Insert Audio File | Displays an Open File dialog box, which lets you load audio files for Audio tracks. |
| Insert Video File | Displays an Open File dialog box, which lets you load video files for Video tracks. |
Insert Current Take
Insert Current Take lets you paste keyframe animation from the take selected in the Transport Controls window to a track in the Action Track list.
You can also insert a take into the Story window by dragging it from the Scene browser. You must drag the take onto an Animation, Character, or Camera Animation track whose Animate button is active and whose track content is defined.
Any merged animation remains connected to the merged animation layers in the resulting clip. This means any updates you make to the merged animation, such as adding new keys to an animation layer, creating a new layer, or editing existing keys, can be inserted into the clip by selecting Update From Current Take from the Story clip context menu.
This replaces the previous animation on the clip. See Inserting take animation into the Story window.
Process Track/Subtracks to New Clip
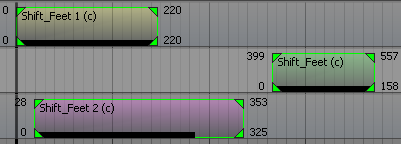
The Process Track/Subtracks To New Clip option combines the animation of a track and its subtracks into one clip. The animation that is merged involves the selected track, all of the selected track’s subtracks, and all tracks above the selected track that have the same track content as the selected track. However, the animation of muted tracks is not merged.
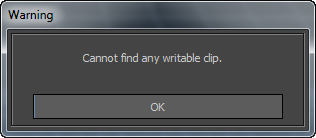
Make All Clips Read-Only
Converts all writeable clips available on the story tracks to read-only. This option appears when you right-click on the Story tool or on one or more writable clips.
- Default Name — Displays the Open Directory window. Choose a folder to save all the converted read-only clips using their default names.
- Customized Name — Displays the Save Clip window. In the File Name text box, enter a custom name to save all read-only clips.
The following two options in this sub-menu allow you to convert all writeable clips on the Story tool to read-only:
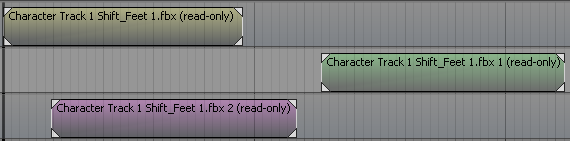
While converting, MotionBuilder identifies that the two duplicated clips are references of the Shift_Feet clip. Therefore, the resultant read-only file is a single "Character Track 1 Shift_Feet 1.fbx" file. Converting multiple clips to a single read-only file saves the system memory.
Import Camera Switcher From
Camera switches created with the Camera Switcher appear as keyframes in the Transport Controls window. The Import Camera Switcher From menu lets you move these camera switches from the takes in the Transport Controls window to the Story window, where they appear as camera shots on a selected Shot track in the Edit Track list.
Export to Camera Switcher
When a Shot track is selected, the Export to Camera Switcher menu lets you plot camera switches from a single Shot track to a take. This lets you use the camera switches in the Camera Switcher settings.
Add/Remove Namespace
Displays the Add/Remove Namespace window.
You can name story tracks using namespaces or use existing namespaces in a scene. For more information, see Namespace.
Rename
The Rename option lets you rename a selected track in the Story window. You can also rename selected tracks and clips in the Asset Settings window.