
Right-click one or more selected clips in the Story window to access the Story clip menu.
See Story context menu and Story track context menu for information on additional menu options. You can also access some of these options from the Story Controls. See Story window controls.
Depending on where you right-click and what is selected, the options in the context menu may change. For example, right-clicking in the Edit Track list shows different options than right-clicking in the Action Track list. The options that appear also change depending on which tracks or clips are selected and apply to the selection.
The options described in the rest of this topic are listed according to the order in which they appear in the context menu. The options that are listed appear regardless of which Track list you right-click, unless otherwise indicated.
The following context menu items may appear when one or more clips are selected in the Story window:
Select Camera
Select Camera lets you select a shot clip’s camera. This option appears when a shot is selected in the Edit Track list.
Make Camera Current
Make Camera Current switches the camera view in the Viewer window to a camera that can be used by a camera shot. The Make Camera Current option is available when a shot is selected in the Edit Track list.
Change Media File
Active when an audio, video, or character clip is selected, the Change Media File option lets you select a different media file for the clip.
Change Take
The .fbx files you use as animation, character and camera animation clips can contain more than one take. The clip uses only one of the takes by default. The Change Take option opens a dialog box, which lets you select a different take for the clip.

Select Take dialog box
Change Character
If your clip contains more than one character, this option lets you re-assign an imported clip's animation to any character contained in the file. This feature works similar to Change Take, and simplifies the workflow of populating Story tracks from a file that contains multiple characters.
Make Clip Writable
This option appears when you right-click a read-only animation clip, character clip, or camera animation clip. This option lets you make read-only clips writable. However, this option does not appear if the clip’s animation is retargeted.
For example, a character clip’s animation is automatically retargeted when the skeleton it was plotted to is different than the skeleton of the character selected in the track’s Character field.
When a clip is writable, its keyframes display, letting you edit them and set new keyframes. A writable clip’s keyframes display and can be edited only when the clip’s track content is selected and the track’s Animate option is active.
The Solving Mode menu, which displays in the Asset Settings window, lets you see which solving mode a character clip is using. If Retarget From Skeleton is selected, the clip can only be made writable if you plot the animation to the current skeleton. When Skeleton or Control Rig is selected in the menu, the clip can be made read-only.
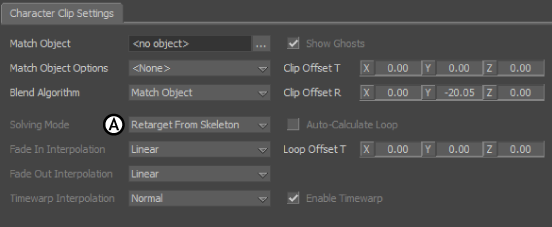
Asset Settings window A. Solving Mode menu
Make All Clips Read-Only
Converts all writeable clips available on the story tracks to read-only. This option appears when you right-click on the Story tool or on one or more writable clips.
- Default Name — Displays the Open Directory window. Choose a folder to save all the converted read-only clips using their default names.
- Customized Name — Displays the Save Clip window. In the File Name text box, enter a custom name to save all read-only clips.
The following two options in this sub-menu allow you to convert all writeable clips on the Story tool to read-only:
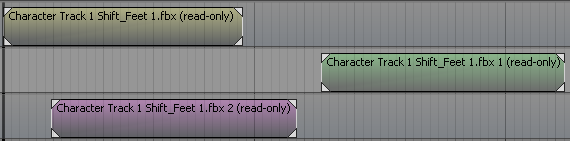
While converting, MotionBuilder identifies that the two duplicated clips are references of the Shift_Feet clip. Therefore, the resultant read-only file is a single "Character Track 1 Shift_Feet 1.fbx" file. Converting multiple clips to a single read-only file saves the system memory.
Export Clip
The Export Clip option appears when you right-click on a writable animation clip, character clip, or camera animation clip.
The Export Clip option lets you save a clip as an .fbx file without making it read-only as well. You can reuse the .fbx file by dragging it from the Asset browser to the Story window.
Clear Values Without Keys
A clip can exist without keyframes. A clip without keyframes is created when a track’s Animate button is active and you translate, rotate, or scale the track’s selected asset. Such a clip displays the letter “c” in parentheses.
This clip contains certain initial values, even though it does not have keyframes. These values are the transform values of the track’s selected asset.
For example, if you rotate an object 90 degrees, the clip that is created contains that value and the object remains rotated 90 degrees. If you create a second similar clip, where you rotate the object again, the object rotates between the two clips.
You can change the values of a clip by placing the Timeline indicator on the clip and transforming the object again.
The Clear Values Without Keys option lets you erase the transform values of a selected clip. When a clip is empty, it contains no values and does not animate the object in any way. The “c” in parentheses does not display on an empty clip.
Assign Sources To Destinations
The selected assets in a track and the track’s clips are linked automatically. The Assign Sources To Destinations option opens a dialog box which lets you view and change these links.
The Assign Sources To Destinations option is active when you right-click animation, camera animation, and character clips.
 Through the
Assign Sources to Destinations dialog, you have the option to search for sources in a clip. Simply click on the search bar in the top left corner and type in the source you're looking for. This is especially helpful when clips contain hundreds of objects.
Through the
Assign Sources to Destinations dialog, you have the option to search for sources in a clip. Simply click on the search bar in the top left corner and type in the source you're looking for. This is especially helpful when clips contain hundreds of objects.
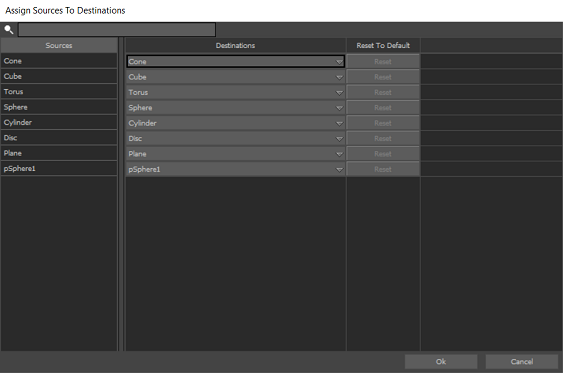
Assign Sources To Destinations dialog box
Update From Current Take
Connected To Current Take
Align To
The Align To options are useful to change the position of one or more clips and align them with other clips on the story tracks.
- Current Time
- Aligns one or more selected clips with the current frame of the Timeline indicator.
Before After 
- Previous Clip
- Aligns one or more selected clips with the previous clips on the same track.
Note: This option does not have an impact on the selected clip that do not have a previous clip on its track.
In the following figure, notice that the position of Box_Roundhouse.fbx clip does not change because it does not have a previous clip on its track.
Before After 

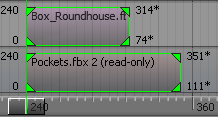
- Previous Clip (All)
- Aligns one or more selected clips with the position of the selected clip's previous clip.
For example, in the following figure, three clips on track 1, 2, and 3 are selected. Right-click Pockets.fbx clip on track 3 and choose Align To > Previous Clip (All). The Pockets.fbx clip aligns with its previous clip on track 3, and the other two clips on tracks 1 and 2 align with reference to the Pockets.fbx clip's previous clip.
Before After 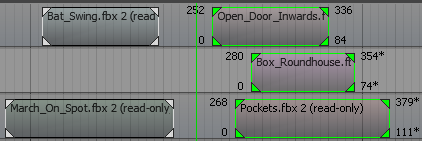

- Next Clip
- Aligns one or more selected clips with the next clip on the same track.
Note: Similar to the Previous Clip option, this option does not have an impact on the selected clips that do not have a next clip on its track.
- Next Clip (All)
- Aligns one or more selected clips with reference to the position of the selected clip's next clip.
For example, in the following figure, three clips on track 1, 2, and 3 are selected. Right-click Pockets.fbx clip on track 3 and choose Align To > Next Clip (All). The Pockets.fbx clip aligns with its next clip on track 3, and the other two clips on tracks 1 and 2 align with reference to the Pockets.fbx clip's next clip.
Before After 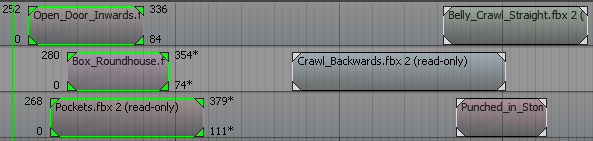

- Current Time (Offset)
- Offsets the selected clip from its current frame to the Timeline indicator.
If you select multiple clips in different tracks, then all other clips, except the right-clicked clip offset to the distance of the right-clicked clip to the Timeline indicator.
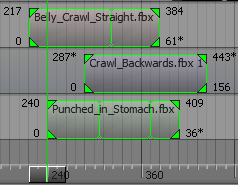
For example, in the following figure, three clips are selected. Right-click the Punched_in_Stomach.fbx clip, and choose Align To > Current Time (Offset). The Punched_in_Stomach.fbx clip offsets to the Timeline indicator (from frame 400 to 240). The other two clips also offset 160 frames toward the Timeline indicator.
Before After 
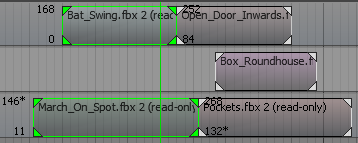
- Previous Clip (Offset)
- Offsets the selected clip to the previous clip on its track.
If you select multiple clips in different tracks, then all other clips, except the right-clicked clip offset to the distance of the right-clicked clip to the previous clips on their tracks.
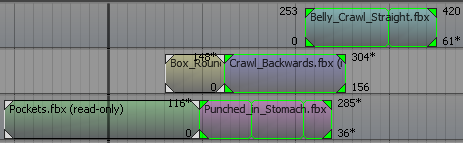
For example, in the following figure, three clips are selected. Right-click the Punched_in_Stomach.fbx clip, and choose Align To > Previous Clip (Offset). The Punched_in_Stomach.fbx clip offsets (from frame 221) to the previous clip (Pockets.fbx at frame 116). The other two clips also offset 105 frames toward the previous clips on their own tracks. This option does not have an impact, if a clip does not have a previous clip.
Before After 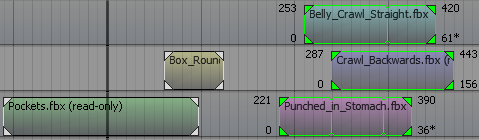
- Next Clip (Offset)
- This option is similar to the Previous Clip (Offset), but offsets the selected clip to the next clip on its track.
If you select multiple clips in different tracks, then all other clips, except the right-clicked clip offset to the distance of the right-clicked clip to the next clips on their tracks.
Expand Selected Clips
You can expand one or more clips on the story track(s) to their nearest clips.
- Expand Clips — Select one or more clips that contain adjacent clips on their story track. Right-click on a selected clips, and choose this option. All selected clips expand to their nearest clips.
Before After 

- Expand Clips, Preserve Overlap — Choosing this option does not expand the overlapped clips. Only the non-overlapped clips expand to their adjacent clips.
Before After 

The Expand Selected Clips sub-menu on the story clip context menu provides the following options:
Create Clip Group
Lets you group selected Story clips to make moving and organizing multiple clips on the timeline easier and faster.
See Group Story clips.
Remove from Clip Group
Lets you remove one or more Story clips from a clip group.
See Group Story clips.
Fade In Interpolation and Fade Out Interpolation
Let's you choose interpolation options for the fade in and out points of the selected animation, camera, or audio clips.
Selecting Custom lets you create your own interpolation using function curves. See Set a custom fade in and out interpolation for Story clips.
For information about Linear, Smooth, Slow, and Fast, see Additional Clip Settings.